
Stream your marketing data from Salesforce to Snowflake
About Salesforce
About SnowFlake
Connect Salesforce to Snowflake in 2023
Many organizations are turning to Salesforce to improve the sales process, but integrating this software with other applications can be difficult. Snowflake is a cloud-based data warehouse that can simplify the integration process by providing a single platform for all your data and analytics needs.
Salesforce is an excellent platform for businesses of all sizes. It offers a wide range of features and functionality that you can customize to meet the needs of any organization.
However, even with its flexibility, there may be times when you need integrations such as Snowflake Salesforce to maximize effectiveness. Fortunately, there are several easy methods you can use to do this.
This page will explore several ways to integrate Snowflake with Salesforce. We’ll also discuss each approach’s pros and cons so you can decide which is best for your business. Stay tuned!
Table of content
- What is Salesforce and SnowFlake?
- Why connect Snowflake to Salesforce?
- How can I connect Salesforce and Snowflake?
- Conclusion
- FAQ: Salesforce to Snowflake Integration
What is Salesforce and SnowFlake?
What is SalesForce?
Salesforce is a leading cloud-based CRM platform (all-in-one platform for Sales, Service, Marketing and more) that integrates with an amazing number of applications and is used by companies to handle everything from customer servicing, account management and digital marketing to time management, team collaboration etc.
If you use Salesforce, you are aware of all the data it generates and the need to securely load and query that data for valuable business and customer insights.
What is Snowflake?
Snowflake refers to a cloud-based data warehouse service and the company that provides it. Snowflake’s data warehouse service is built for the cloud and offers a unique architecture optimized for data warehouse workloads.
This allows businesses to use Snowflake to store and analyze data in the cloud without having to set up and manage their data warehouse infrastructure.
In addition to its cloud-based data warehouse service, Snowflake offers several other products and services, including a data integration platform, a data exchange service, and a data analytics platform.
Why connect Snowflake to Salesforce?
With Snowflake and Salesforce integration, businesses can use the best of both platforms by using Snowflake’s powerful data warehousing capabilities to complement Salesforce’s sales and marketing data.
For example, businesses can use Snowflake to extract data from Salesforce, clean and prepare it for analysis, and load it into a data warehouse.
Businesses can use Snowflake’s SQL query language to run complex queries on their data.
You can use the combination of Salesforce and Snowflake to answer several business questions, such as:
- How effective is your sales team at converting leads into customers?
- What are the most common reasons that customers churn?
- What are the most popular products or services that your customers purchase?
- How do seasonal changes impact your sales?
- Which marketing campaigns are the most effective at generating leads?
How can I connect Salesforce and Snowflake?
Various connectors allow Snowflake Salesforce integration. When deciding how to connect the two platforms, you’ll need to consider factors such as the data you want to transfer, the frequency of data transfers, and the level of integration you need.
Below are four different methods you can use for Snowflake to Salesforce integration:
Method 1: Easily Move Data from Salesforce to Snowflake Using Windsor.ai Connector
The Windsor.ai Connector is a point-and-click tool that makes it easy to connect all your sales, marketing, and CRM data. For example, you can connect Google Analytics 4, Salesforce, Facebook Ads, and LinkedIn Ads in minutes without writing any code.
With this Snowflake Salesforce connector, the integration between the two tools is seamless, and you’re set in just a few steps.
The steps involved in the Salesforce Snowflake integration using the Windsor.ai Connector are as follows:
Step 1: Sign up for a Windsor.ai account

The first step is to sign up for a Windsor.ai account. You can do this by going to the Windsor.ai website and clicking on the “Sign Up” button. You will then be prompted to enter your email address and create a password.
Step 2: Grant access to your Snowflake account
2.1 The first step will be adding all the columns your connector’s URL returns.
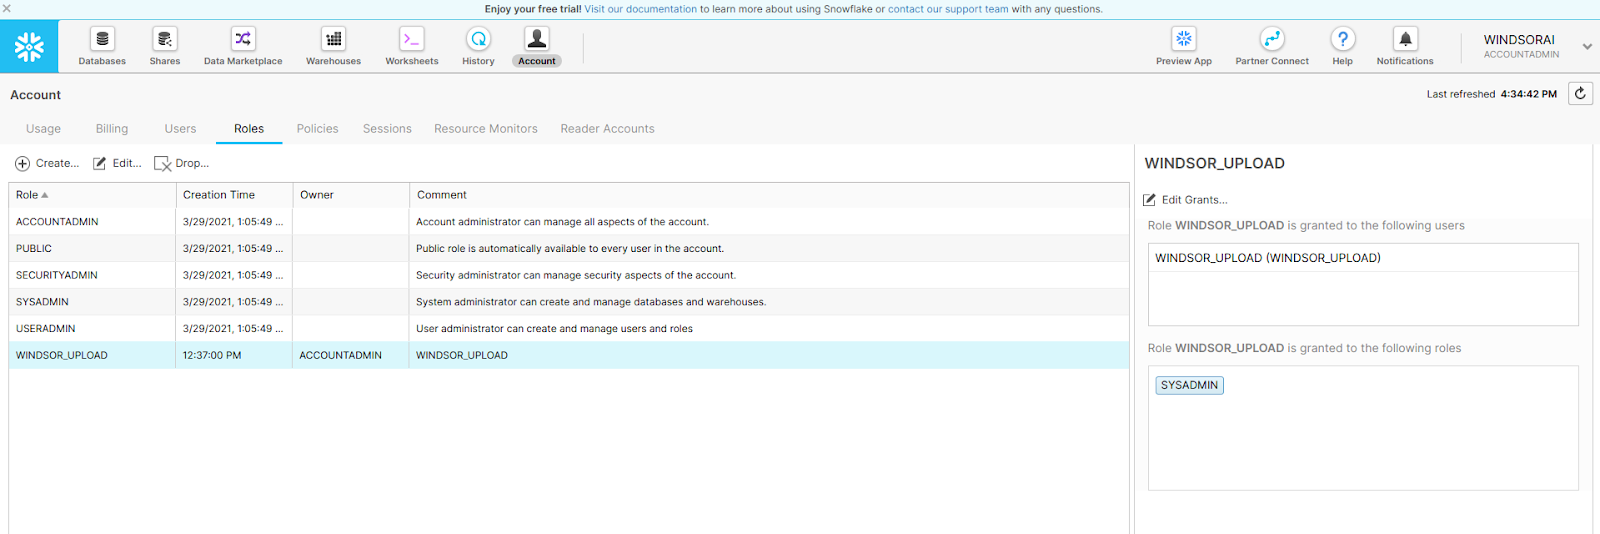
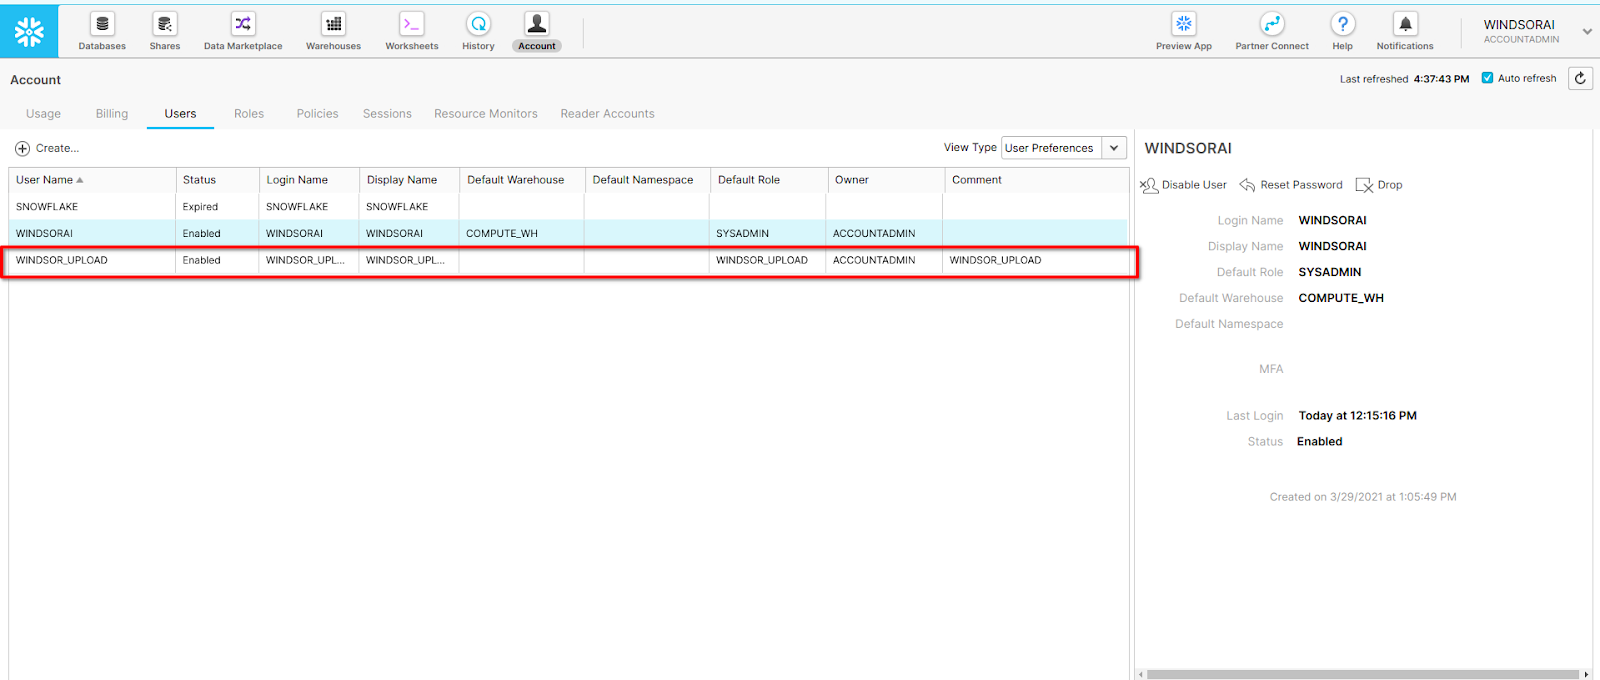
2.2 Next, establish the WINDSOR_UPLOAD role.

2.3 Now that you have a role, create a user, then give that user the previously created role.
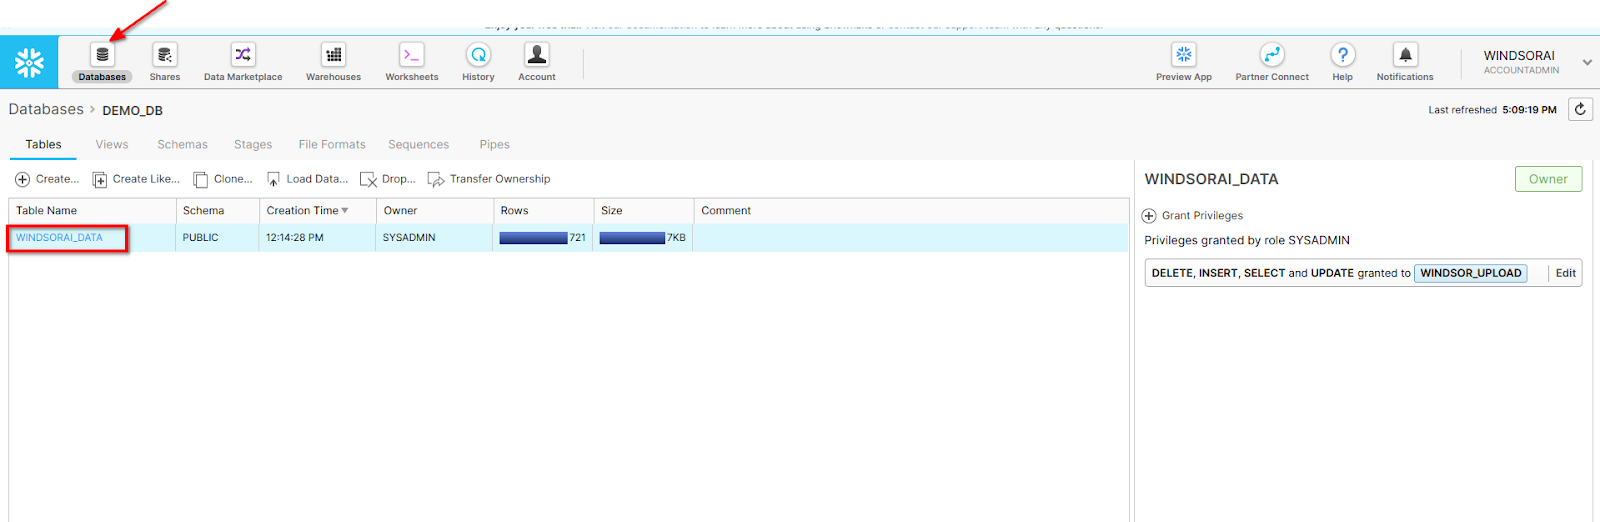
2.4 The created user will also require rights to the database. As the system admin, grant your user database privileges.

2.5 The next step is to grant rights, including delete, insert, select, and update, to the destination table.

2.6 You will then need to fetch the necessary fields from Snowflake to use the Snowflake destination in the Onboard Form. The fields include:
Username

Password

Account

Warehouse

Database

Schema

Table name
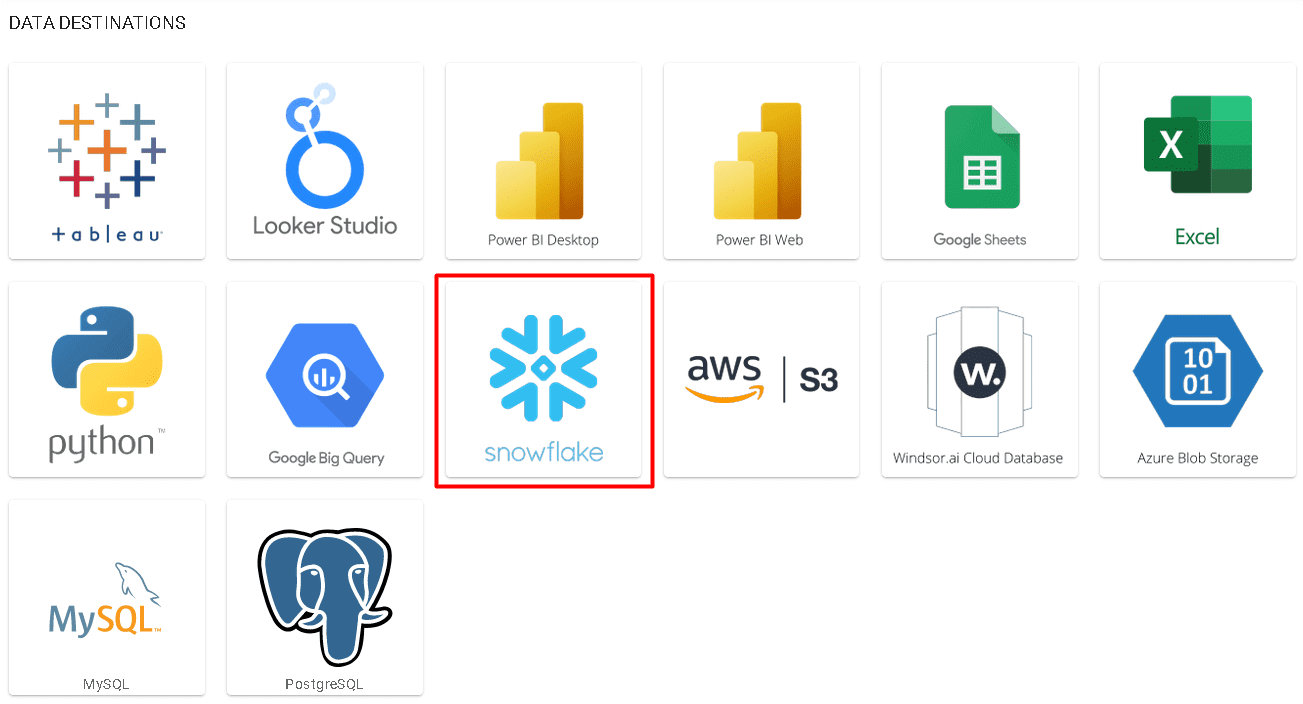
Step 3: Choose Snowflake as destination
Connecting your data sources to the Windsor.ai Snowflake to Salesforce connector allows you to select and transfer Salesforce data to Snowflake.
Once you connect Salesforce to Windsor.ai, you’ll need to select Snowflake as your destination.
Step 4: Enter your Snowflake account details
When prompted, enter your Snowflake account details. After selecting Snowflake, all your data is streamed in real-time, so you’ll always have up-to-date data in Snowflake.

After the Snowflake Salesforce connection, you can apply data-driven attribution on the conversion journeys. This lets you see which marketing channels are the most effective at generating leads and customers.
It also lets you see how different channels work together to create a customer journey. This is a valuable tool for optimizing your marketing efforts.
Snowflake and Salesforce integration using Windsor.ai allows you to join the costs of all connected channels. This helps you understand the return on ad spend (ROAS), cost per acquisition (CPA), and other important KPIs.
It also allows you to optimize your marketing efforts for the maximum return on investment and see which channels are the most efficient at generating leads and customers.
Try Windsor.ai today
Access all your data from your favorite sources in one place.
Get started for free with a 30 - day trial.
Method 2: Load Data from Salesforce to Snowflake using Tableau CRM Integration
Tableau CRM is a software company that provides data visualization and analytics solutions. The Tableau CRM integration is a cloud-based solution that acts as a Snowflake Salesforce connector.
The steps involved in using the Tableau CRM integration as a Salesforce Snowflake connector are:
Step1: Sign up for a Tableau CRM account

You can sign up for a Tableau CRM account by going to the Tableau website and clicking on the “Try Now” tab. You will need to enter your contact information on the Tableau CRM page.
The Tableau CRM free trial allows you to use all the software’s features for 14 days and see if it’s a good fit for your needs. After the trial, you must acquire a paid Tableau CRM license to continue using it.
Step 2: Build Snowflake objects
You must represent any Salesforce data you intend to move to Snowflake as a Tableau CRM object. To do this, you’ll need to create a new object in Tableau CRM. Find a warehouse to load your data, then create a new database and schema that are compatible with your Salesforce data.
After setting these up, create a new Role and grant usage access to the database, warehouse, and schema. You will also need to assign this Role to a User who will create and replace tables. They require the ability to insert, truncate, update, merge data, and create a temporary internal stage.
You should create a user specifically to avoid giving full control of your data warehouse.
Step 3: Enable Tableau CRM sync out
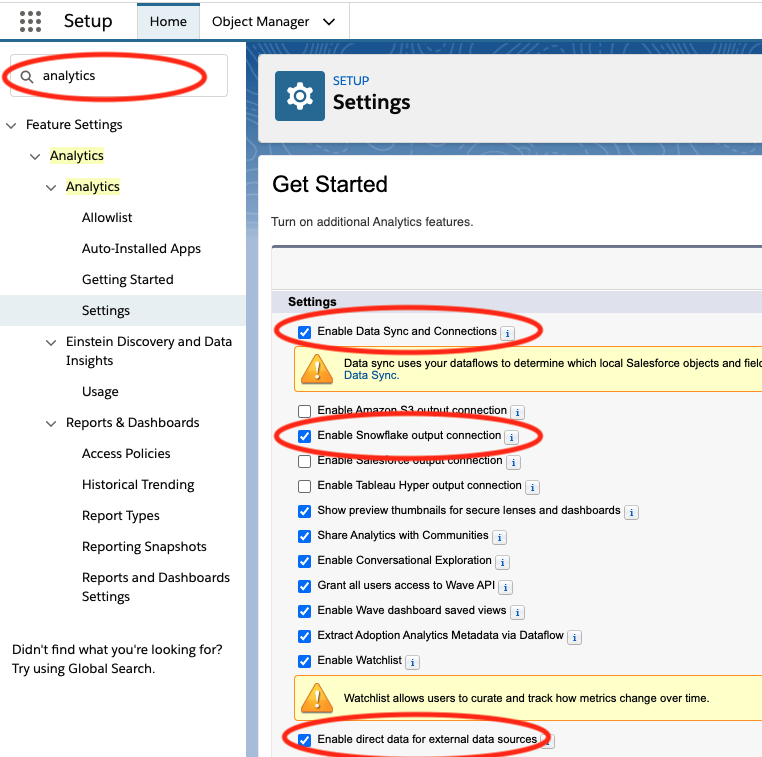
In order to load data from Salesforce to Snowflake, you will need to enable sync out in Tableau CRM. Tableau CRM is available in performance, enterprise, and unlimited Salesforce editions.
From the Salesforce setup menu, type “Analytics” into the fast find box and select “Settings” from the drop-down list. Check “Enable Data Sync and Connections” and “Enable Snowflake Output Connection” after opening the settings panel, then hit “Save.”
Step 4: Configure the Snowflake output connection

Open Salesforce and access the Analytics Studio app. Open the Connect page by going to Data Manager in the left-hand column and clicking “Connect to Data.” From this point, you may choose the “Snowflake” data source type and input your Snowflake login information, which includes the Connection Name, Developer Identity, Description, Username, Role, Passcode, Account, Database, Warehouse, and Schema information.
You should not include any capital letters in your Snowflake details or lowercase letters in your Schema, Username, Database, and Role.
Step 5: Connect to Salesforce data

You can connect Snowflake to Salesforce after configuring your Snowflake output connection. In the Connections window, open your Salesforce database sync settings, enable the object you would like to sync, and click “Continue.”
Tableau CRM will automatically map the data fields from Salesforce to Snowflake. You can also use Tableau CRM’s transformation rules to customize the data mapping further.
Step 6: Enable Tableau CRM sync out and create a schedule

The final step is to enable sync out and create a schedule. Click the drop-down arrow at the top-right of the table and click “Sync Out.” Flick the toggle to enable sync out and click save.
Click the same drop-down menu and click “Schedule” to create your schedule. You will need to modify this stage based on your company’s needs, but the options are self-explanatory.
Method 3: Load Data from Salesforce to Snowflake using Data loader
A data loader is a tool that helps you to load data into Salesforce from a comma-separated values (CSV) file. The data loader is handy when you want to load a large amount of data into Salesforce since it has an upload of up to 5 million records per sync. It is also helpful when you want to schedule the loading of data into Salesforce so that you can keep your data up-to-date.
To implement a data loader, follow the steps below:
Step1: Download and install the data loader on your computer
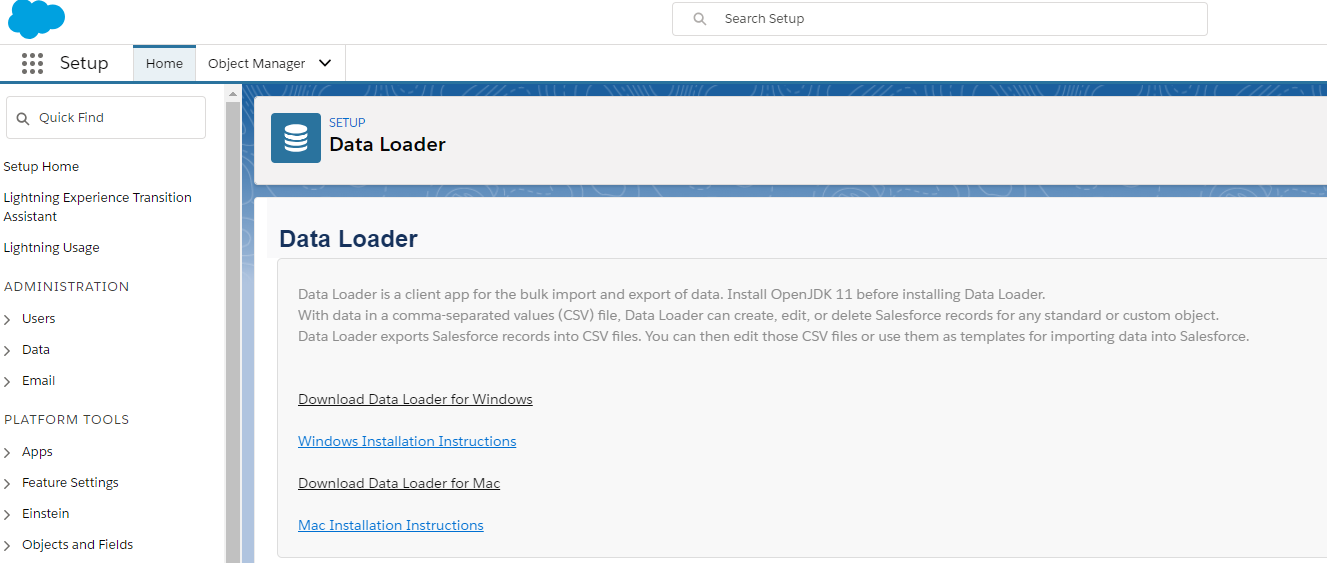
The data loader is available for free from Salesforce. You can download it from AppExchange. Once you download it, double-click on the file to begin the installation process and follow the instructions on the screen.
Step 2: Configure the data loader
Open the data loader and click “Configuration” in the left-hand side panel. Enter your Salesforce username, password, and security token.
The security token is a unique code that Salesforce generates. You can find it by logging into Salesforce and going to “My Profile” > “Personal” > “Reset My Security Token.” Once you enter your Salesforce credentials, click “Login” and then “Allow.”
Step 3: Map the data fields

The next step is to map the data fields from the CSV file to the fields in Salesforce. To do this, click “Map Fields” and then “Create New Map.” Select the CSV file you want to upload and click “Next.”
Choose the object you want to update in Salesforce and then map the fields from the CSV file to the fields in Salesforce.
Step 4: Load the data
Once you have mapped the fields, you can load data from Snowflake to Salesforce. To do this, click “Load Data” and then “Add to Queue.” Select the CSV file you want to upload and click “Next.” Choose the object you want to update in Salesforce and click “Start Load.” The data loader will then upload the data into Salesforce.
Method 4: Move Data from Salesforce to Snowflake Using Data import wizard
The Data import wizard is a tool that helps you to load data into Salesforce from a comma-separated values (CSV) file. It is similar to the data loader but has a few limitations. The data import wizard can only upload up to 50,000 records per sync and cannot schedule data loading.
To implement the data import wizard, follow the steps below:
Step 1: Log into Salesforce

The first step is to log into Salesforce and go to Setup. Enter “data import” in the search bar and click “Data Import Wizard.”
Step 2: Select the object you want to update

The next step is selecting the object you want to update. The data import wizard supports most standard and custom objects. Choose custom or standard objects and select the type of import you want to perform. You can add new records, update existing records, or upsert new records.
Step 3: Map the data fields

Next, map the fields from the CSV file to the fields in Salesforce. To do this, click “Map Fields” and then “Create New Map.” Select the CSV file you want to upload and click “Next.” Choose the object you want to update in Salesforce and then map the fields from the CSV file to the fields in Salesforce.
The Data Import Wizard is not automatic, and you will need to select the object you want to update and map the fields manually. If you want to automate the process, you can use the data loader.
Conclusion
When it comes to choosing a cloud-based data platform, it depends on your needs. Snowflake will be a good choice if you are mainly concerned with storing and querying data. However, if you are interested in managing customer relationships, then Salesforce would be a better option.
No matter which platform you choose, Windsor.ai can help you load your data into Salesforce. Windsor.ai is a cloud-based data integration platform that makes it easy to load data from Snowflake to Salesforce. Windsor.ai offers a free trial, so you can try it out before you commit to a subscription.
A Snowflake to Salesforce connector allows you to schedule data transfers and map data fields. Sign up for a free trial today and see how Windsor.ai can help you streamline your Snowflake to Salesforce integration process.
FAQ: Salesforce to Snowflake Integration
What is the difference between Snowflake and Salesforce?
The main difference between Snowflake and Salesforce is that Snowflake is a cloud-based data warehouse while Salesforce is a cloud-based CRM. Both platforms are designed to help businesses manage their data but have different functionality.
Snowflake is mainly used for storing and querying data, while Salesforce is used for managing customer relationships.
The platforms also differ in terms of pricing. Snowflake charges based on the amount of data stored and queried, while Salesforce charges based on the number of users and the features used.
Why sync data from Snowflake to Salesforce?
Salesforce is the single source of truth for your sales team, but it only shows one view of your customer. Actually, all of your product usage data, event data, and custom audiences live in Snowflake. To truly have a 360-degree view of your customer, your sales team needs access to this information.
Salesforce metrics and dimensions available for streaming into Snowflake
| Name | Type | Description |
|---|---|---|
| Account Source | TEXT | Account Source |
| Account Annual Revenue | NUMERIC | Account Annual Revenue |
| Account Billing Address | TEXT | Account Billing Address |
| Account Billing City | CITY | Account Billing City |
| Account Billing Country | COUNTRY | Account Billing Country |
| Account Billing Geocode Accuracy | TEXT | Account Billing Geocode Accuracy |
| Account Billing Latitude | NUMERIC | Account Billing Latitude |
| Account Billing Longitude | NUMERIC | Account Billing Longitude |
| Account Billing Zip/Postal Code | TEXT | Account Billing Zip/Postal Code |
| Account Billing State/Province | TEXT | Account Billing State/Province |
| Account Billing Street | TEXT | Account Billing Street |
| Account Created By ID | TEXT | Account Created By ID |
| Account Created Date | DATE | Account Created date |
| Account Description | TEXT | Account Description |
| Account Fax | TEXT | Account Fax |
| Account ID | TEXT | Account ID |
| Account Industry | TEXT | Account Industry |
| Account Deleted | BOOLEAN | Account Deleted |
| Account Data.com Key | TEXT | Account Data.com Key |
| Account Jigsaw Company ID | TEXT | Account Jigsaw Company ID |
| Account Last Activity | DATE | Account Last Activity |
| Account Last Modified By ID | TEXT | Account Last Modified By ID |
| Account Last Modified Date | DATE | Account Last Modified date |
| Account Last Referenced Date | DATE | Account Last Referenced date |
| Account Last Viewed Date | DATE | Account Last Viewed date |
| Account Master Record ID | TEXT | Account Master Record ID |
| Account Name | TEXT | Account Name |
| Account Employees | NUMERIC | Account Employees |
| Account Operating Hour ID | TEXT | Account Operating Hour ID |
| Account Owner ID | TEXT | Account Owner ID |
| Account Parent Account ID | TEXT | Account Parent Account ID |
| Account Phone | TEXT | Account Phone |
| Account Photo URL | TEXT | Account Photo URL |
| Account Shipping Address | TEXT | Account Shipping Address |
| Account Shipping City | CITY | Account Shipping City |
| Account Shipping Country | COUNTRY | Account Shipping Country |
| Account Shipping Geocode Accuracy | TEXT | Account Shipping Geocode Accuracy |
| Account Shipping Latitude | NUMERIC | Account Shipping Latitude |
| Account Shipping Longitude | NUMERIC | Account Shipping Longitude |
| Account Shipping Zip/Postal Code | TEXT | Account Shipping Zip/Postal Code |
| Account Shipping State/Province | TEXT | Account Shipping State/Province |
| Account Shipping Street | TEXT | Account Shipping Street |
| Account SIC Description | TEXT | Account SIC Description |
| Account System Modstamp | TEXT | Account System Modstamp |
| Account Type | TEXT | Account Type |
| Account Website | TEXT | Account Website |
| Campaign Actual Cost in Campaign | NUMERIC | Campaign Actual Cost in Campaign |
| Campaign Value Opportunities in Campaign | NUMERIC | Campaign Value Opportunities in Campaign |
| Campaign Value Won Opportunities in Campaign | NUMERIC | Campaign Value Won Opportunities in Campaign |
| Campaign Budgeted Cost in Campaign | NUMERIC | Campaign Budgeted Cost in Campaign |
| Campaign Record Type ID | TEXT | Campaign Record Type ID |
| Campaign Created By ID | TEXT | Campaign Created By ID |
| Campaign Created Date | DATE | Campaign Created date |
| Campaign Description | TEXT | Campaign Description |
| Campaign End Date | DATE | Campaign End date |
| Campaign Expected Response (%) | NUMERIC | Campaign Expected Response (%) |
| Campaign Expected Revenue in Campaign | NUMERIC | Campaign Expected Revenue in Campaign |
| Campaign ID | TEXT | Campaign ID |
| Campaign Active | BOOLEAN | Campaign Active |
| Campaign Deleted | BOOLEAN | Campaign Deleted |
| Campaign Last Activity | DATE | Campaign Last Activity |
| Campaign Last Modified By ID | TEXT | Campaign Last Modified By ID |
| Campaign Last Modified Date | DATE | Campaign Last Modified date |
| Campaign Last Referenced Date | DATE | Campaign Last Referenced date |
| Campaign Last Viewed Date | DATE | Campaign Last Viewed date |
| Campaign Name | TEXT | Campaign Name |
| Campaign Contacts in Campaign | NUMERIC | Campaign Contacts in Campaign |
| Campaign Converted Leads in Campaign | NUMERIC | Campaign Converted Leads in Campaign |
| Campaign Leads in Campaign | NUMERIC | Campaign Leads in Campaign |
| Campaign Opportunities in Campaign | NUMERIC | Campaign Opportunities in Campaign |
| Campaign Responses in Campaign | NUMERIC | Campaign Responses in Campaign |
| Campaign Won Opportunities in Campaign | NUMERIC | Campaign Won Opportunities in Campaign |
| Campaign Num Sent in Campaign | NUMERIC | Campaign Num Sent in Campaign |
| Campaign Owner ID | TEXT | Campaign Owner ID |
| Campaign Parent Campaign ID | TEXT | Campaign Parent Campaign ID |
| Campaign Start Date | DATE | Campaign Start date |
| Campaign Status | TEXT | Campaign Status |
| Campaign System Modstamp | TEXT | Campaign System Modstamp |
| Campaign Type | TEXT | Campaign Type |
| Campaign Member Campaign ID | TEXT | Campaign Member ID of the Campaign to which this Lead or Contact is associated. |
| Campaign Member CompanyOrAccount | TEXT | Campaign Member The company or account of the lead or contact. |
| Campaign Member ContactId | TEXT | Campaign Member ID of the Contact who is associated with a Campaign. |
| Campaign Member Country | COUNTRY | Campaign Member The country for the address of the lead or contact. |
| Campaign Member Description | TEXT | Campaign Member The description of the associated lead or contact. |
| Campaign Member DoNotCall | BOOLEAN | Campaign Member Indicates that the contact doesn’t wish to be called. |
| Campaign Member Fax | TEXT | Campaign Member Fax number for the contact or lead. |
| Campaign Member First Name | TEXT | Campaign Member The first name of the contact or lead. |
| Campaign Member FirstRespondedDate | DATE | Campaign Member Indicates the date on which the campaign member was first given a responded status. |
| Campaign Member HasOptedOutOfFax | BOOLEAN | Campaign Member Indicates that the contact or lead doesn’t wish to receive faxes. |
| Campaign Member HasResponded | BOOLEAN | Campaign Member Indicates whether the campaign member has responded to the campaign (true) or not (false). Label is Responded. |
| Campaign Member LastName | TEXT | Campaign Member The last name of the contact or lead. Limit is 80 characters. |
| Campaign Member LeadId | TEXT | Campaign Member ID of the Lead who is associated with a Campaign. |
| Campaign Member LeadOrContactId | TEXT | Campaign Member The ID of the associated lead or contact. |
| Campaign Member LeadOrContactOwnerId | TEXT | Campaign Member The ID of the owner of the associated lead or contact. |
| Campaign Member LeadSource | TEXT | Campaign Member The source from which the lead was obtained. |
| Campaign Member Name | TEXT | Campaign Member First and last name of the contact or lead with which the campaign member is associated. |
| Campaign Member PostalCode | TEXT | Campaign Member The postal code of the lead or contact. |
| Campaign Member Salutation | TEXT | Campaign Member Salutation for the lead or contact. |
| Campaign Member State | TEXT | Campaign Member The state for the address of the lead or contact. Limit is 80 characters. |
| Campaign Member Status | TEXT | Campaign Member Controls the HasResponded flag on this object. You can't directly set the HasResponded flag, as it’s read-only. You can set it indirectly by setting this field in a create or update call. Each predefined value implies a HasResponded flag value. Each time you update this field, you implicitly update the HasResponded flag. In the Salesforce user interface, Marketing users can define valid status values for the Status Text. They can choose one status as the default status. For each Status field value, they can also select which values to count as “Responded,” meaning that the HasResponded flag is set to true for those values. 40 character limit. |
| Campaign Member Street | TEXT | Campaign Member The street for the address of the lead or contact. |
| Campaign Member Title | TEXT | Campaign Member Title for the lead or contact. |
| Campaign Member Type | TEXT | Indicates whether the campaign member is a lead or a contact. |
| Contact Account ID | TEXT | ID of the account that’s the parent of this contact. |
| Contact Assistants Name | TEXT | The assistant’s name. |
| Contact Assitants Phone Number | TEXT | The assistant’s telephone number. |
| Contact Birthdate | DATE | The contact’s birthdate. |
| Contact Created By | TEXT | The user who created the contact |
| Contact Creation Date | DATE | The Creation Date (Duplicate) |
| Contact Date | DATE | The Creation Date |
| Contact Department | TEXT | The contact’s department. |
| Contact Description | TEXT | Contact's description |
| Contact Email | TEXT | The contact’s email address. |
| Contact Email Bounced Date | TIMESTAMP | If bounce management is activated and an email sent to the contact bounces, the date and time of the bounce. |
| Contact Email Bounced Reason | TEXT | If bounce management is activated and an email sent to the contact bounces, the reason for the bounce. |
| Contact Fax | TEXT | The contact’s fax number (Label is Business Fax). |
| Contact First Name | TEXT | The contact’s first name (up to 40 characters). |
| Contact Home Phone | TEXT | The contact’s home telephone number. |
| Contact Id | TEXT | The Contact ID |
| Contact Is Deleted | TEXT | Is contact deleted |
| Contact Is Email Bounced | TEXT | Contact's description |
| Contact Last Activity Date | DATE | Value is the most recent of either: Due date of the most recent event logged against the record or due date of the most recently closed task associated with the record. |
| Contact Last Modified Date | TIMESTAMP | Contact last modified date |
| Contact Last Name | TEXT | RequiredLast name of the contact (up to 80 characters). |
| Contact Lead Source | TEXT | The lead’s source. |
| Contact Mailing City | CITY | Mailing address details. |
| Contact Mailing Country | COUNTRY | Mailing country. |
| Contact Mailing Postal Code | TEXT | The zip or postal code in the mailing address |
| Contact Mailing State | TEXT | Mailing state details. |
| Contact Mailing Street | TEXT | Street address for mailing address. |
| Contact Mobile Phone | TEXT | Contact’s mobile phone number. |
| Contact Name | TEXT | Contact full name |
| Contact Other City | CITY | Alternative city details. |
| Contact Other Country | COUNTRY | Alternative country details. |
| Contact Other Phone | TEXT | Telephone for alternate address. |
| Contact Other Postal Code | TEXT | Alternative postal code details. |
| Contact Other State | TEXT | Alternate address details (state). |
| Contact Other Street | TEXT | Street for alternate address. |
| Contact Owner ID | TEXT | The ID of the owner of the account associated with this contact. |
| Contact Business Phone | TEXT | Telephone number for the contact |
| Contact Reports to ID | TEXT | ID of contact's manager |
| Contact Salutation | TEXT | Honorific abbreviation, word, or phrase to be used in front of name in greetings, such as Dr. or Mrs. |
| Contact Title | TEXT | Title of the contact, such as CEO or Vice President. |
| Data Source | TEXT | The name of the Windsor connector returning the row |
| Last Modified Date | DATE | The Last Modified Date of the selected Object |
| Day of month | TEXT | Day of the month |
| Lead Email | TEXT | Lead Email |
| Lead Address | TEXT | Lead Address |
| Lead Annual Revenue | NUMERIC | Lead Annual Revenue |
| Lead City | CITY | Lead City |
| Lead Company | TEXT | Lead Company |
| Lead Converted Account ID | TEXT | Lead Converted Account ID |
| Lead Converted Contact ID | TEXT | Lead Converted Contact ID |
| Lead Converted Date | DATE | Lead Converted date |
| Lead Converted Opportunity ID | TEXT | Lead Converted Opportunity ID |
| Total number of leads | NUMERIC | Leads |
| Lead Country | COUNTRY | Lead Country |
| Lead Created By ID | TEXT | Lead Created By ID |
| Lead Created Date | DATE | Lead Created date |
| Lead Description | TEXT | Lead Description |
| Lead Email (duplicate) | TEXT | Lead Email |
| Lead Email Bounced Date | DATE | Lead Email Bounced date |
| Lead Email Bounced Reason | TEXT | Lead Email Bounced Reason |
| Lead First Name | TEXT | Lead First Name |
| Lead Geocode Accuracy | TEXT | Lead Geocode Accuracy |
| Lead ID | TEXT | Lead ID |
| Lead Individual ID | TEXT | Lead Individual ID |
| Lead Industry | TEXT | Lead Industry |
| Lead Converted | BOOLEAN | Lead Converted |
| Lead Deleted | BOOLEAN | Lead Deleted |
| Lead Unread By Owner | TEXT | Lead Unread By Owner |
| Lead Data.com Key | TEXT | Lead Data.com Key |
| Lead Jigsaw Contact ID | TEXT | Lead Jigsaw Contact ID |
| Lead Last Activity | DATE | Lead Last Activity |
| Lead Last Modified By ID | TEXT | Lead Last Modified By ID |
| Lead Last Modified Date | DATE | Lead Last Modified date |
| Lead Last Name | TEXT | Lead Last Name |
| Lead Last Referenced Date | DATE | Lead Last Referenced date |
| Lead Last Viewed Date | DATE | Lead Last Viewed date |
| Lead Latitude | NUMERIC | Lead Latitude |
| Lead Source | TEXT | Lead Source |
| Lead Longitude | NUMERIC | Lead Longitude |
| Lead Master Record ID | TEXT | Lead Master Record ID |
| Lead Full Name | TEXT | Lead Full Name |
| Lead Employees | NUMERIC | Lead Employees |
| Lead Owner ID | TEXT | Lead Owner ID |
| Lead Phone | TEXT | Lead Phone |
| Lead Photo URL | TEXT | Lead Photo URL |
| Lead Zip/Postal Code | TEXT | Lead Zip/Postal Code |
| Lead Rating | TEXT | Lead Rating |
| Lead Salutation | TEXT | Lead Salutation |
| Lead State/Province | TEXT | Lead State/Province |
| Lead Status | TEXT | Lead Status |
| Lead Street | TEXT | Lead Street |
| Lead System Modstamp | TEXT | Lead System Modstamp |
| Lead Title | TEXT | Lead Title |
| Lead Website | TEXT | Lead Website |
| Month | TEXT | Number of the month |
| Opportunity Account ID | TEXT | Opportunity Account ID |
| Opportunity Amount | NUMERIC | Opportunity Amount |
| Opportunity Campaign ID | TEXT | Opportunity Campaign ID |
| Opportunity Close Date | DATE | Opportunity Close date |
| Opportunity Contact ID | TEXT | Opportunity Contact ID |
| Opportunity Created By ID | TEXT | Opportunity Created By ID |
| Opportunity Created Date | DATE | Opportunity Created date |
| Opportunity Description | TEXT | Opportunity Description |
| Opportunity Fiscal Period | TEXT | Opportunity Fiscal Period |
| Opportunity Fiscal Quarter | NUMERIC | Opportunity Fiscal Quarter |
| Opportunity Fiscal Year | NUMERIC | Opportunity Fiscal Year |
| Opportunity Forecast Category | TEXT | Opportunity Forecast Category |
| Opportunity Forecast Category Name | TEXT | Opportunity Forecast Category Name |
| Opportunity Has Open Activity | BOOLEAN | Opportunity Has Open Activity |
| Opportunity Has Line Item | BOOLEAN | Opportunity Has Line Item |
| Opportunity Has Overdue Task | BOOLEAN | Opportunity Has Overdue Task |
| Opportunity ID | TEXT | Opportunity ID |
| Opportunity Closed | BOOLEAN | Opportunity Closed |
| Opportunity Deleted | BOOLEAN | Opportunity Deleted |
| Opportunity Won | BOOLEAN | Opportunity Won |
| Opportunity Last Activity | DATE | Opportunity Last Activity |
| Opportunity Amount Changed History ID | DATE | Last amount changed history ID |
| Opportunity Last Close Date Changed | TEXT | Last close date changed history Id |
| Opportunity Last Modified By ID | TEXT | Opportunity Last Modified By ID |
| Opportunity Last Modified Date | DATE | Opportunity Last Modified date |
| Opportunity Last Referenced Date | DATE | Opportunity Last Referenced date |
| Opportunity Last Viewed Date | DATE | Opportunity Last Viewed date |
| Opportunity Lead Source | TEXT | Opportunity Lead Source |
| Opportunity Name | TEXT | Opportunity Name |
| Opportunity Next Step | TEXT | Opportunity Next Step |
| Opportunity Owner ID | TEXT | Opportunity Owner ID |
| Opportunity Price Book ID | TEXT | Opportunity Price Book ID |
| Opportunity Probability (%) | NUMERIC | Opportunity Probability (%) |
| Opportunity Stage | TEXT | Opportunity Stage |
| Opportunity System Modstamp | TEXT | Opportunity System Modstamp |
| Opportunity Type | TEXT | Opportunity Type |
| Source | TEXT | The name of the Windsor connector returning the row |
| Task Account ID | TEXT | Task Account ID |
| Task Due Date Only | DATE | Task Due Date Only |
| Task Call Result | TEXT | Task Call Result |
| Task Call Duration | NUMERIC | Task Call Duration |
| Task Call Object Identifier | TEXT | Task Call Object Identifier |
| Task Call Type | TEXT | Task Call Type |
| Task Completed Date | DATE | Task Completed date |
| Task Created By ID | TEXT | Task Created By ID |
| Task Created Date | DATE | Task Created date |
| Task Description | TEXT | Task Description |
| Task Activity ID | TEXT | Task Activity ID |
| Task Archived | BOOLEAN | Task Archived |
| Task Closed | BOOLEAN | Task Closed |
| Task Deleted | BOOLEAN | Task Deleted |
| Task High Priority | BOOLEAN | Task High Priority |
| Task Create Recurring Series of Tasks | BOOLEAN | Task Create Recurring Series of Tasks |
| Task Reminder Set | BOOLEAN | Task Reminder Set |
| Task Last Modified By ID | TEXT | Task Last Modified By ID |
| Task Last Modified Date | DATE | Task Last Modified date |
| Task Assigned To ID | TEXT | Task Assigned To ID |
| Task Priority | TEXT | Task Priority |
| Task Recurrence Activity ID | TEXT | Task Recurrence Activity ID |
| Task Recurrence Day of Month | NUMERIC | Task Recurrence Day of Month |
| Task Recurrence Day of Week Mask | NUMERIC | Task Recurrence Day of Week Mask |
| Task Recurrence End | TEXT | Task Recurrence End |
| Task Recurrence Instance | TEXT | Task Recurrence Instance |
| Task Recurrence Interval | NUMERIC | Task Recurrence Interval |
| Task Recurrence Month of Year | TEXT | Task Recurrence Month of Year |
| Task Repeat This Task | TEXT | Task Repeat This Task |
| Task Recurrence Start | TEXT | Task Recurrence Start |
| Task Recurrence Time Zone | TEXT | Task Recurrence Time Zone |
| Task Recurrence Type | TEXT | Task Recurrence Type |
| Task Reminder Date/Time | TEXT | Task Reminder Date/Time |
| Task Status | TEXT | Task Status |
| Task Subject | TEXT | Task Subject |
| Task System Modstamp | TEXT | Task System Modstamp |
| Task Subtype | TEXT | Task Subtype |
| Task Related To ID | TEXT | Task Related To ID |
| Task Name ID | TEXT | Task Name ID |
| Today | DATE | Today's date |
| Week | TEXT | Week (Sun-Sat). |
| Day of week and day number | TEXT | Weekday number and name combined (Sun-Sat).Numbered from 0 Sunday to 6 Saturday. |
| Day of week and day number, ISO | TEXT | Weekday number and name combined, ISO format (Mon-Sun).Numbered from 1 Monday to 7 |
| Week ISO | TEXT | Week, ISO format (Mon-Sun). |
| Year | TEXT | Year |
| Yearmonth | TEXT | Year and month, e.g. 2024|3 |
| Year of week | TEXT | The year that contains first day of the week (Sun-Sat). |
| Year of week, ISO | TEXT | The year that contains first day of the ISO week (Mon-Sun). |
| Year week | TEXT | Year and week for US weeks (Sun-Sat), e.g. 2024|15 |
| Year week ISO | TEXT | Year and week for ISO weeks (Mon-Sun), e.g. 2024|20 |
Easily connect Salesforce to Snowflake
See the value and return on every marketing touchpoint

Providing 50+ marketing data streams, we make sure that all the data we integrate is fresh and accessible by marketers, whenever they want.

Spend less time on manual data loading and spreadsheets. Focus on delighting your customers.