 AI insights
 About us
 Careers
 Security
 Customer reviews
 Contact us
 Affiliate program
 Solution partners
 Looker Studio templates
 Tableau templates
 Facebook Ads templates
 Google Ads templates
 Data fields & Metrics
 AI prompt library & Guides
 Product documentation
 API documentation
 Case studies
 Blog
Blog Data models
 Windsor vs Supermetrics
 Windsor vs Fivetran
 Windsor vs Portermetrics
How to integrate data into Amazon Redshift with Windsor.ai
What is Amazon Redshift?
Amazon Redshift is a fast, fully managed cloud data warehouse offered by AWS, designed for large-scale data storage and analytics. Using Redshift, you can quickly run complex analytical queries across vast datasets, making it an ideal tool for business intelligence, reporting, and machine learning workloads.
With features like automatic workload management, concurrency scaling, and serverless options, Redshift optimizes resource allocation and ensures seamless performance. It also integrates natively with AWS services like S3, Glue, and Athena, simplifying data ingestion and transformation. Redshift’s security features—such as VPC isolation, encryption, and access control—ensure data integrity and compliance with enterprise security standards.
By integrating Amazon Redshift with Windsor.ai data connectors, you can:
- Automatically transfer data from 315+ sources into Redshift for real-time reporting.
- Perform cross-channel attribution modeling, customer segmentation, and ROI analysis.
- Set up data refresh schedules to keep reports up-to-date without any manual intervention.
- Visualize Redshift’s data in Tableau, Power BI, Looker Studio, and Sigma Computing.
Explore our video tutorial and a step-by-step guide to automatically integrate your data into Redshift with the Windsor.ai no-code ELT connector.
How to connect Amazon Redshift to Windsor.ai
Connecting data in Windsor.ai
1. Create a Windsor.ai account and log in.
2. Select the data source which you want to stream data from, e.g., Google Analytics 4. Sign in with your associated Google account and select the next step, “Data preview.”
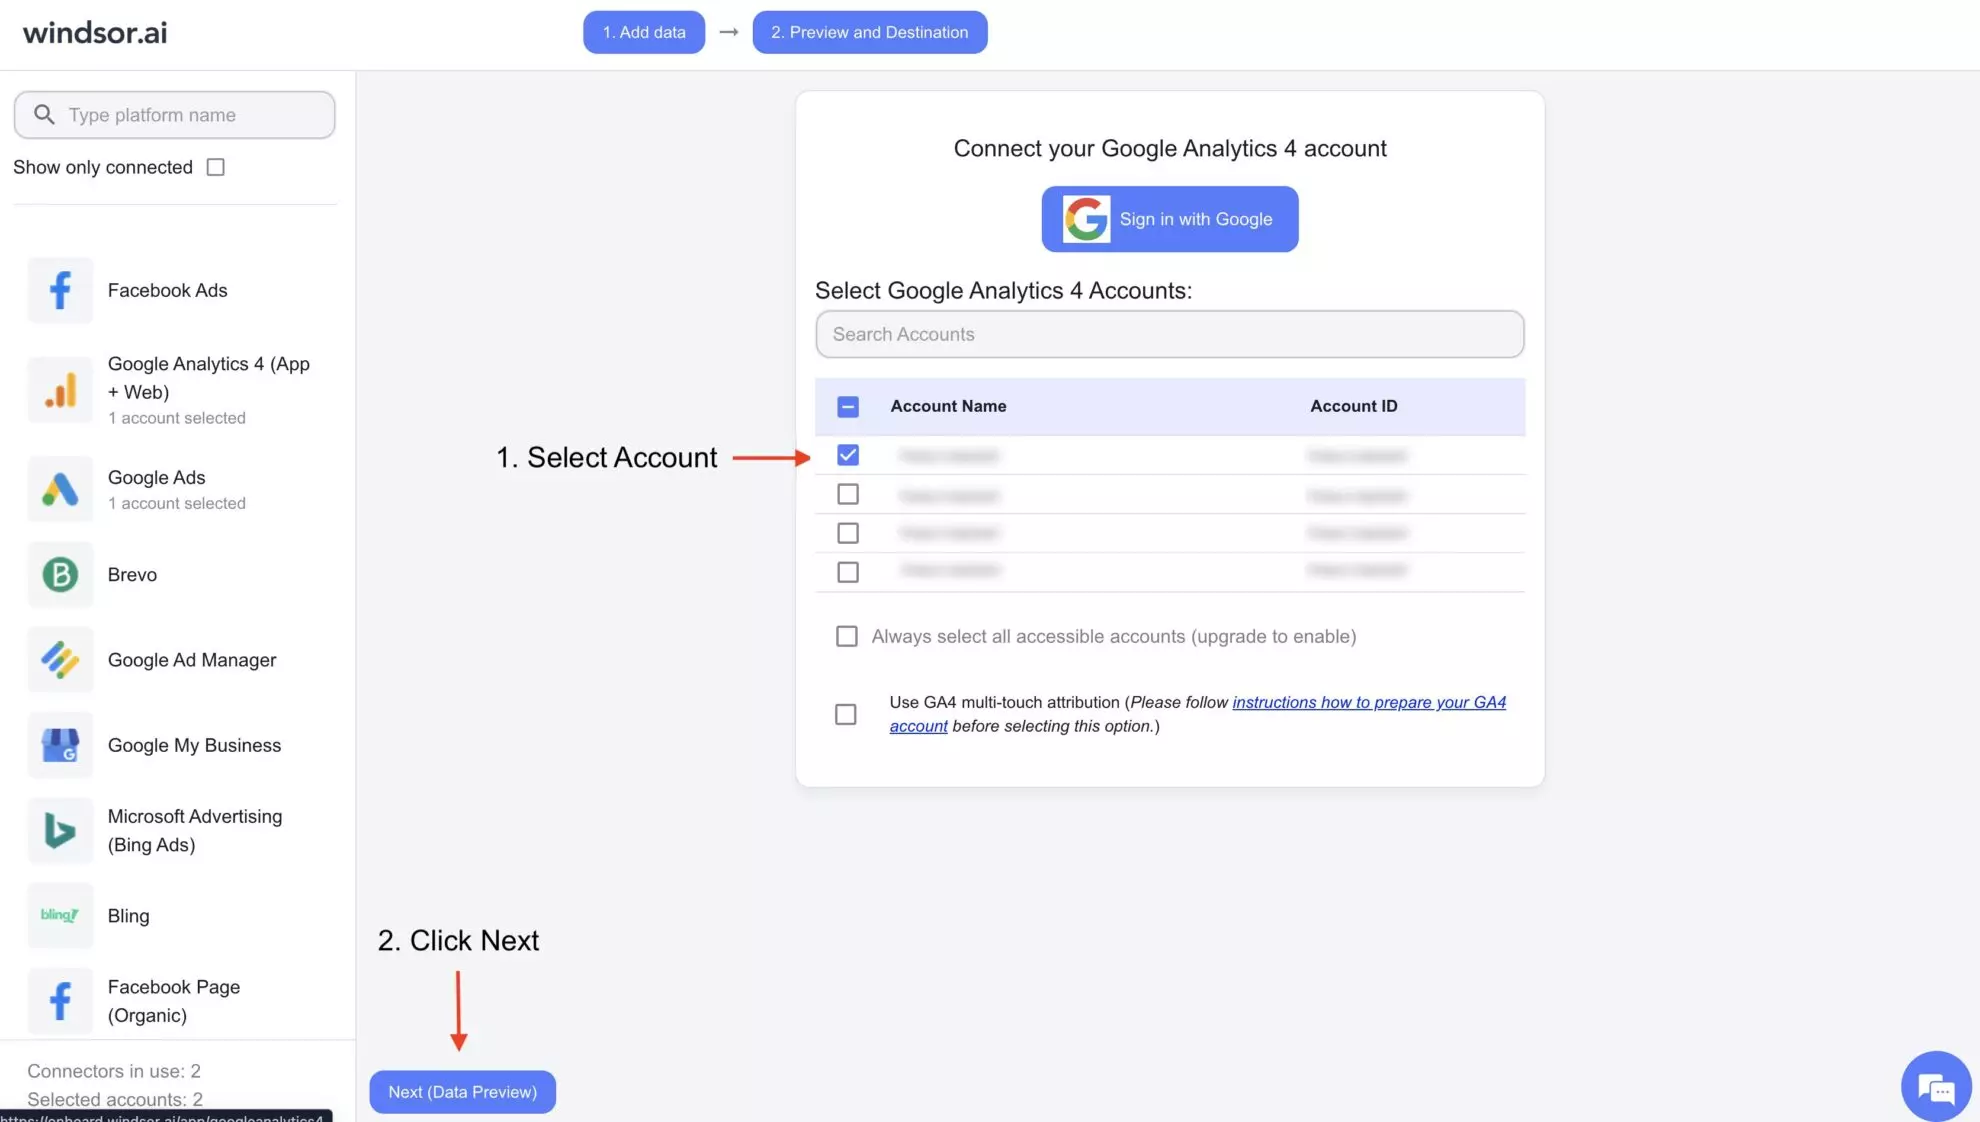
3. You’ll see your Google Analytics 4 data displayed in your Windsor.ai account.
4. At this step, you need to copy Windsor.ai’s IP address, which you’ll later use to access the database during the Redshift setup process.
For this, scroll down to data destinations and select Redshift.
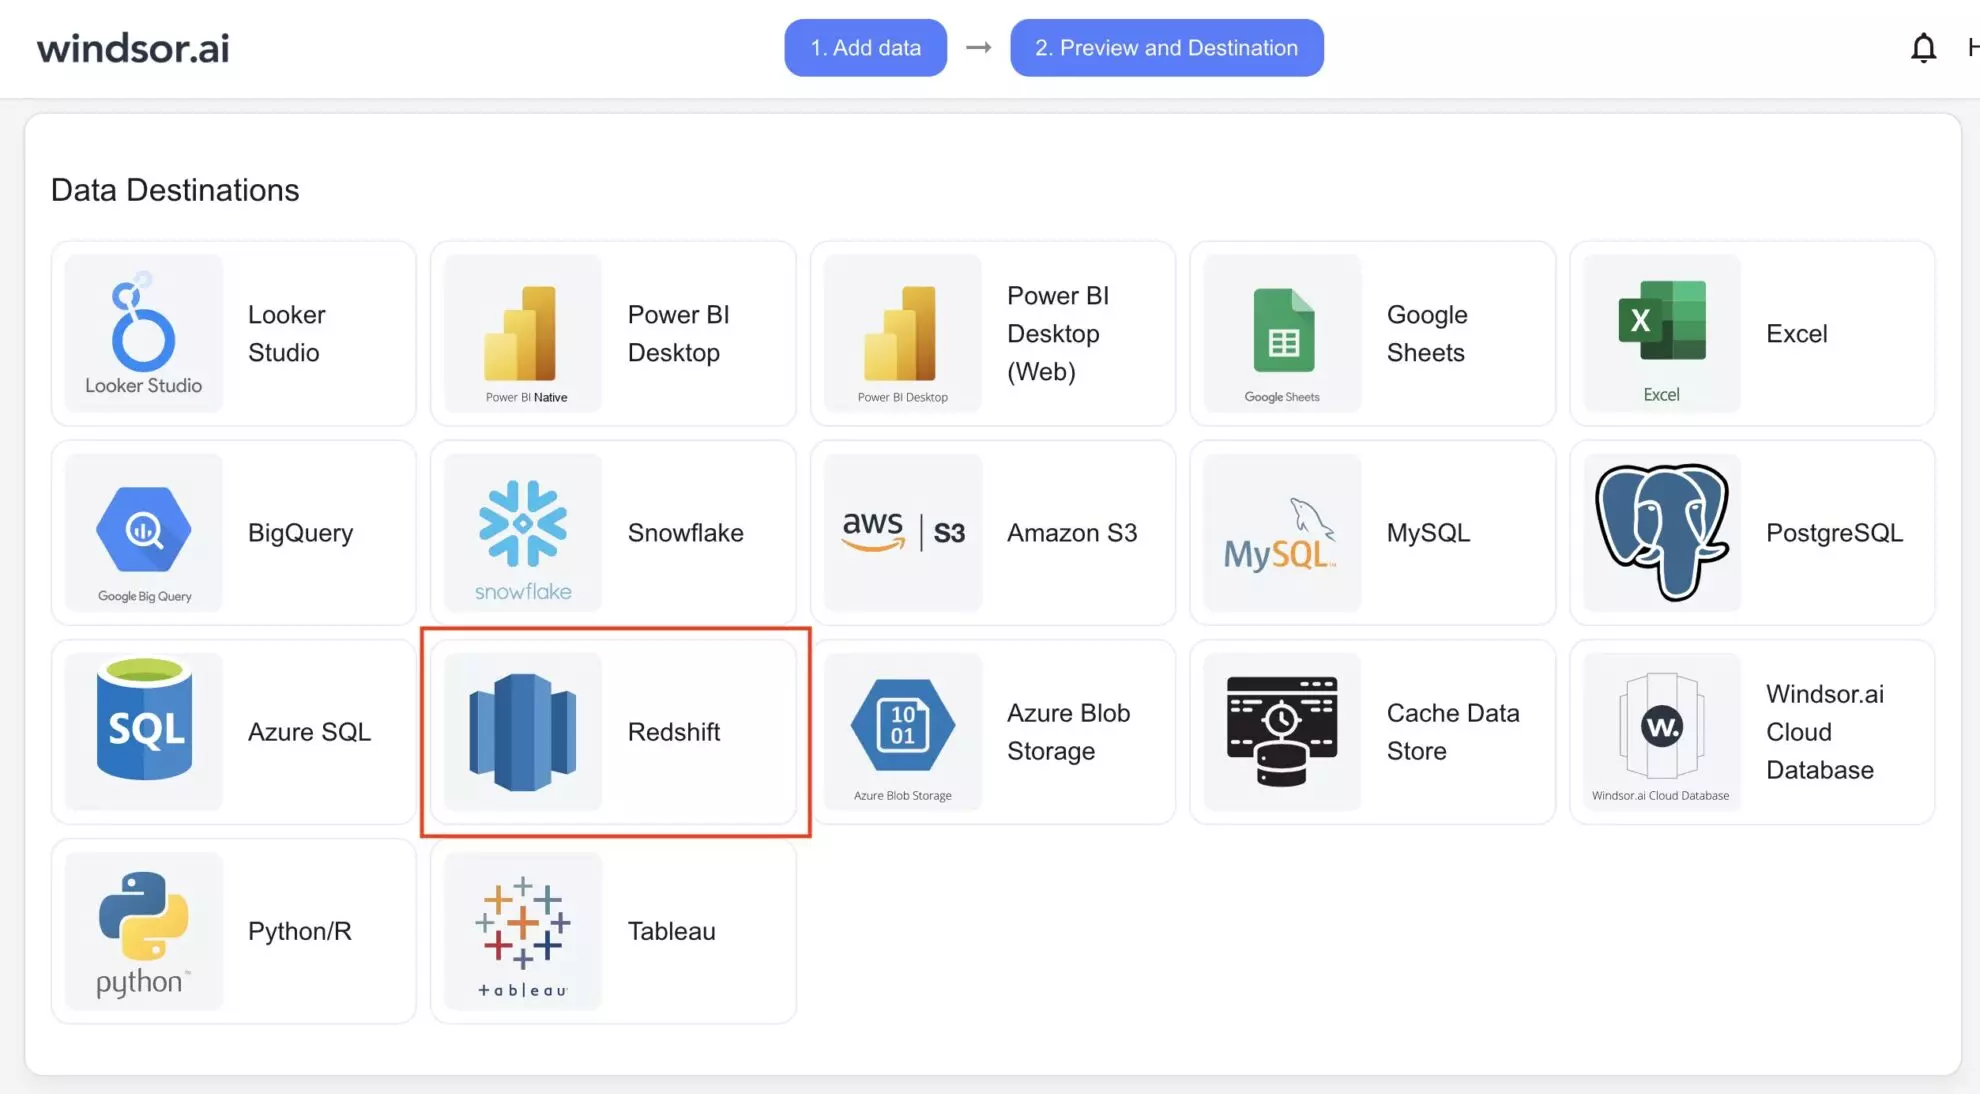
Click “Add Destination Task” and copy the IP address listed at the bottom of the instructions; save it for future use.

Now, let’s proceed with setting up Amazon Redshift for data integration.
Setting up Amazon Redshift
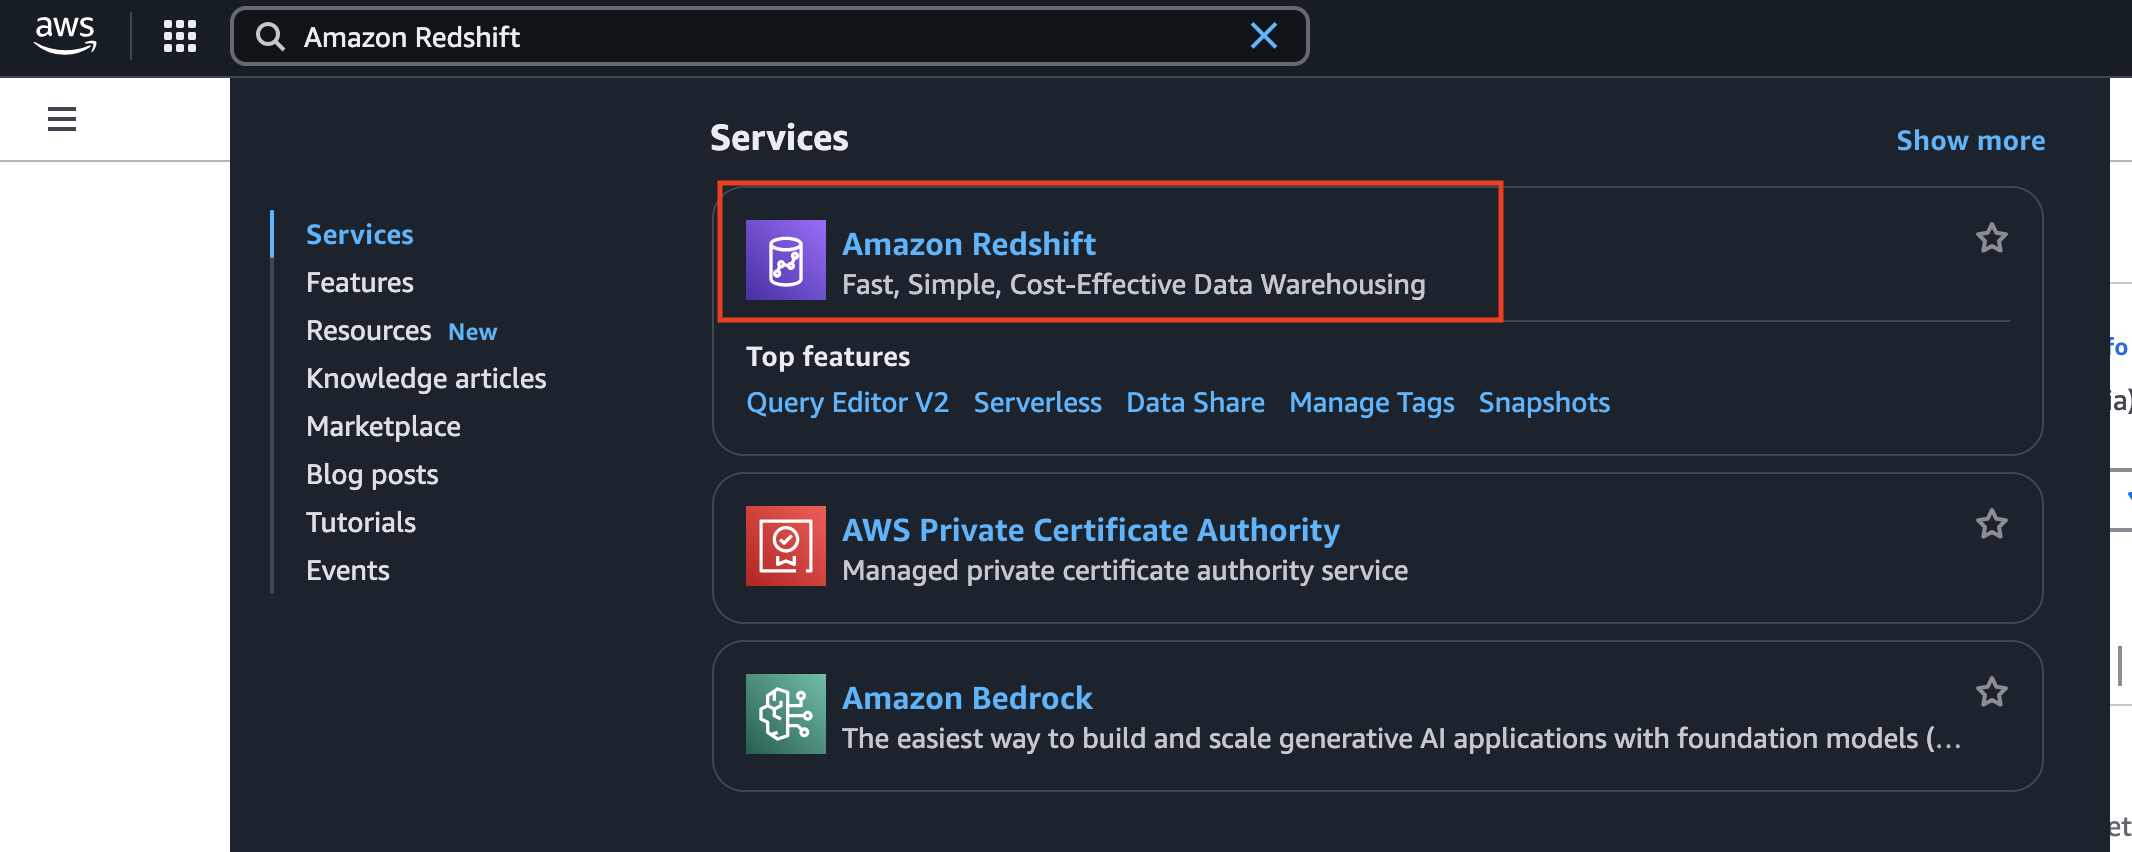
1. Go to your AWS management console. Log in, search for “Amazon Redshift,” and click on it.
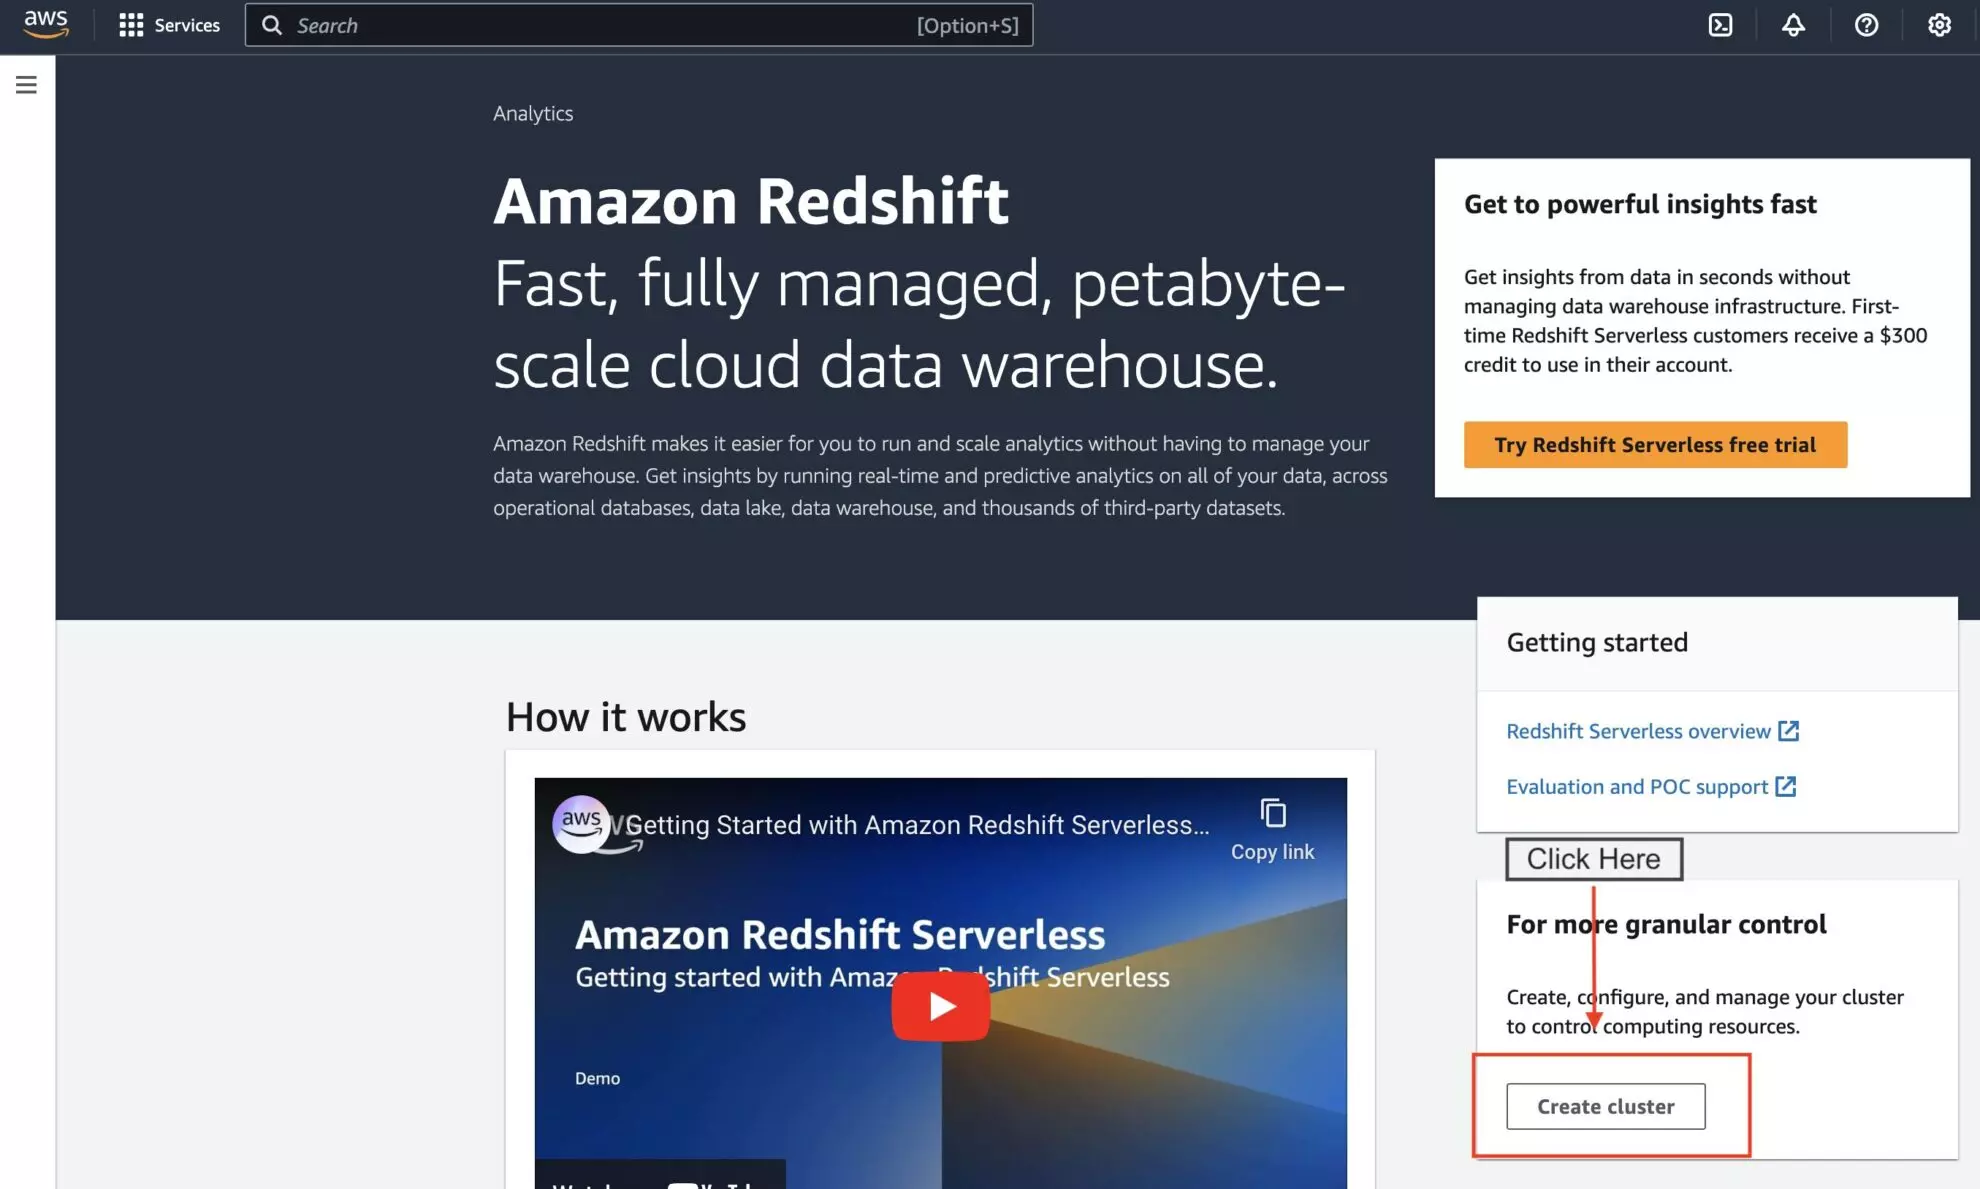
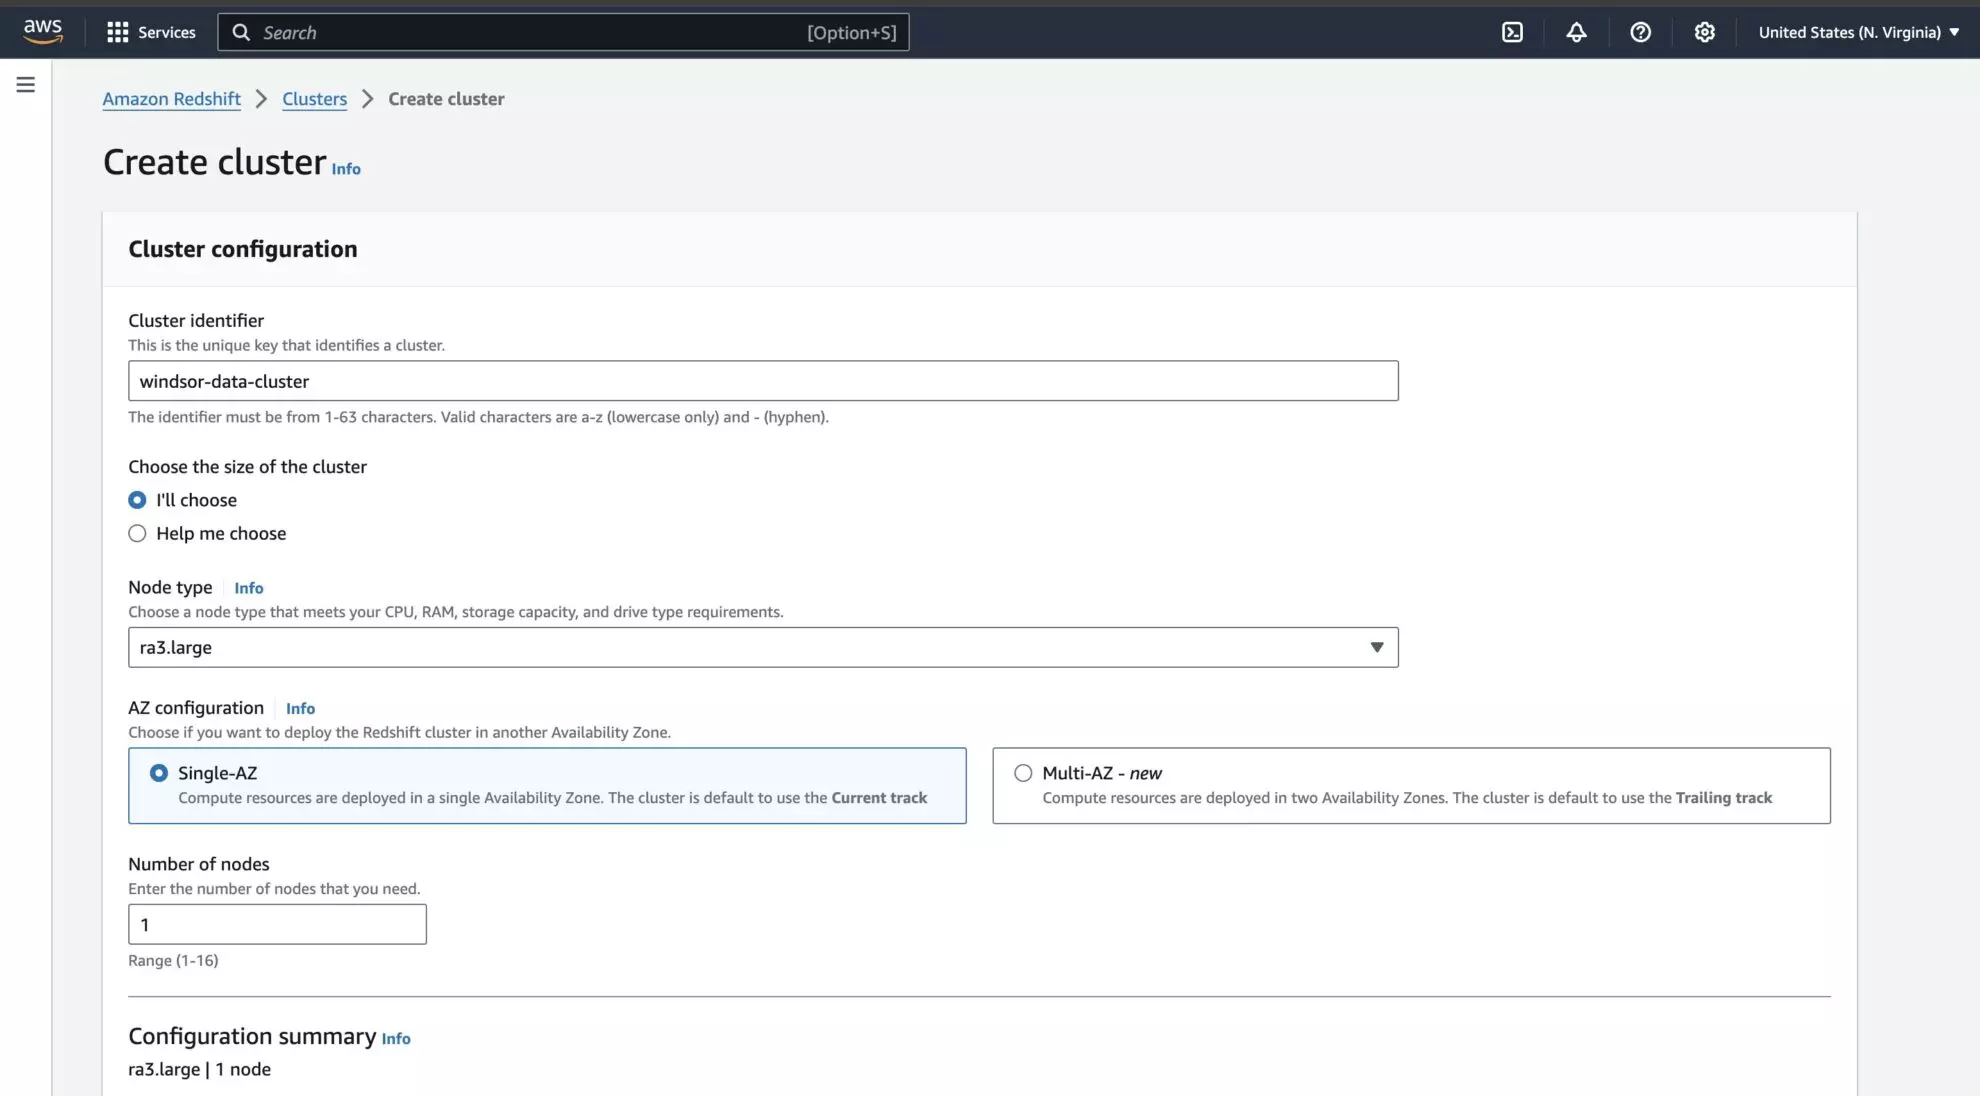
2. On the Redshift page, click “Create Cluster.”
3. In the create cluster form, enter the Name of your cluster (you can give any) and select the Node Type and Number of Nodes according to your computation preferences.
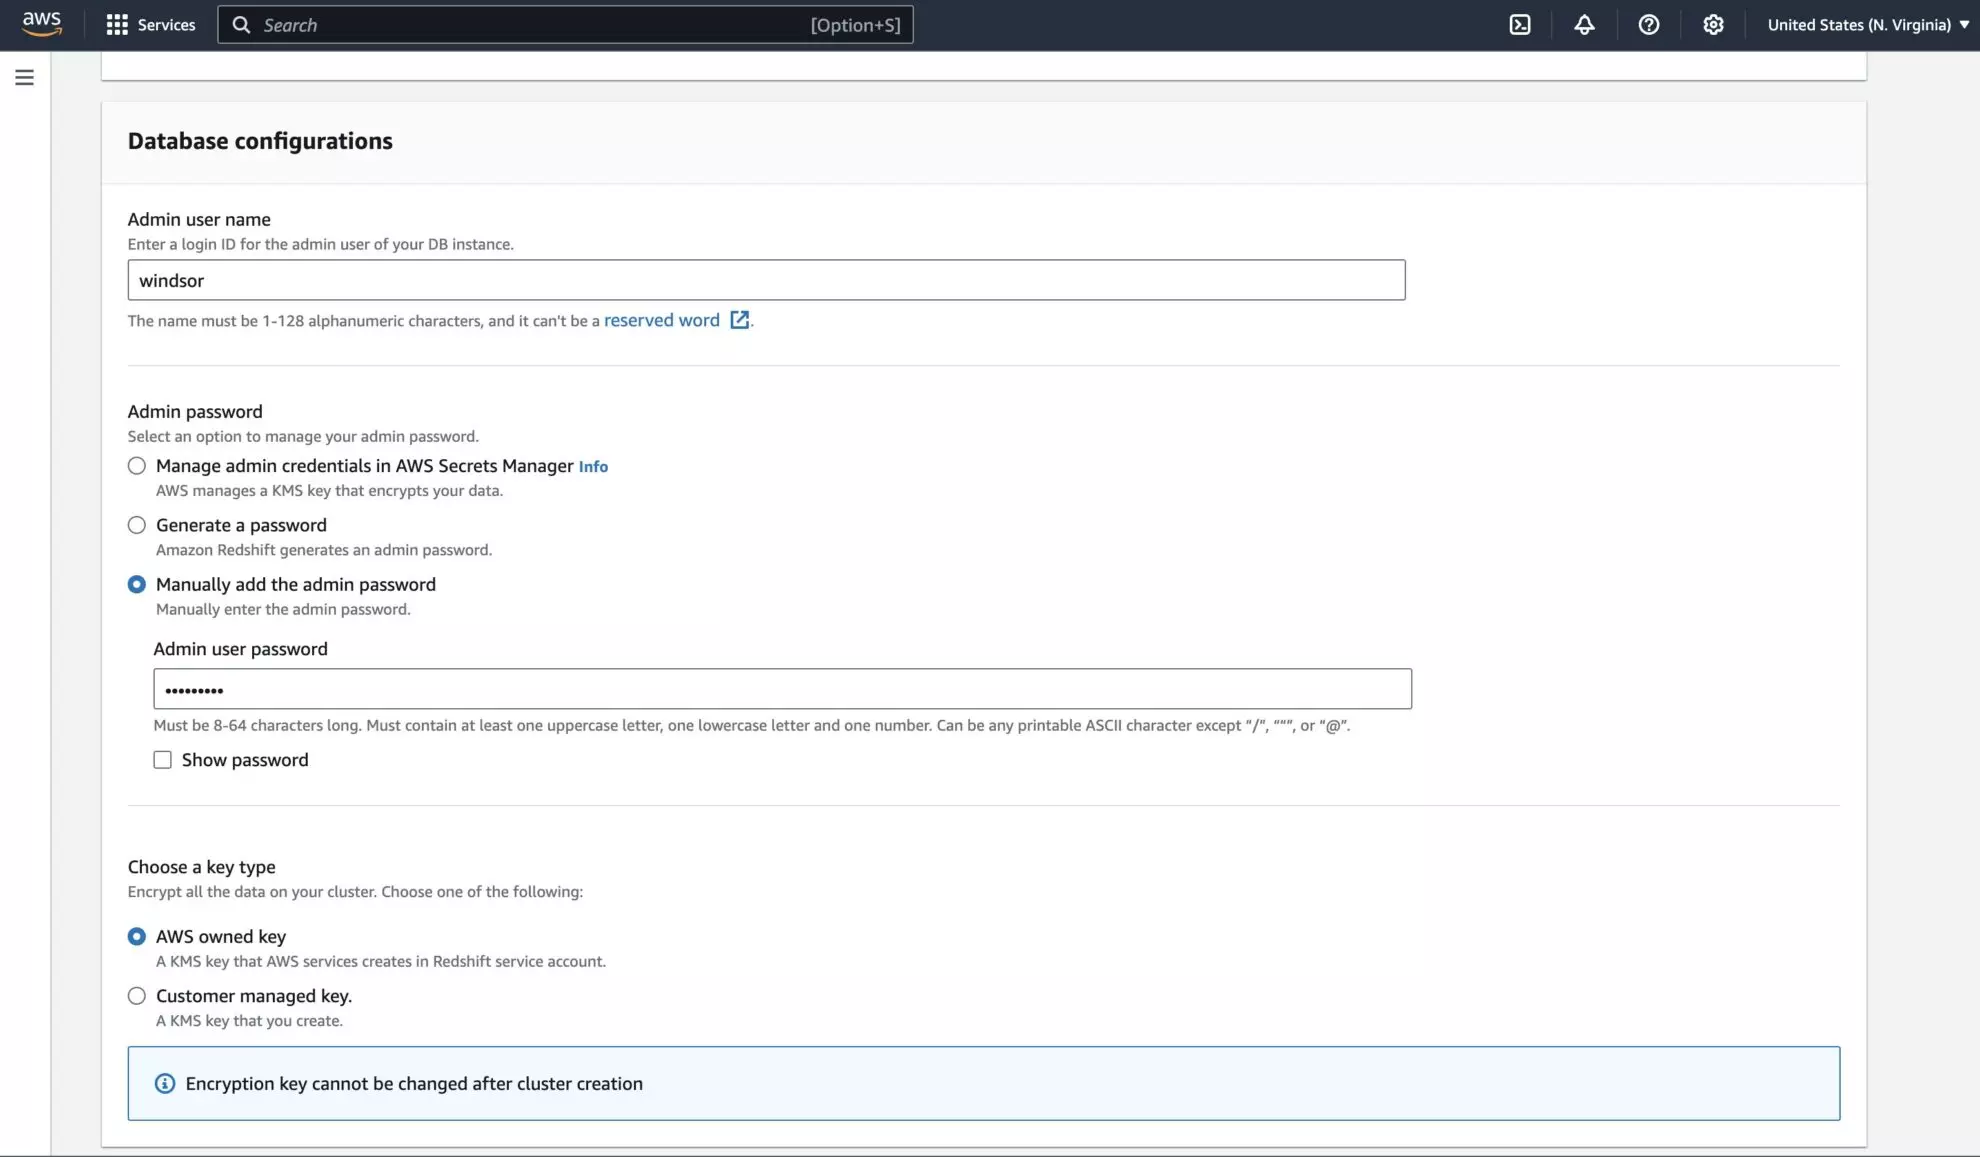
4. Now, in the database configuration section, enter the Admin Username (you can enter anything you wish). In the admin password section, select the “Manually add the admin password” option and enter the database’s Admin User Password. Copy this password, as you’ll need it to connect Windsor.ai with Redshift later.
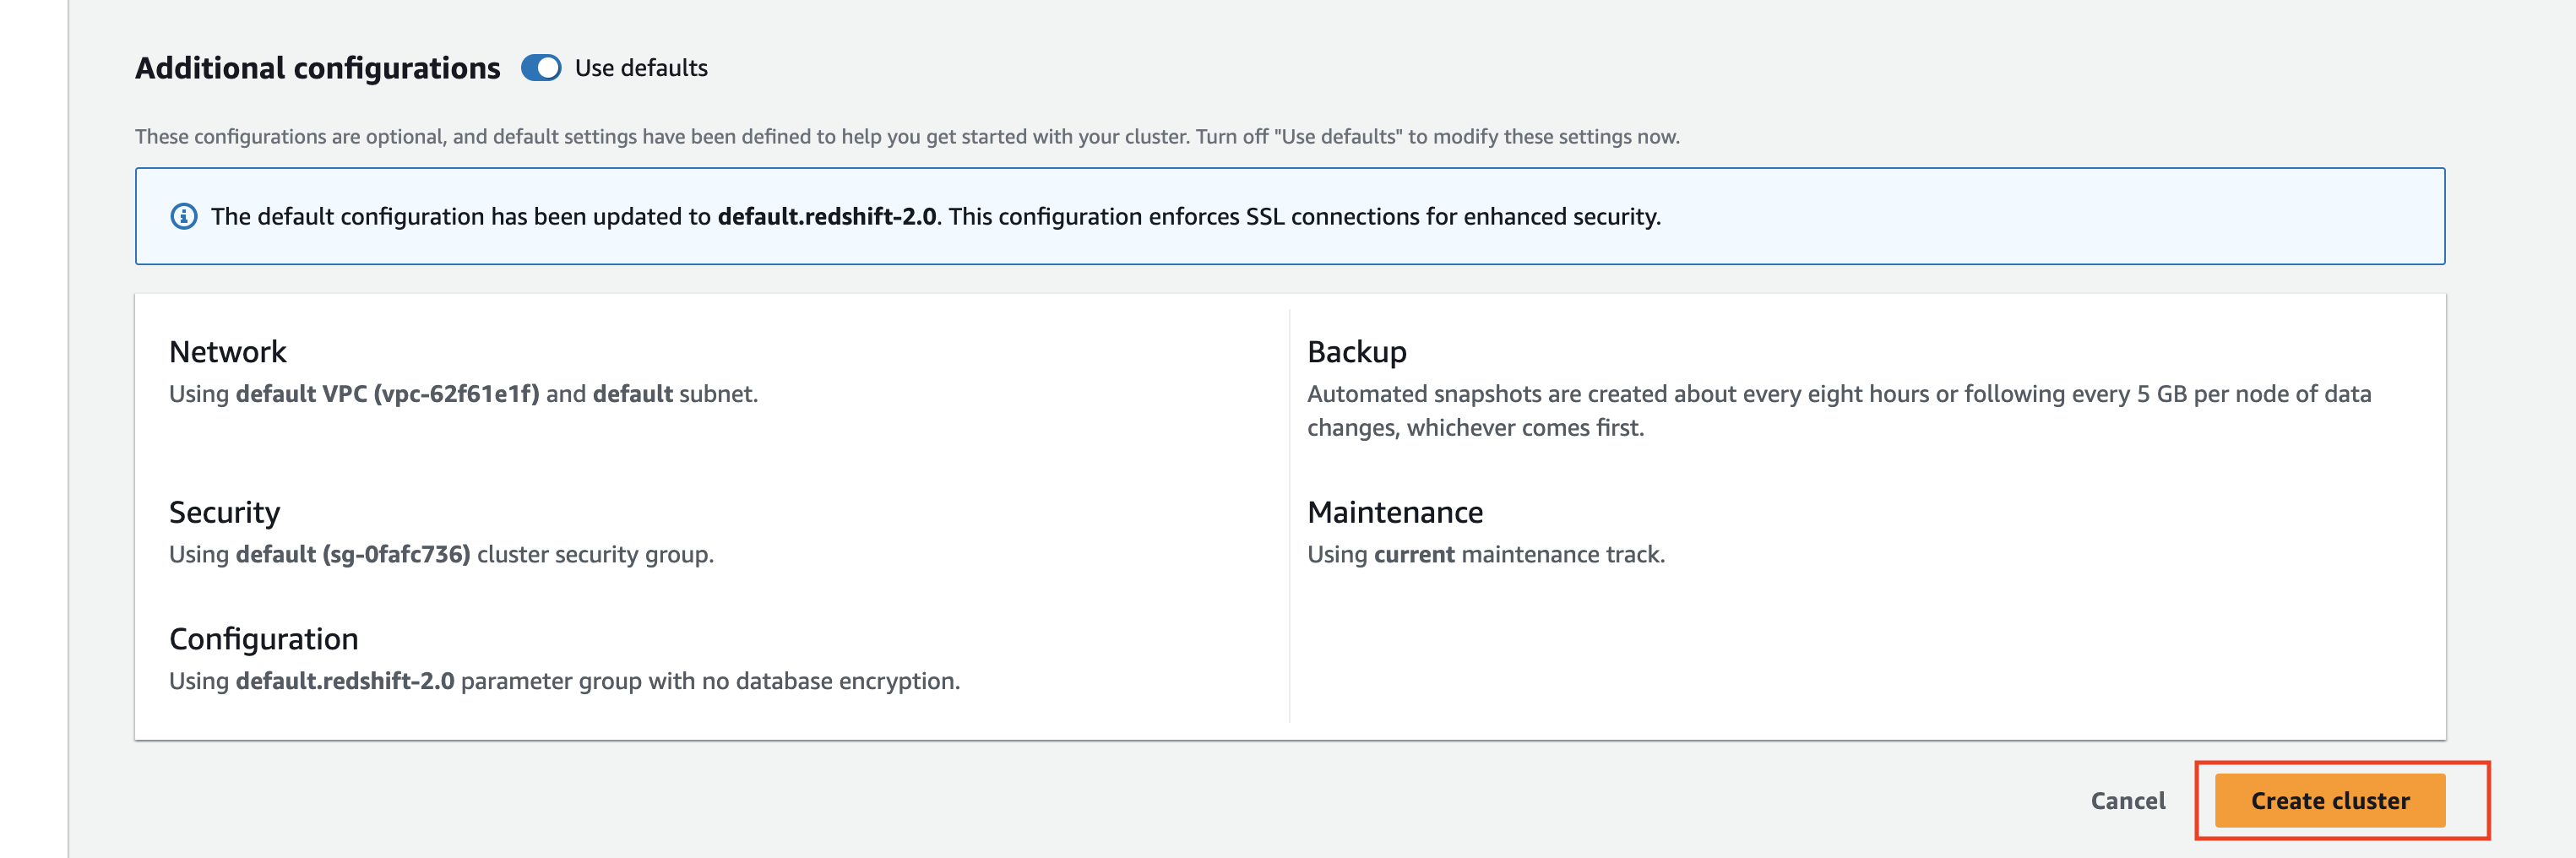
5. Scroll down to the bottom and click “Create Cluster.”
The Redshift cluster is created and running. Now, let’s set it up to connect with Windsor.ai.
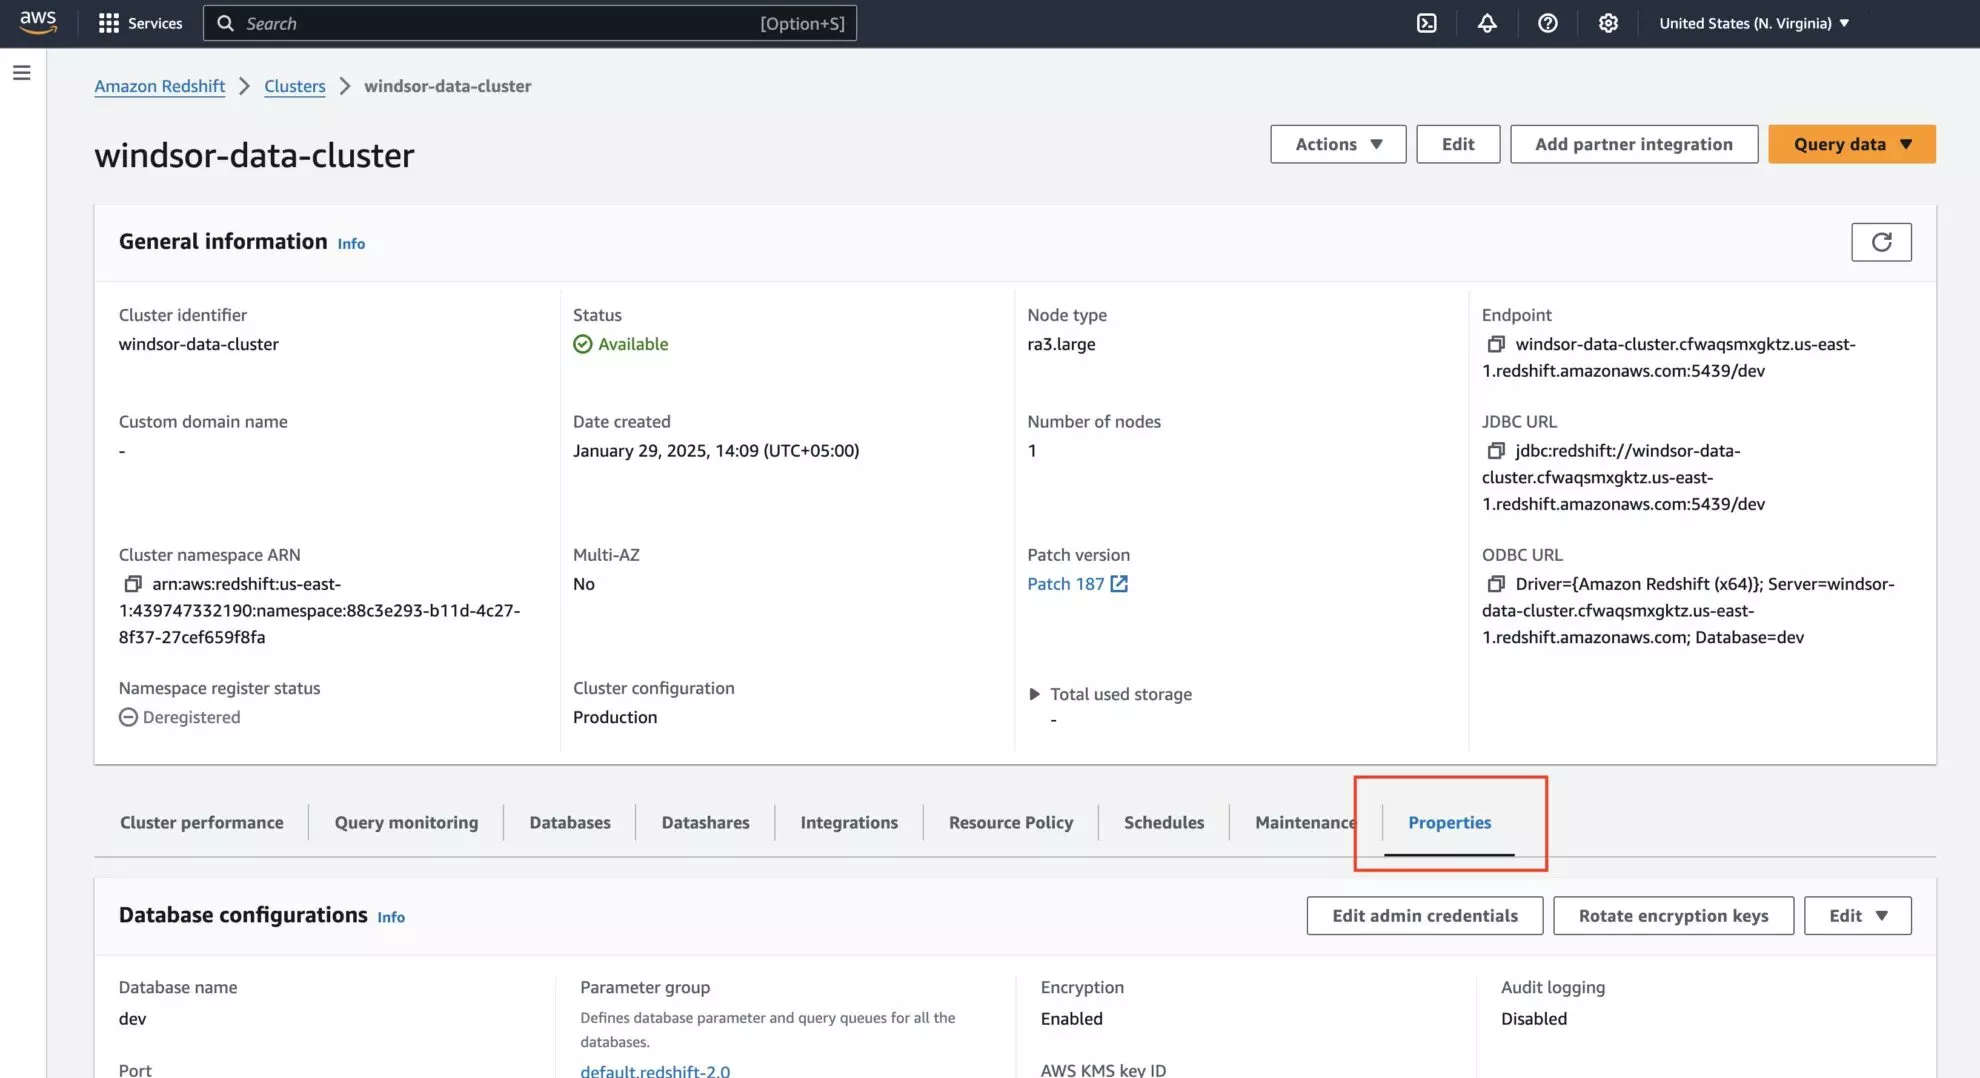
6. Go to your newly created cluster and select “Properties” from the tab menu.
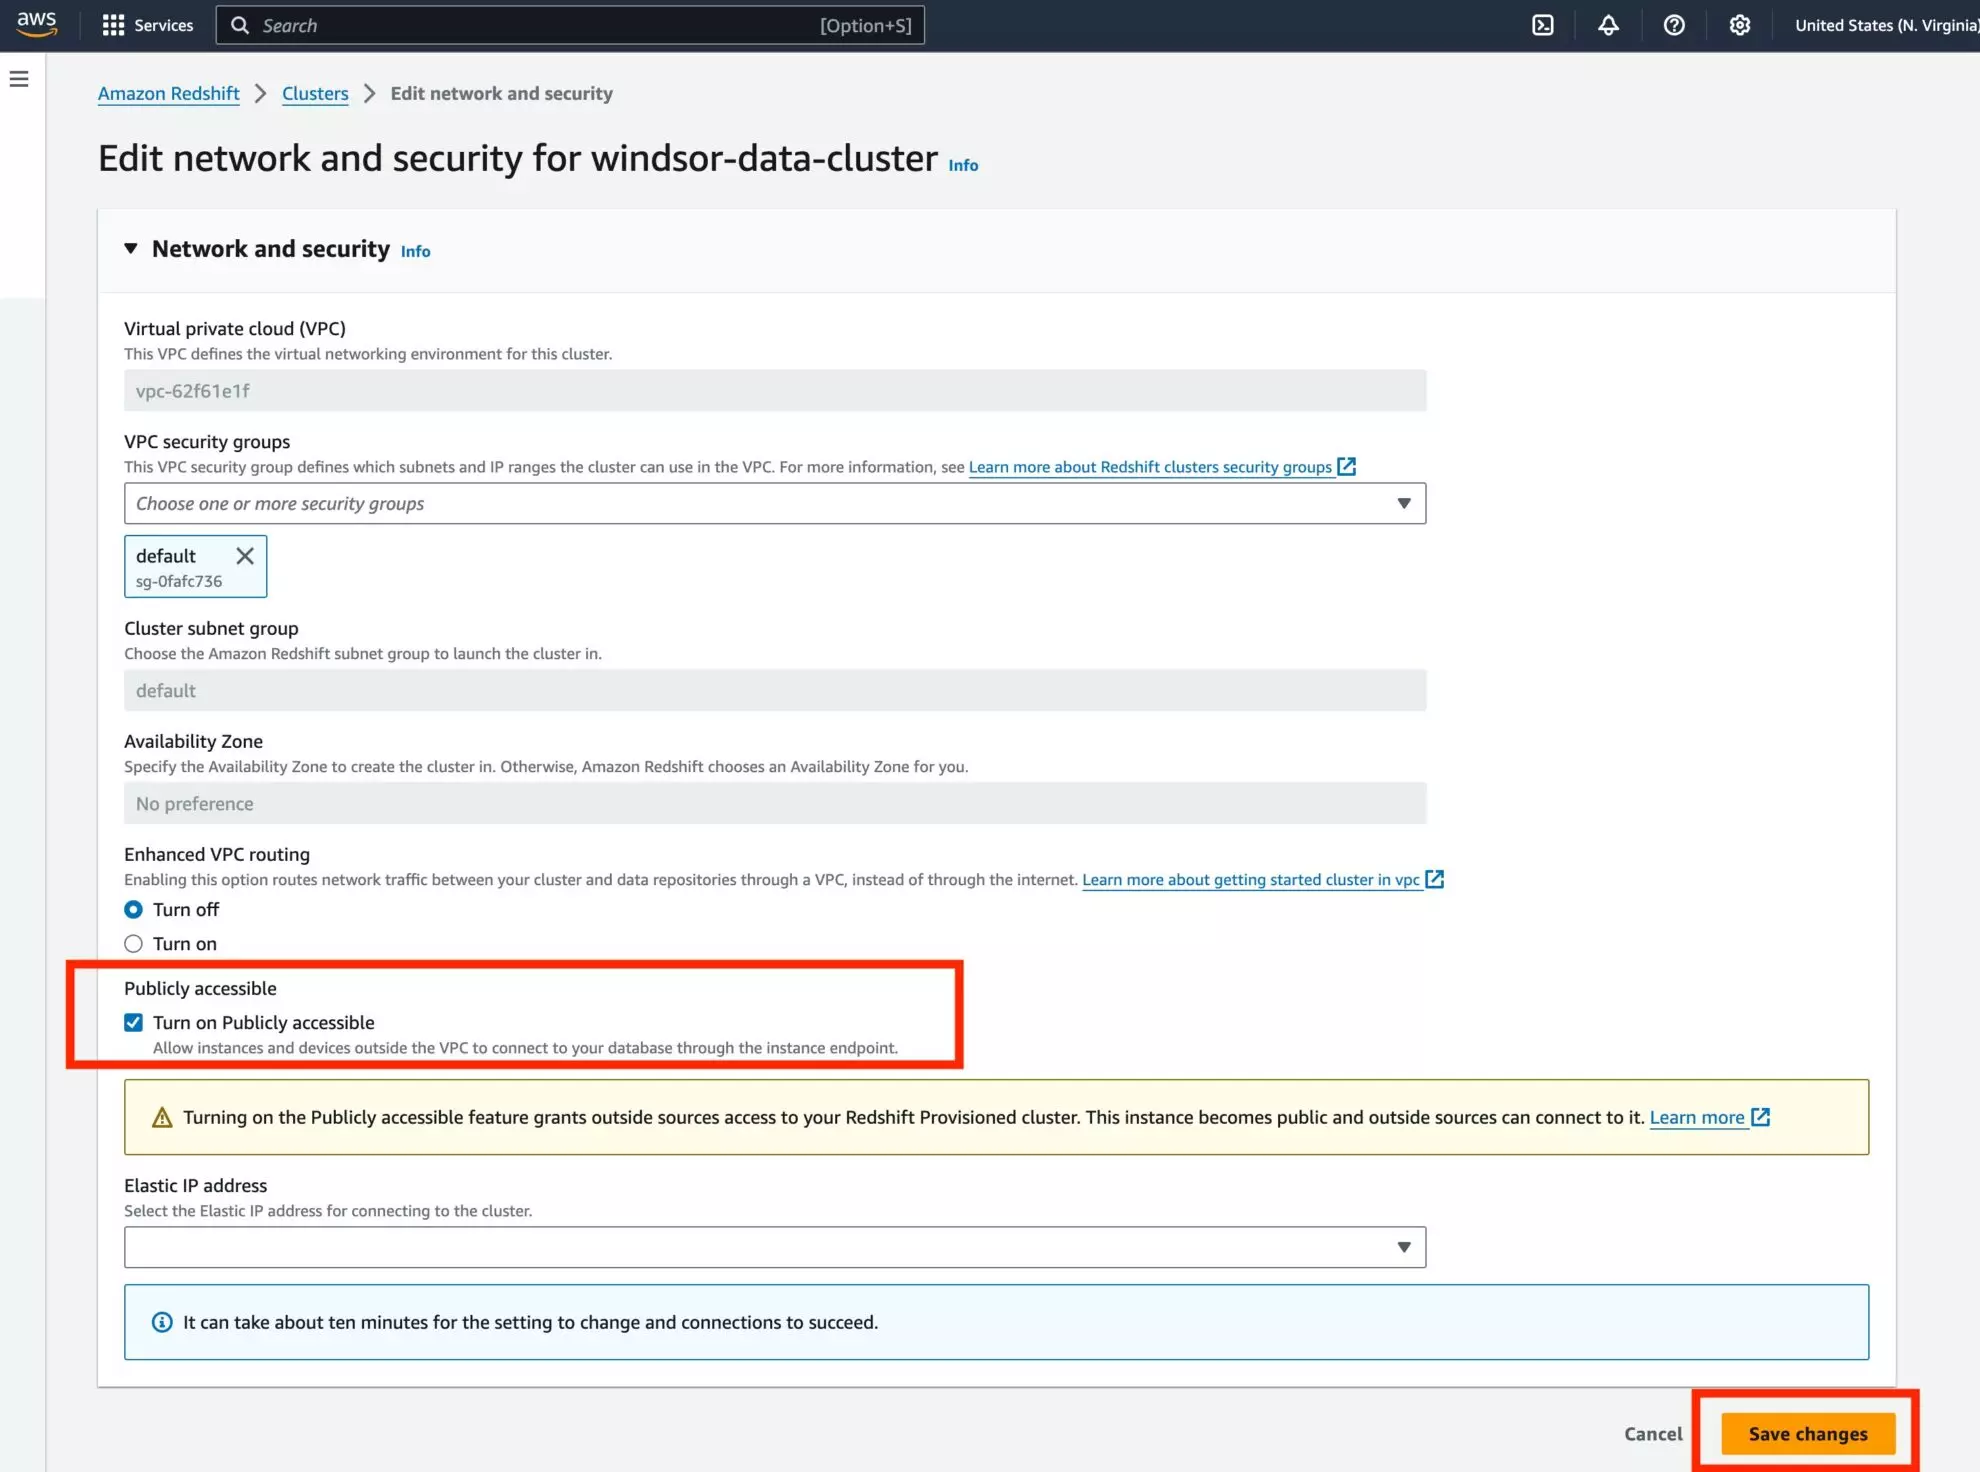
7. Scroll down to the Network and Security Settings and click “Edit.”

8. Tick the checkbox “Turn on Publicly Accessible” and click “Save Changes.” Wait for the cluster to be modified.
9. Add the Windsor.ai IP address to the clusters’ security group so that Windsor.ai can access this cluster database.
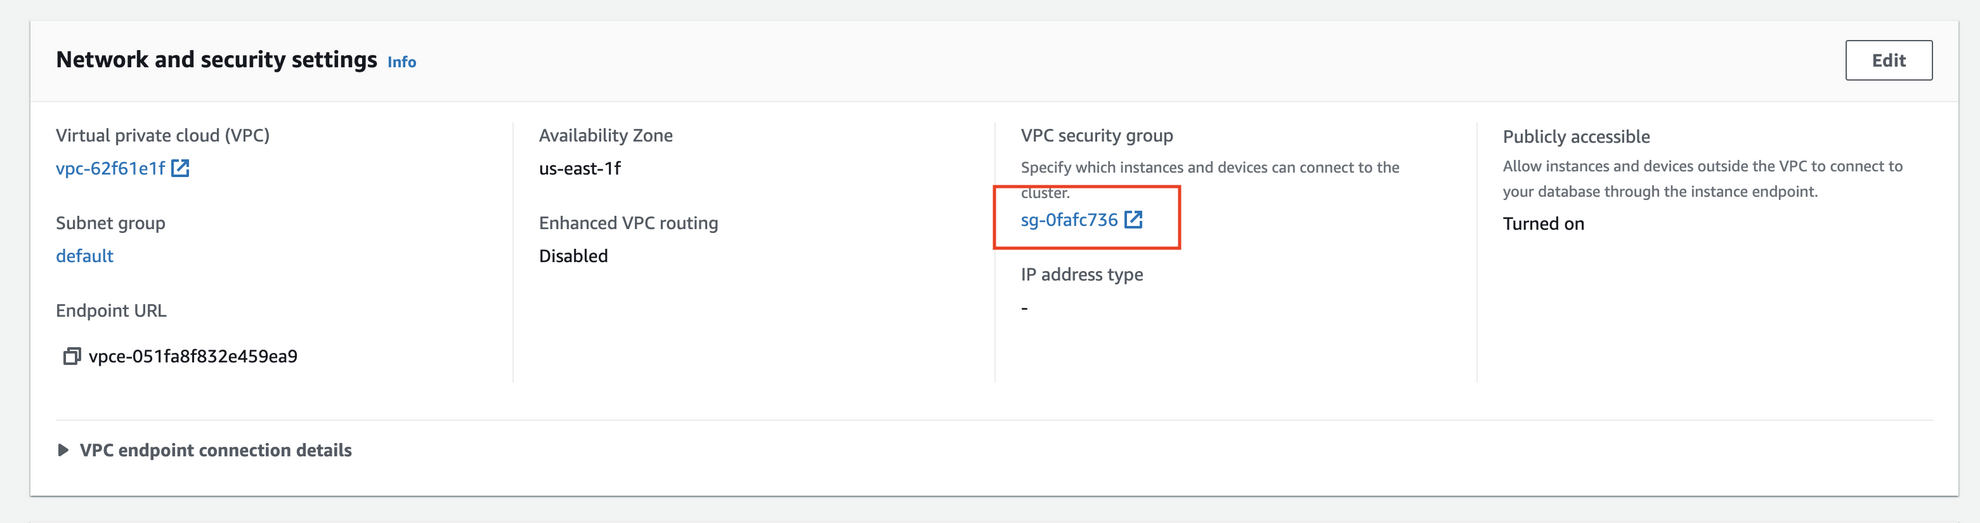
For this, go to the “Properties” tab on the cluster page and take the following steps:
- In the Network and Security Settings section, click “VPC Security Group Link.”
- Security Groups will open in a new tab. Your clicked security group will be listed on that page. Click on it.

- Click “Edit Inbound Rules.”

- Click “Add Rule.” Select All Traffic from the Type dropdown, and in the search icon field, paste the Windsor.ai IP address you’ve previously copied from the Windsor.ai platform. A dropdown menu will open the address in the CIDR Blocks section.

- Click “Save Rules.” Now, we have the security group updated, and the Windsor.ai IP address has been added.

At this stage, the Redshift cluster is set up, and its security settings are updated to receive data from the Windsor.ai platform.
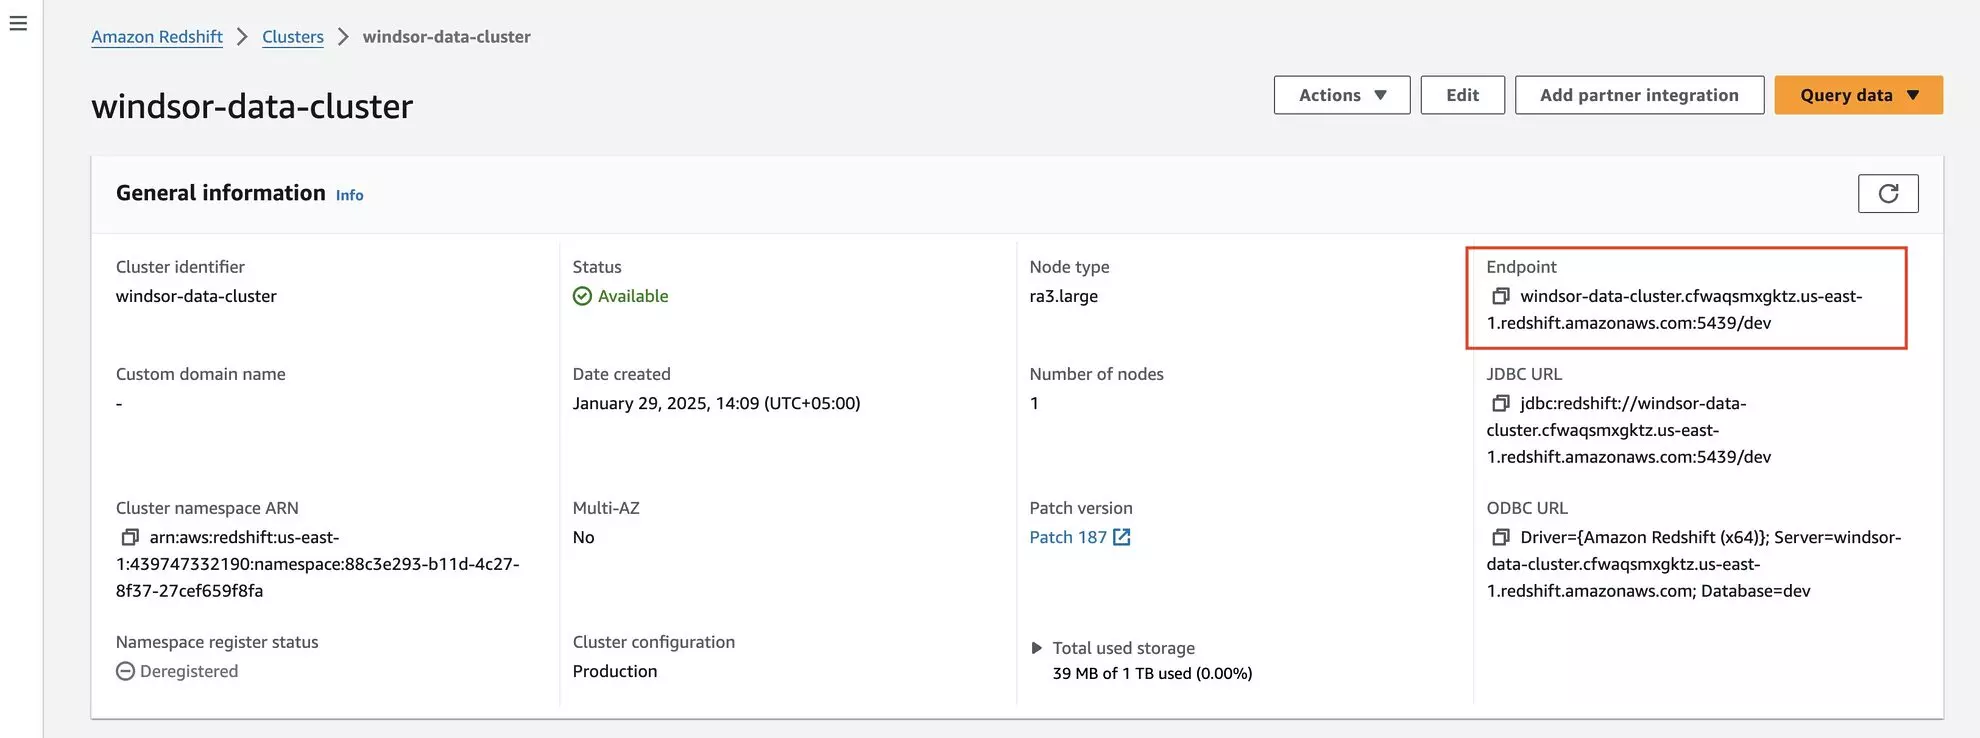
10. Get the required fields from the AWS console to create the connection between Redshift and Windsor.ai:
- Go to your Redshift cluster page and copy the Host. It is written in the general information section under the Endpoint heading. Copy the URL till “:” e.g, if your endpoint is “windsor-data-cluster.cfwaqsmxgktz.us-east-1.redshift.amazonaws.com:5439/dev,” your host will be “windsor-data-cluster.cfwaqsmxgktz.us-east-1.redshift.amazonaws.com.”
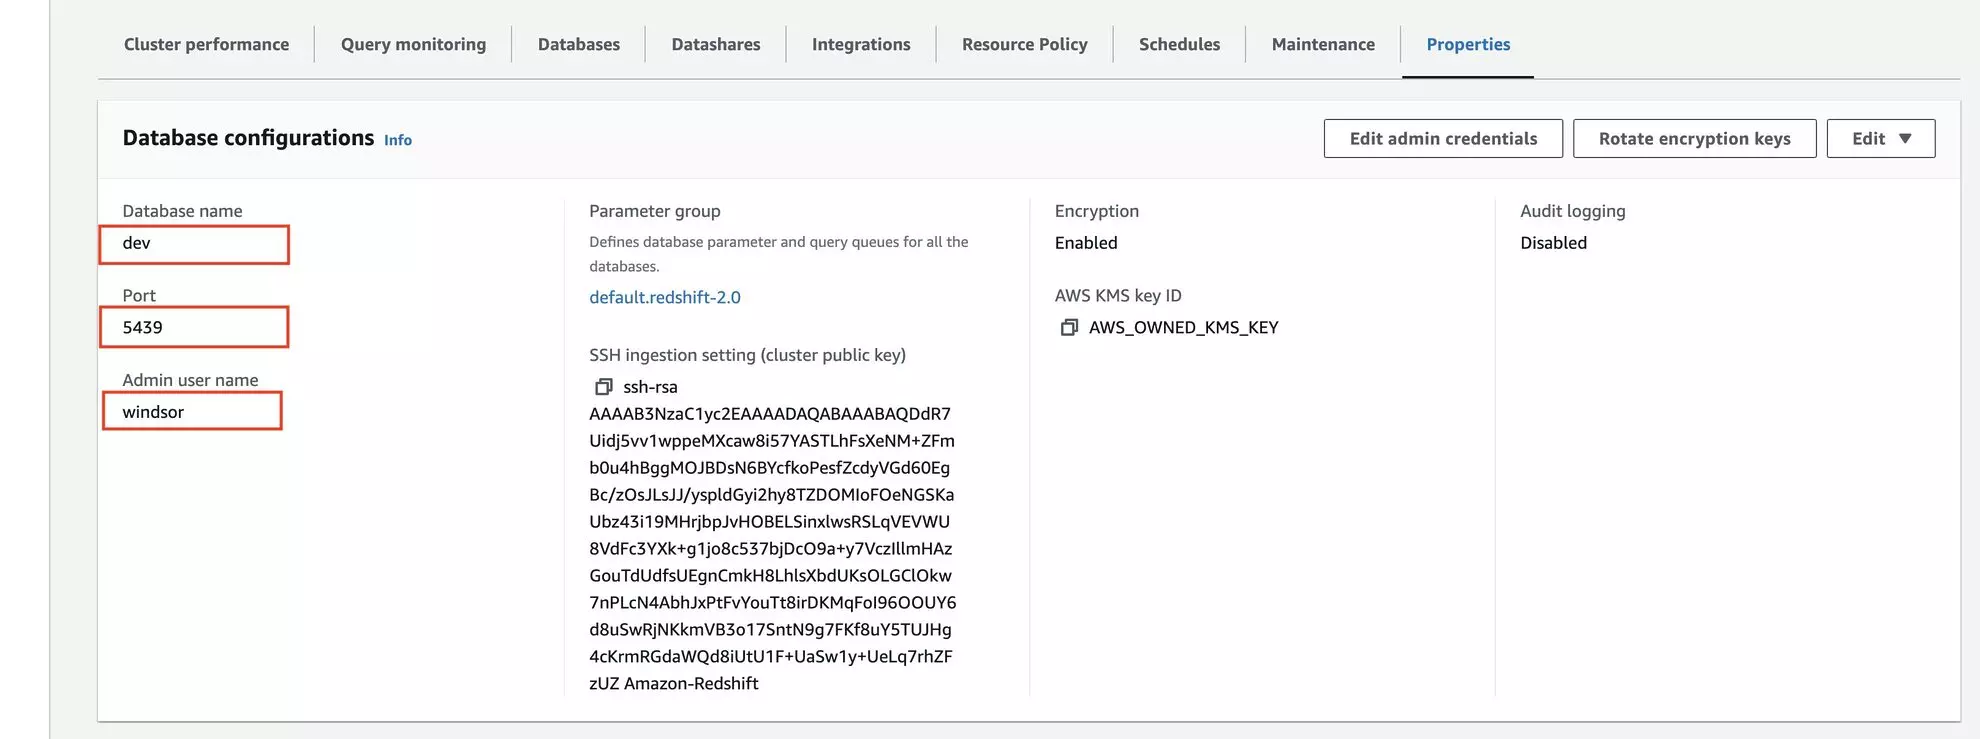
- Get the user, port, and database name. Go to the Redshift cluster page and select the Properties tab. For this, go to the Database Configurations section and copy the required credentials.
Here it is; you have set up the Amazon Redshift cluster on the AWS management console and gathered the required credentials.
Now, let’s import your data from Windsor.ai to this Redshift cluster database.
Sending Windsor.ai data to Amazon Redshift
1. Go back to your Windsor.ai’s destination task for Redshift.
Windsor.ai app -> Data preview -> Data destinations (Redshift) -> Add a destination task
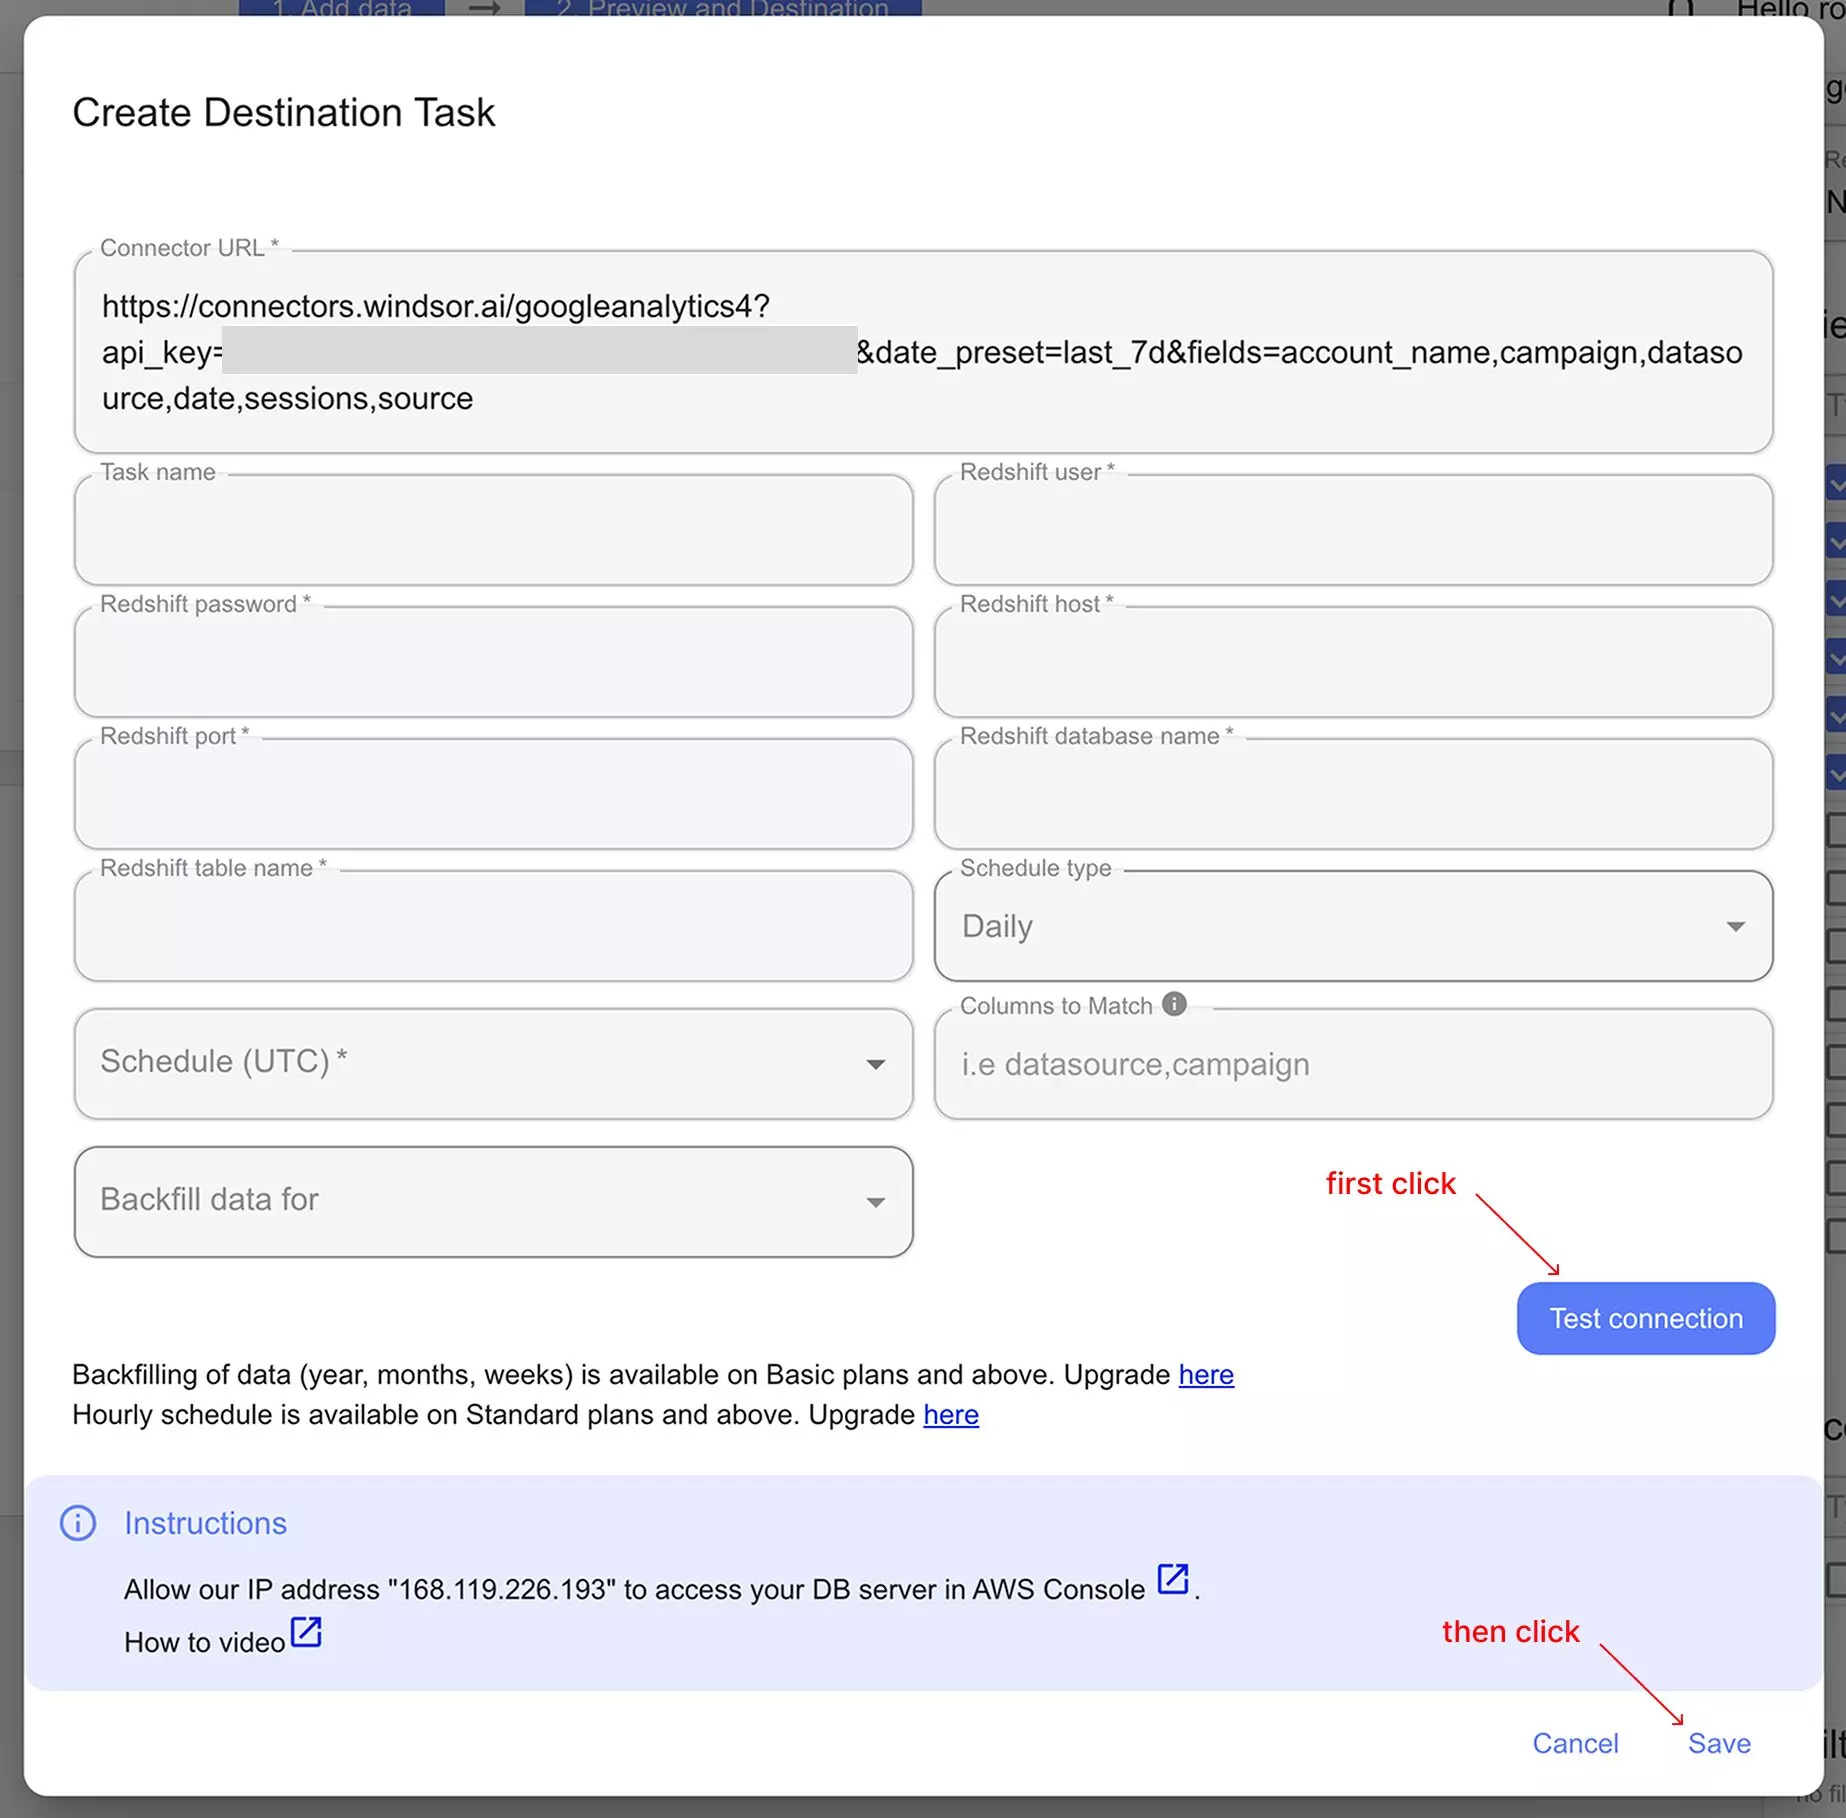
2. Enter all the required credentials in the destination task form:
- Task name (you can provide any, based on the data integration purpose).
- User, host, port, and database name that you got from the AWS console.
- The password you set while creating the Redshift cluster.
- Table name (you can provide any, based on the data integration purpose), or it will be created in your database automatically. If you already have a table for your Google Analytics data, you can enter that table name.
Click “Test Connection.”
You’ll see a success message at the bottom if the connection is set properly; otherwise, the error message will be displayed. When successful, click on “Save” in the lower right corner of the form. The data stream to Amazon Redshift has started.
3. You can now see the task running in the selected data destination section. The green ‘upload‘ button with the status ‘ok‘ indicates that the task is active and running successfully.

4. Verify that your data is being added to the Redshift cluster database.
Go to your cluster page and select Query Editor. Connect using your database username and password. You will see the new table in your cluster database and can preview the data by querying it.

Cheers! Your Google Analytics 4 data is now integrated into the Amazon Redshift and ready for in-depth analysis.
FAQs
What prerequisites are needed to set up Amazon Redshift?
To get started with this connector, you will need:
- An active AWS account.
- Access to the AWS management console.
- Basic knowledge of Redshift clusters and security groups.
- An active Windsor.ai account.
Can I schedule automated reports from Windsor.ai to Amazon Redshift?
Yes, while connecting Windsor.ai to Amazon Redshift, you can schedule automated data streams by specifying the schedule type and time.
What credentials are needed to connect Amazon Redshift with Windsor.ai?
You need to provide the information about the Redshift cluster admin user, host, password, and database name.
What should I do if the connection test between Windsor.ai and Amazon Redshift fails?
Make sure you have the following things in place:
- Correct credentials are provided, and the host is accurate.
- The Redshift cluster is up and running.
- Windsor.ai IP address is added to the security group of your Redshift cluster.
- Ensure public access is enabled in Redshift clusters’s security settings.
Can I visualize Windsor.ai data directly from Redshift?
Yes, after data is imported, you can connect BI tools like Tableau, Looker, Power BI, or Sigma Computing to your Redshift cluster for data visualization.
Can I connect multiple Redshift clusters to Windsor.ai?
Yes, Windsor.ai allows you to connect multiple Redshift clusters by configuring separate data destination tasks. Each cluster must have its own endpoint, security settings, and credentials.
How much data can I transfer to Redshift via Windsor.ai?
Windsor.ai supports large-scale data ingestion; however, performance depends on your Redshift cluster size, storage type, and concurrency settings. To optimize performance, consider using compression and partitioning.
How can I ensure data security when using Windsor.ai?
Windsor.ai uses secure OAuth authentication and encrypted data transfer protocols. Ensure your AWS roles and privileges are configured to limit access to sensitive data.
Is it possible to integrate additional data sources with Amazon Redshift via Windsor.ai?
Yes, Windsor.ai supports over 315 data sources, including Facebook Ads, Google Analytics, Salesforce, and other popular platforms. You can connect any data source to Amazon Redshift by following a similar procedure.
Tired of manually transferring data to Amazon Redshift? Try Windsor.ai today to automate the process

