 AI insights
 About us
 Careers
 Security
 Customer reviews
 Contact us
 Affiliate program
 Solution partners
 Looker Studio templates
 Tableau templates
 Facebook Ads templates
 Google Ads templates
 Data fields & Metrics
 AI prompt library & Guides
 Product documentation
 API documentation
 Case studies
 Blog
Blog Data models
 Windsor vs Supermetrics
 Windsor vs Fivetran
 Windsor vs Portermetrics
How to integrate data into Azure Blob Storage with Windsor.ai
What is Azure Blog Storage?
Azure Blob Storage is a cloud-based solution designed to store large amounts of unstructured data. The platform provides organizations with a cost-effective and reliable way to store and manage data like documents, images, videos, and backups.
Unlike traditional on-premise solutions, Azure Blob Storage operates entirely in the cloud, offering tiered storage options to optimize performance and cost. The service can be used for a wide range of use cases, including data archiving, big data analytics, and disaster recovery, and it can be connected to other Azure services.
By integrating Azure Blob Storage with the Windsor.ai data movement platform, you can:
- Centralize marketing, sales, and CRM data (e.g., Facebook Ads, Google Ads, Google Analytics, Salesforce) in a secure and scalable storage solution.
- Store and manage raw or processed data from various sources for further analysis or visualization.
- Enable seamless cross-channel data storage and analytics for better decision-making and business insights.
Explore our step-by-step guide to automatically integrate your data into Azure Blog Storage with the Windsor.ai no-code ELT connector.
How to connect Azure Blob Storage to Windsor.ai
Connecting data in Windsor.ai
1. Create a Windsor.ai account and log in.
2. Select the data source which you want to stream data from, e.g., Google Analytics 4 (GA4). Sign in with your associated Google account and select the next step, “Data preview.”
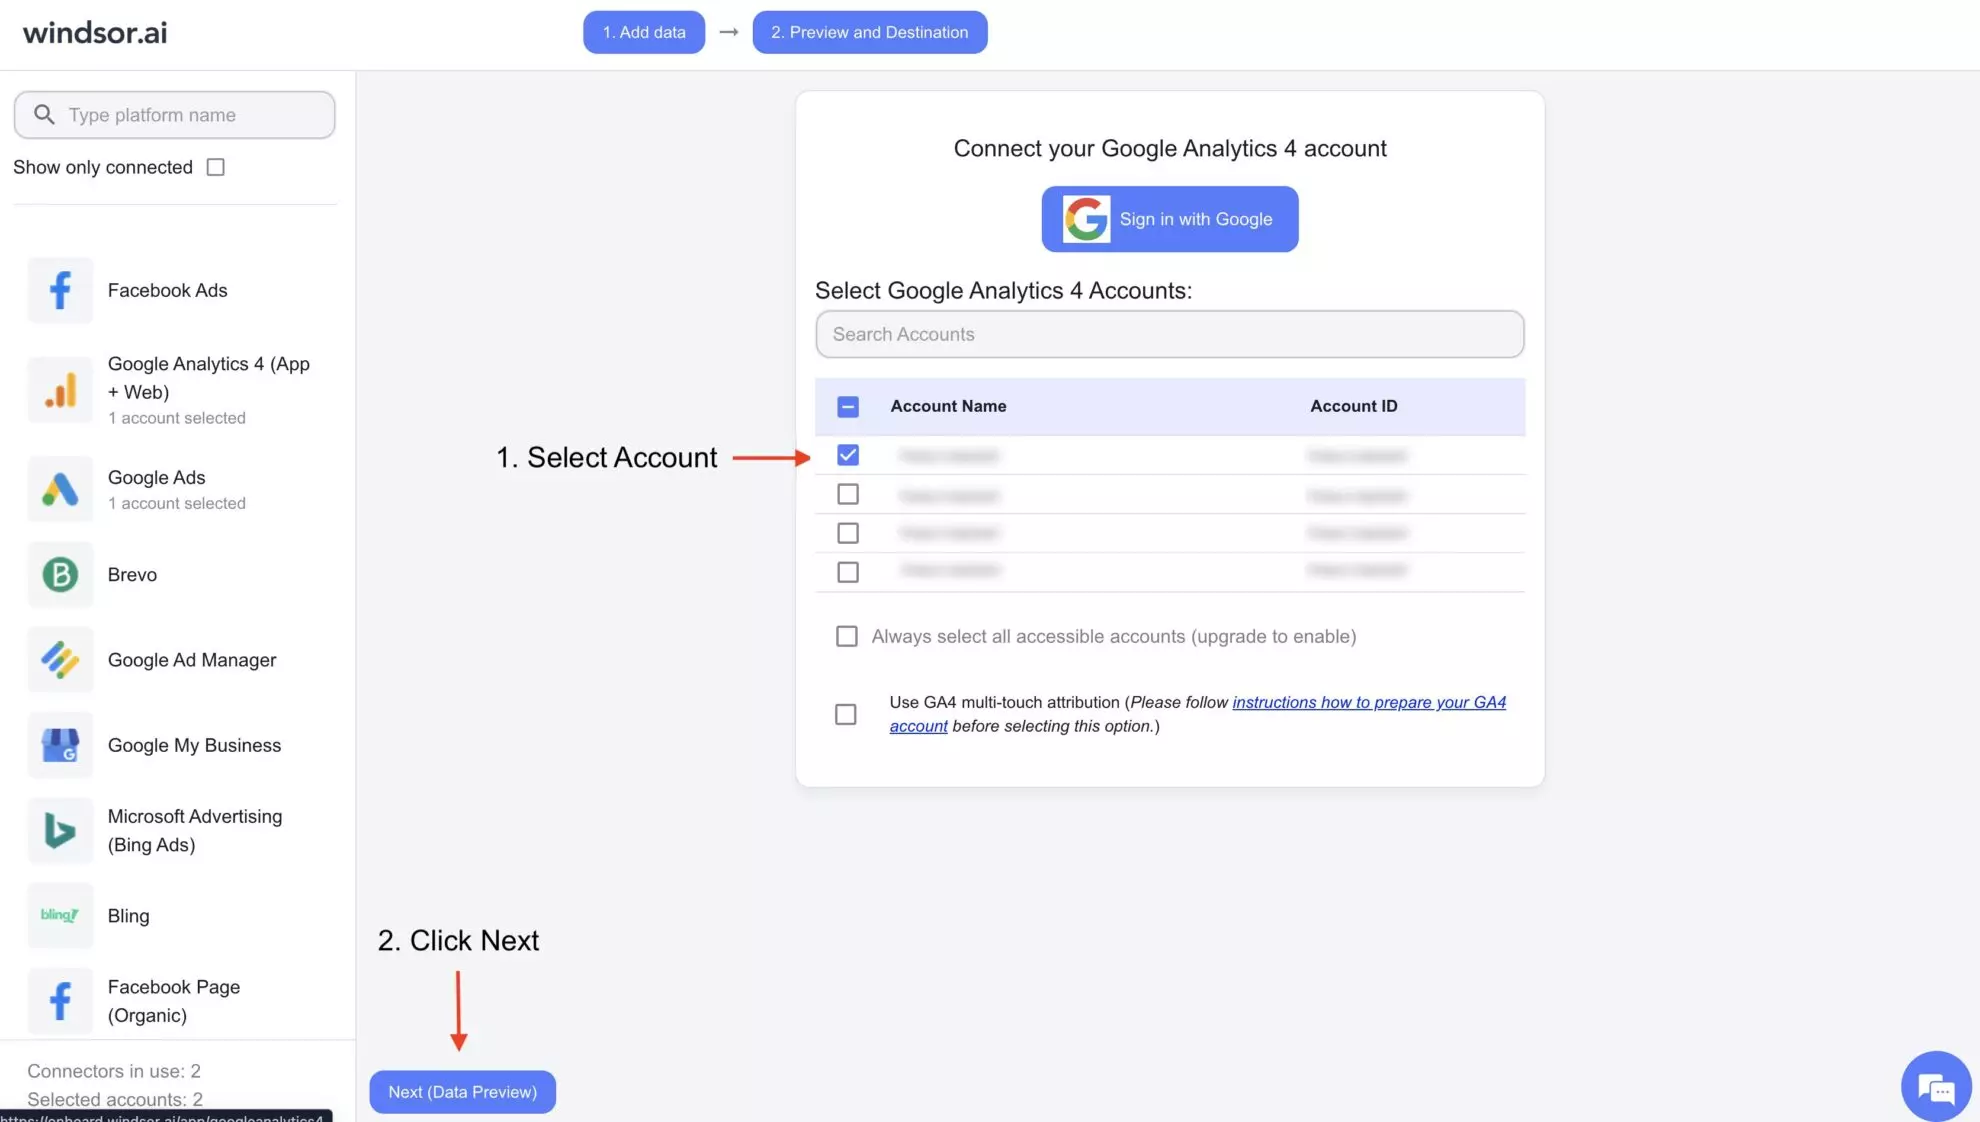
3. You’ll see your Google Analytics 4 data displayed in your Windsor.ai account.
Now, let’s proceed with setting up Azure Blob Storage for data integration.
Configure Azure Blob Storage as the destination for your data
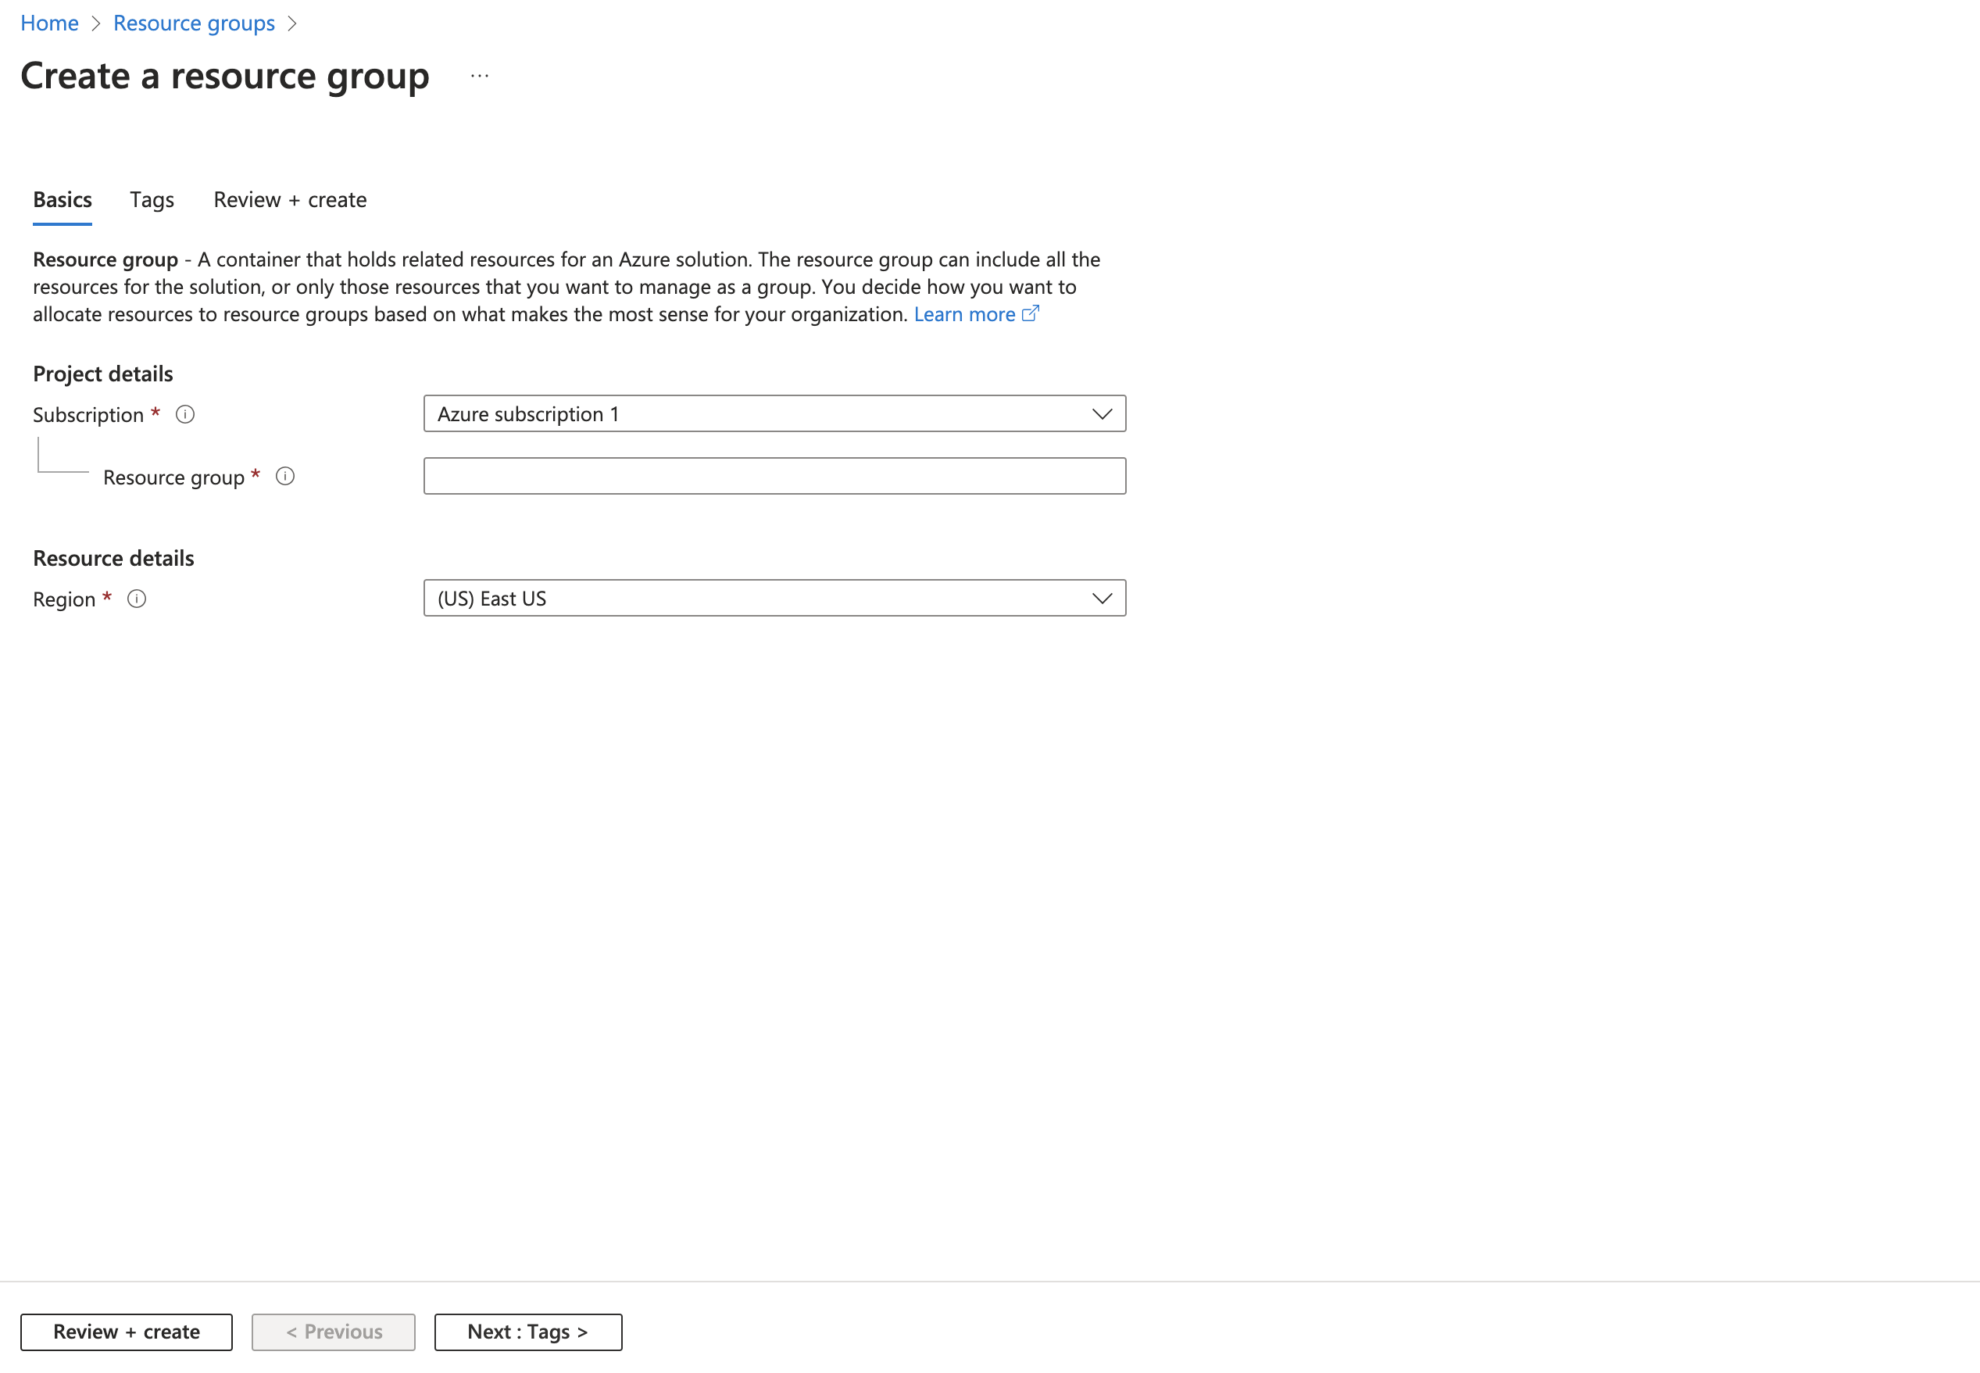
1. First of all, make sure you have an active Azure subscription. Go to Azure Portal and create a resource group. Select your Azure subscription and region, and enter the name of the resource group (anything you wish).
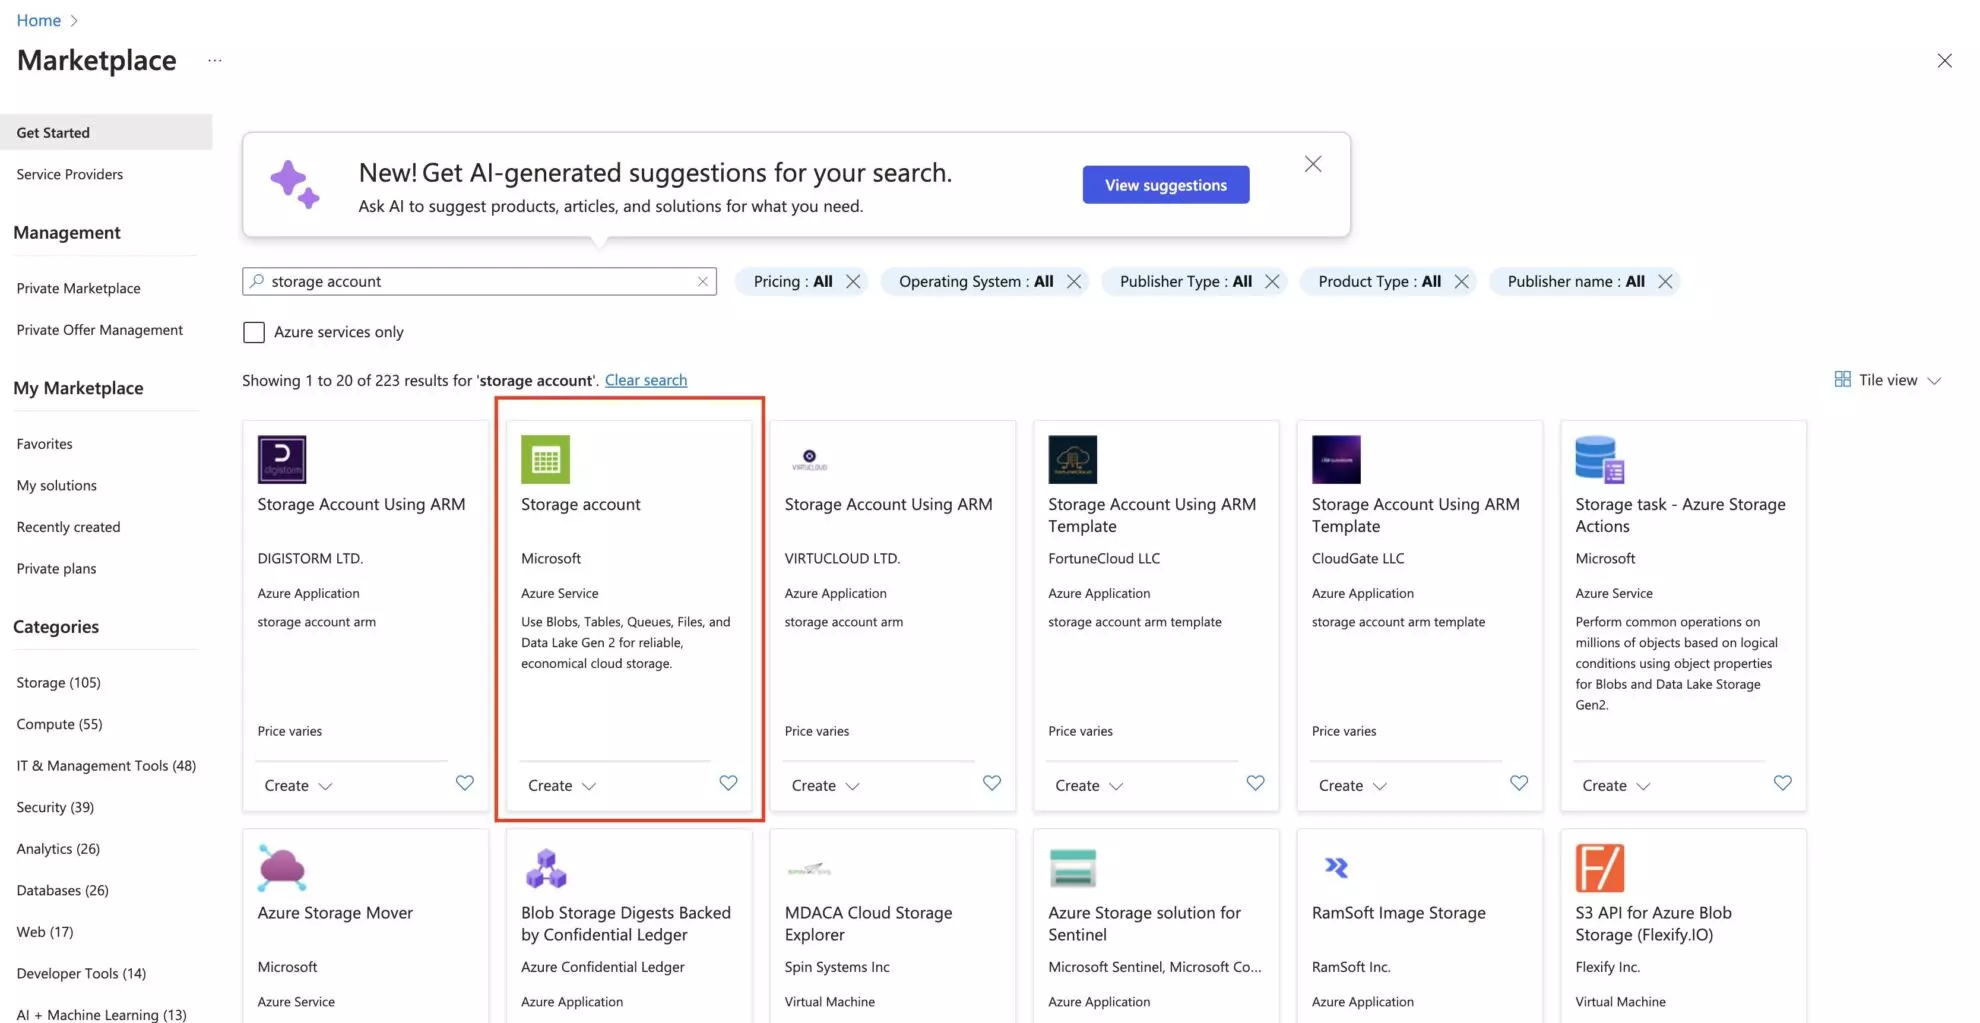
2. Set up a storage account in that resource group. For this, go to the newly created resource group and click “Create.” Search “Storage account” and select Azure service storage account.
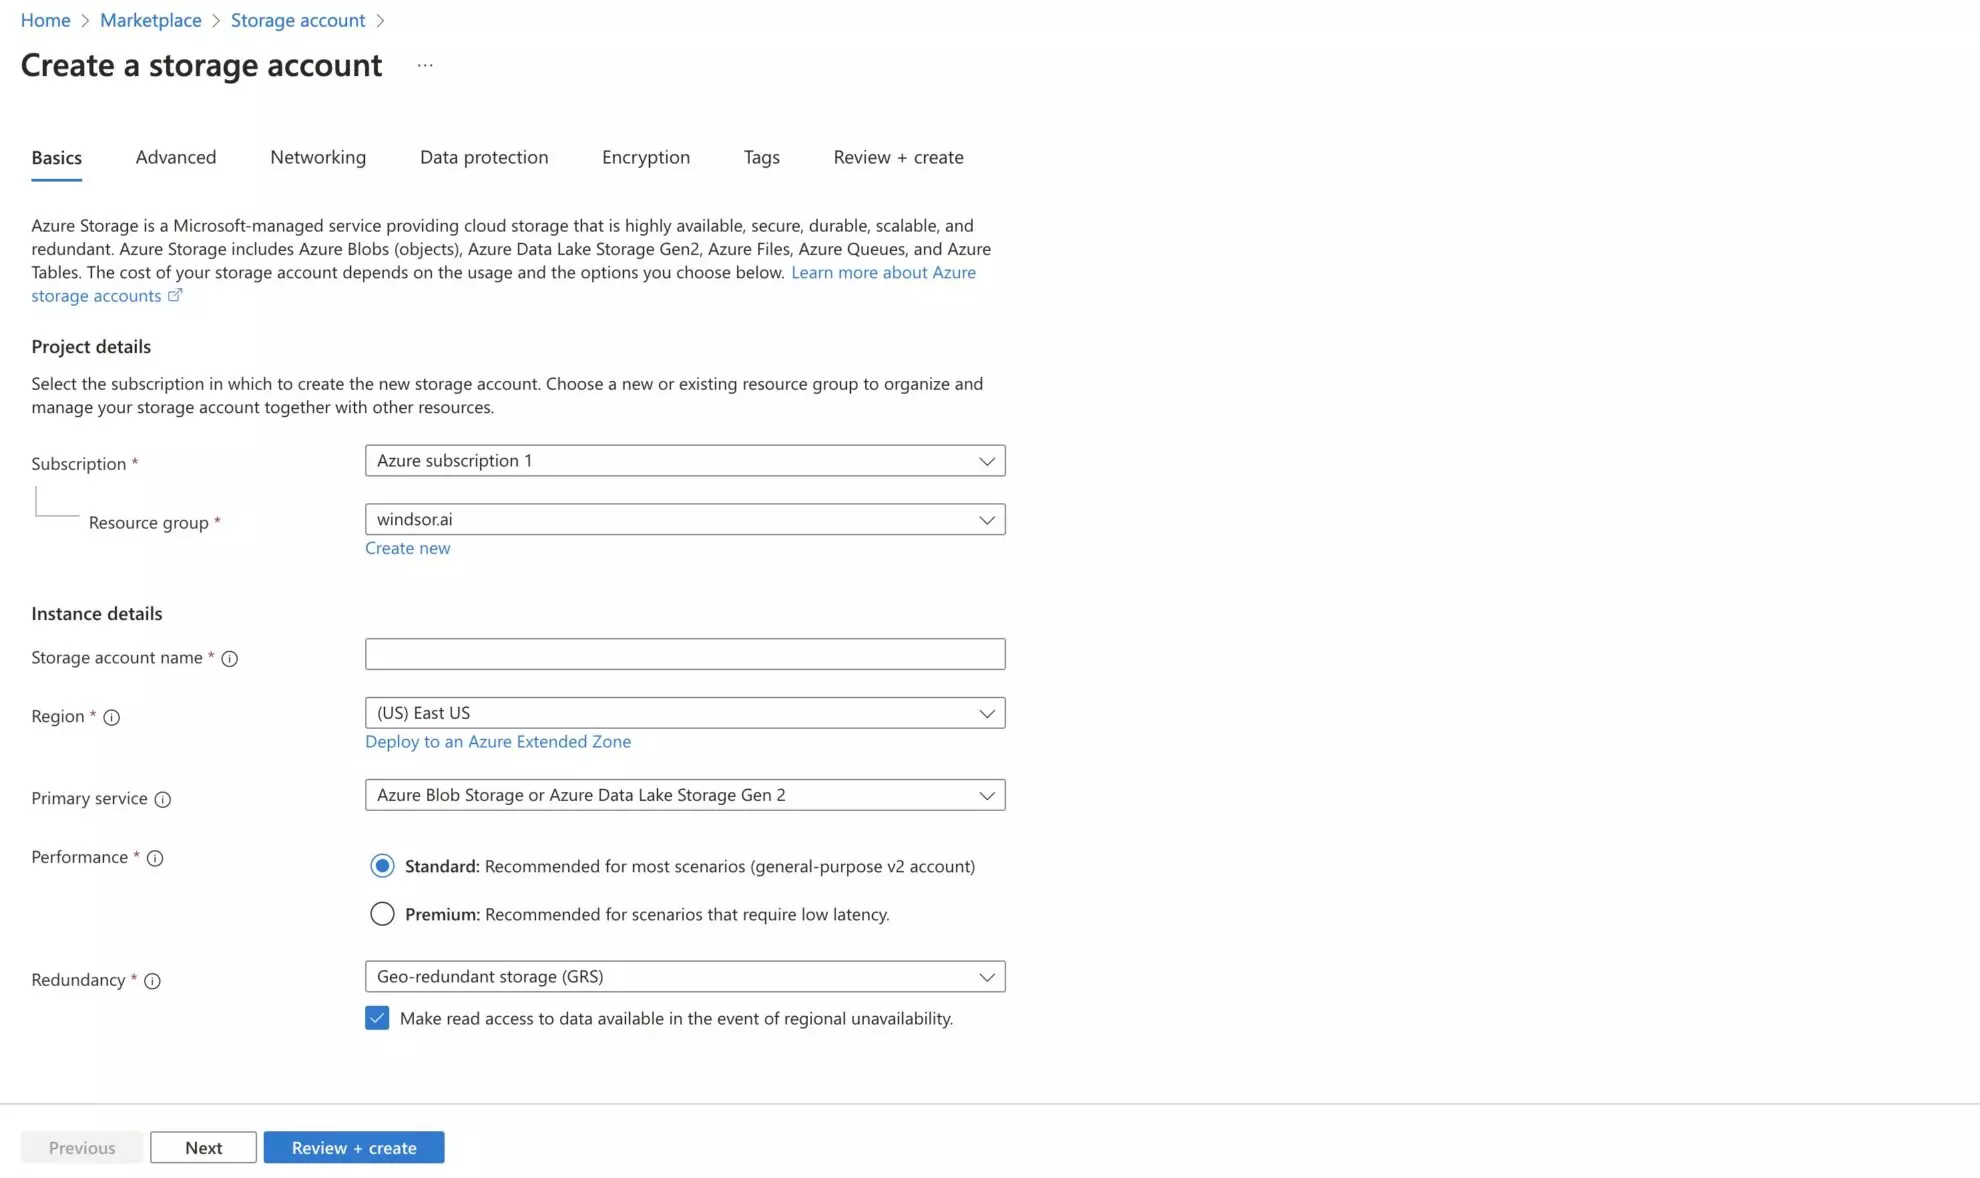
3. Enter the storage account name, choose your preferred region, and select Azure Blob Storage as the primary service. Then, click on “Review + create.”
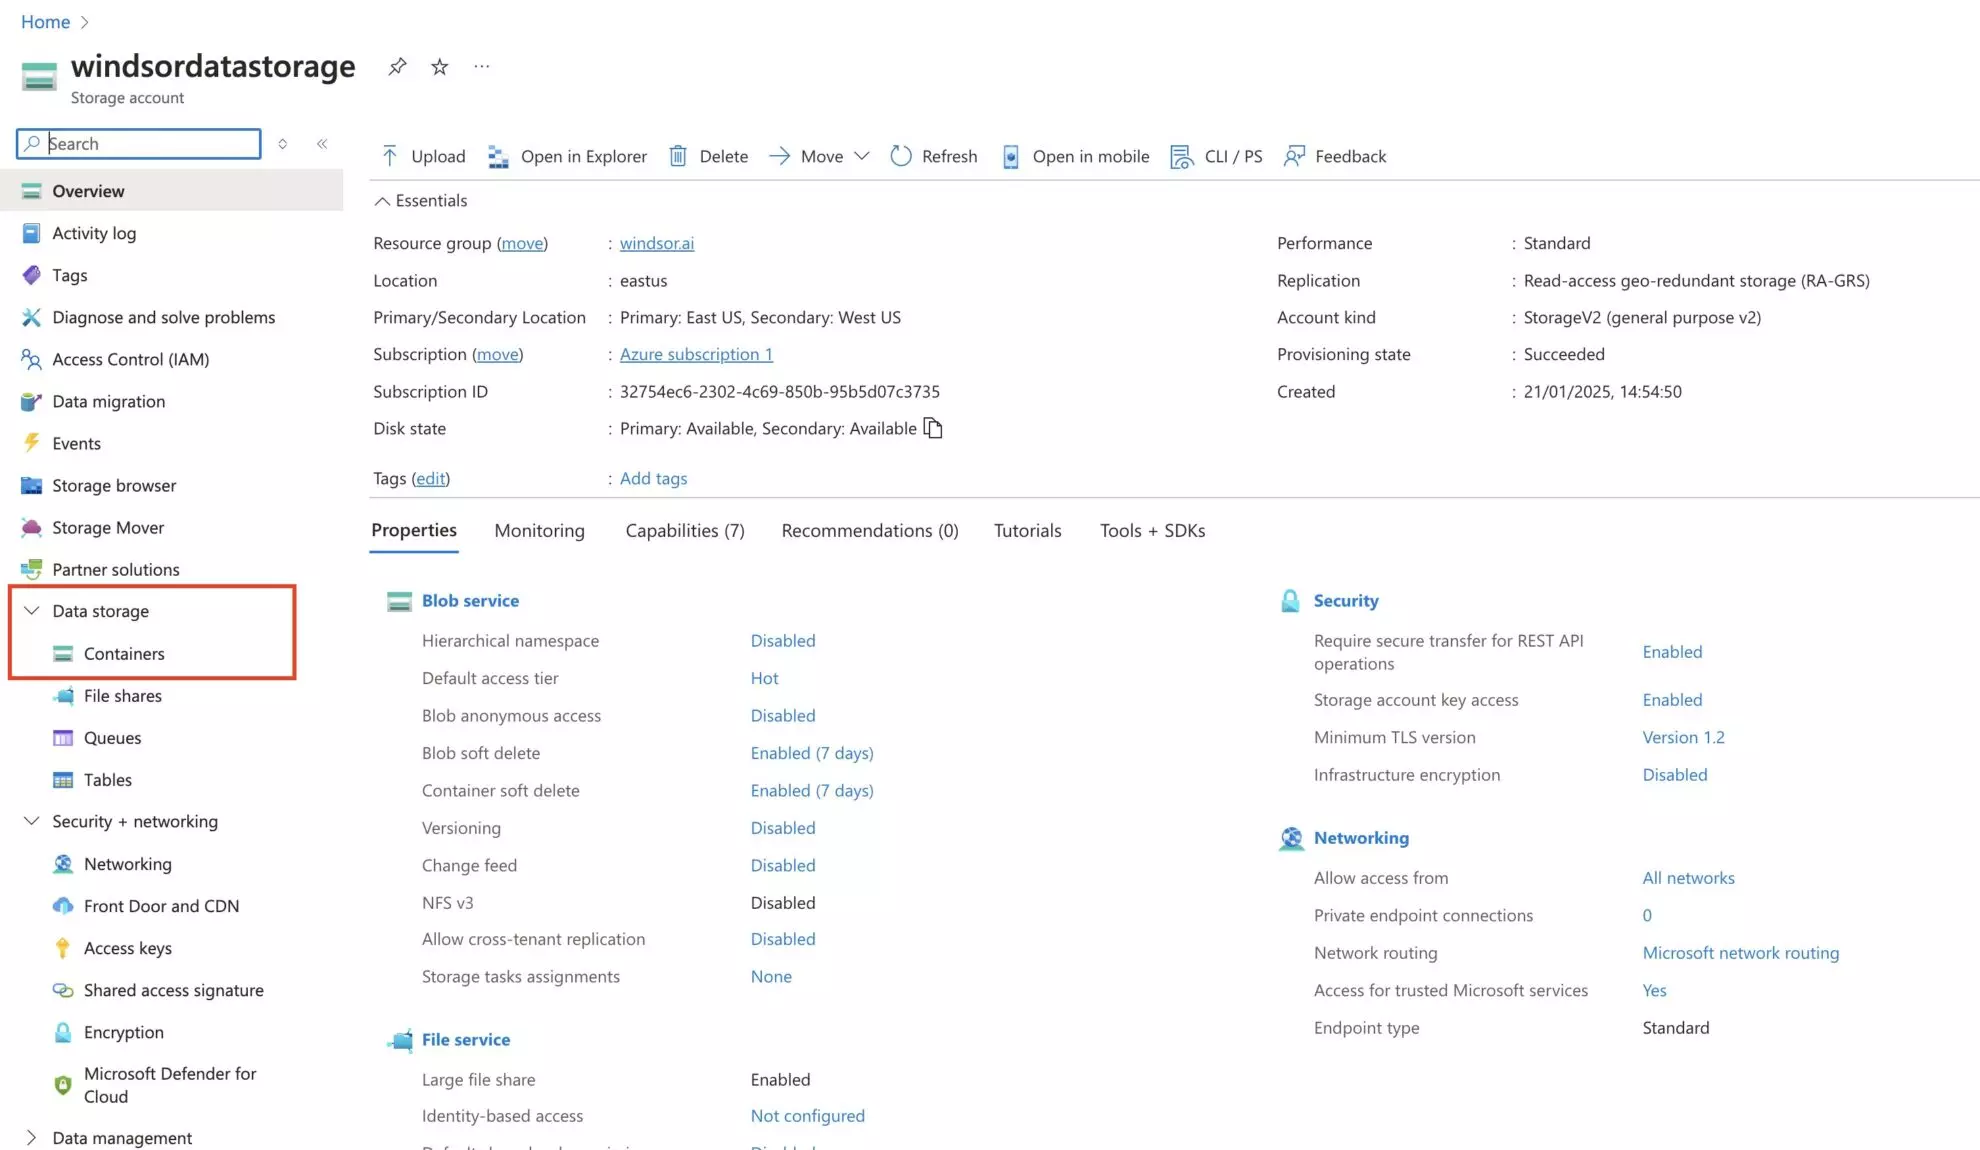
4. Create a container inside the newly created storage account. Go to your storage account and in the sidebar, open the data storage dropdown menu. Select Containers and click + container.
5. Enter a name for your container and click “Create.”

6. Get the required fields from the Azure portal to create the connection between Azure Blob Storage and Windsor.ai:
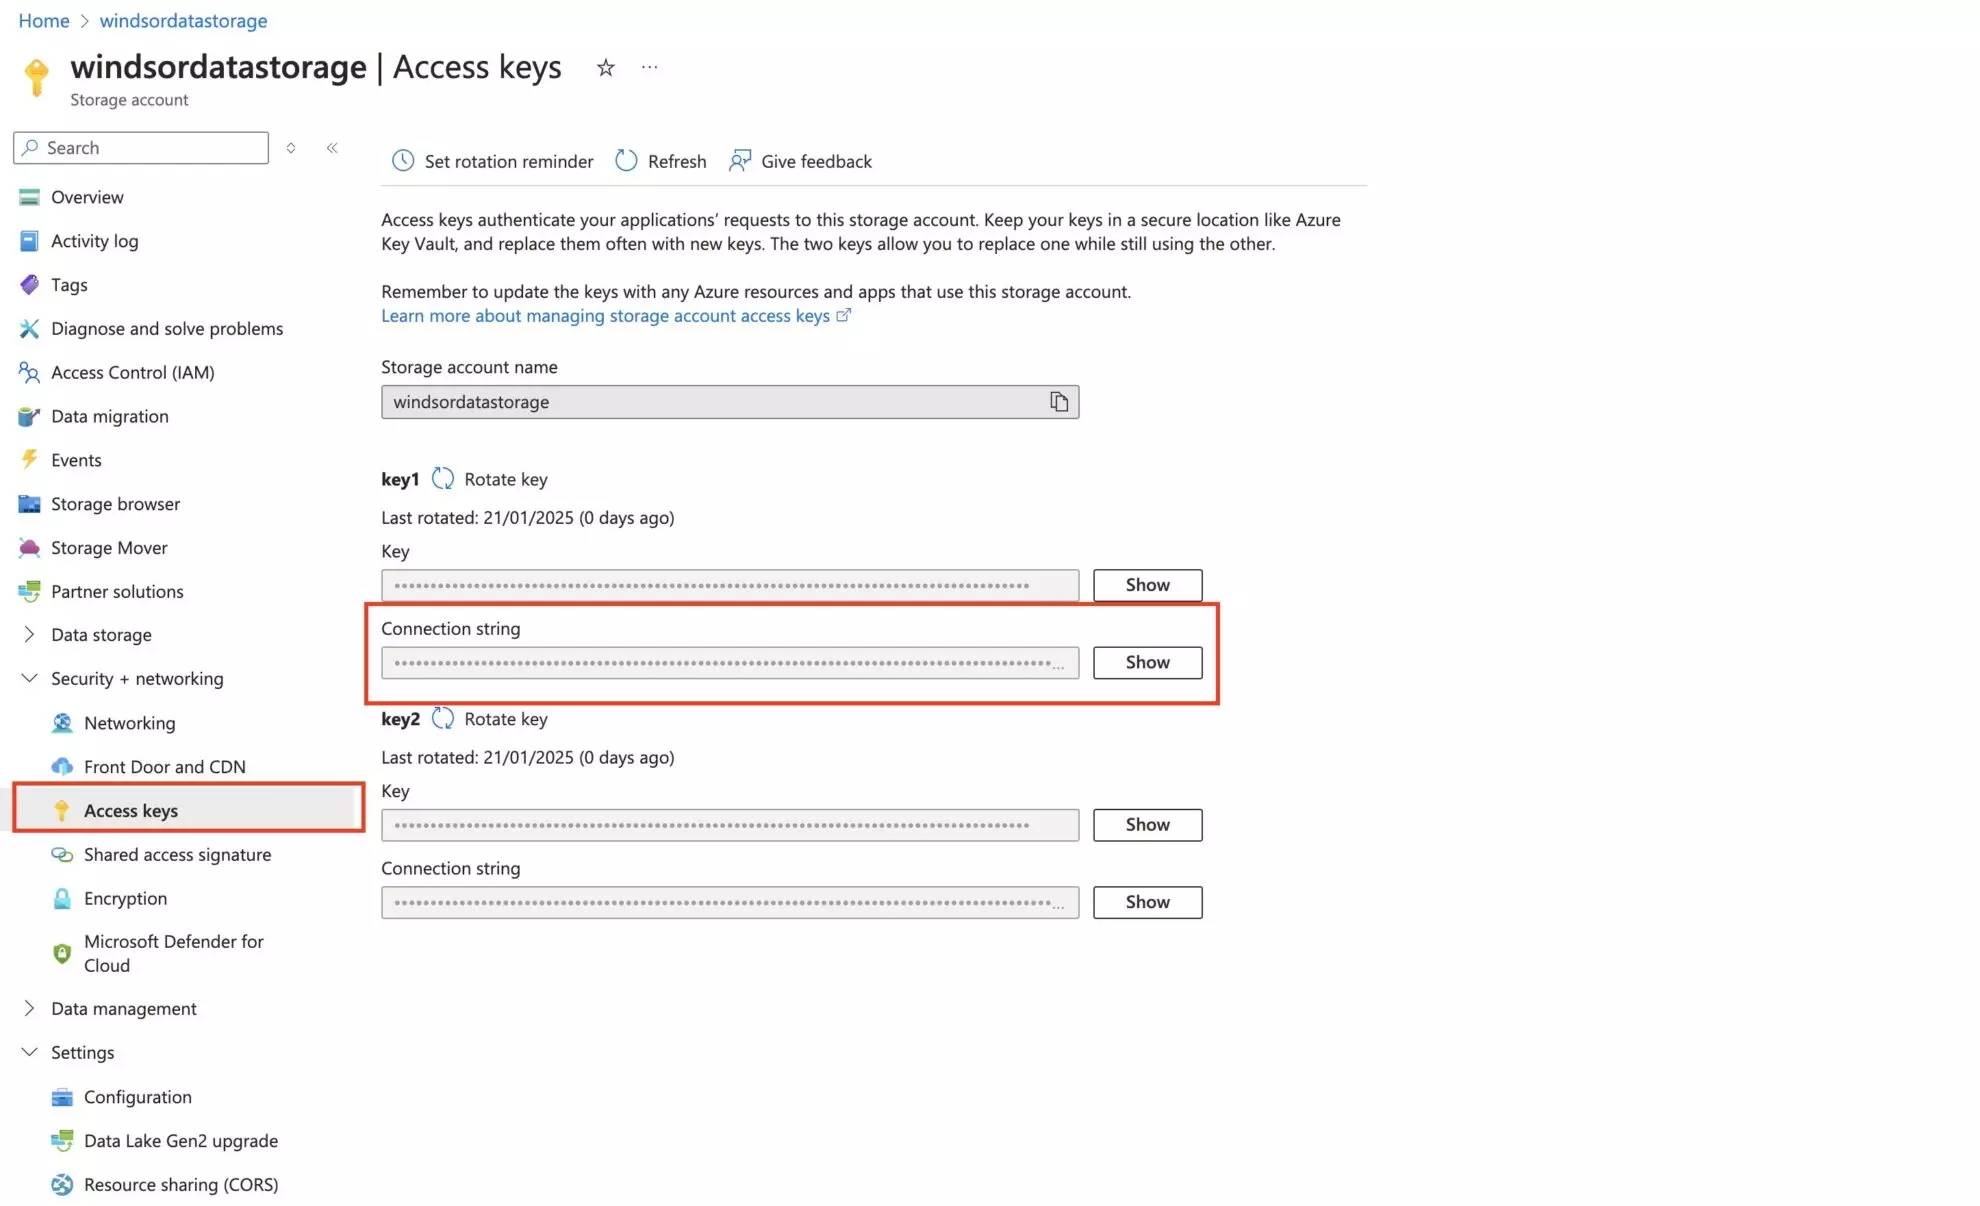
- Get the connection string. Go to your storage account. In the sidebar, open the “Security + networking” dropdown, select “Access keys,” and copy the “Connection string.”
- Get the container name.
Storage Account-> Data Storage-> Containers
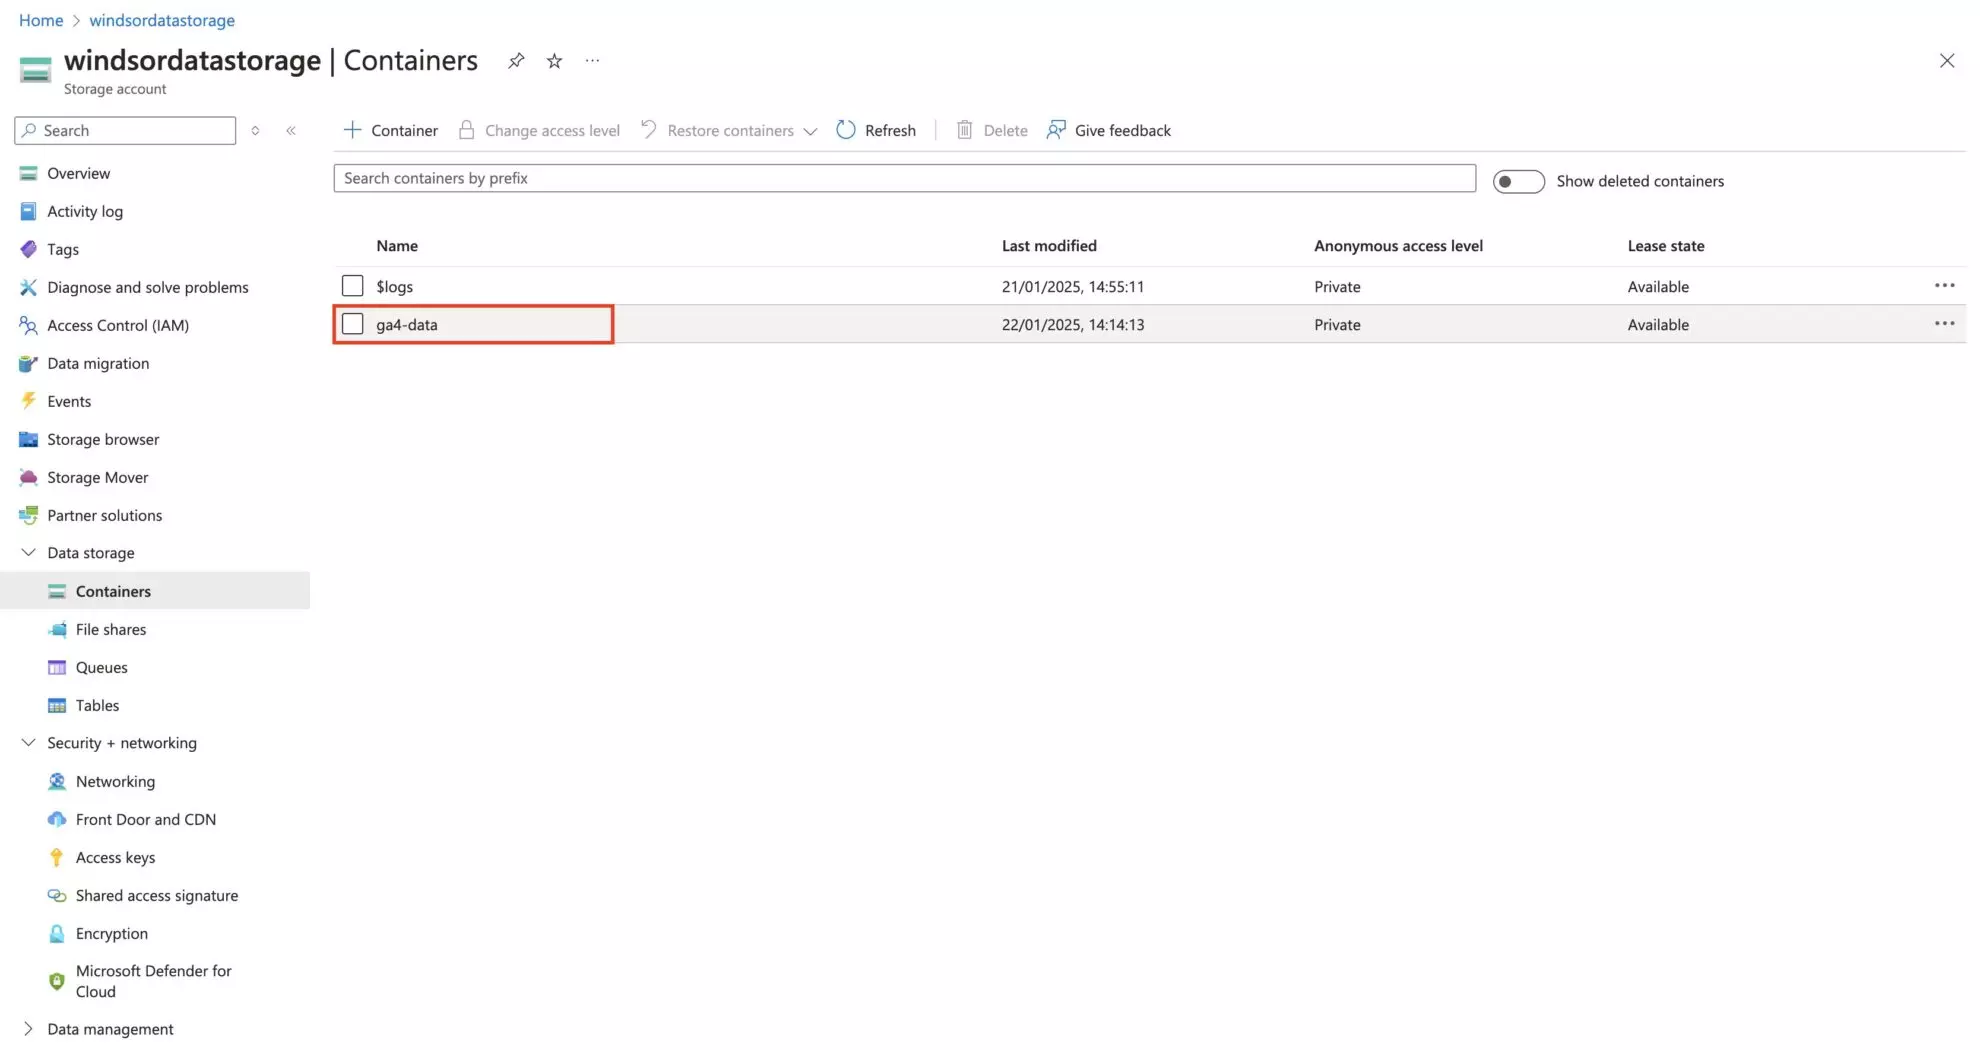
Here it is; you have set up the storage account and blob on the Azure portal side.
Now, let’s import your data from Windsor.ai into this blob storage.
Sending Windsor.ai data to Azure Blob Storage
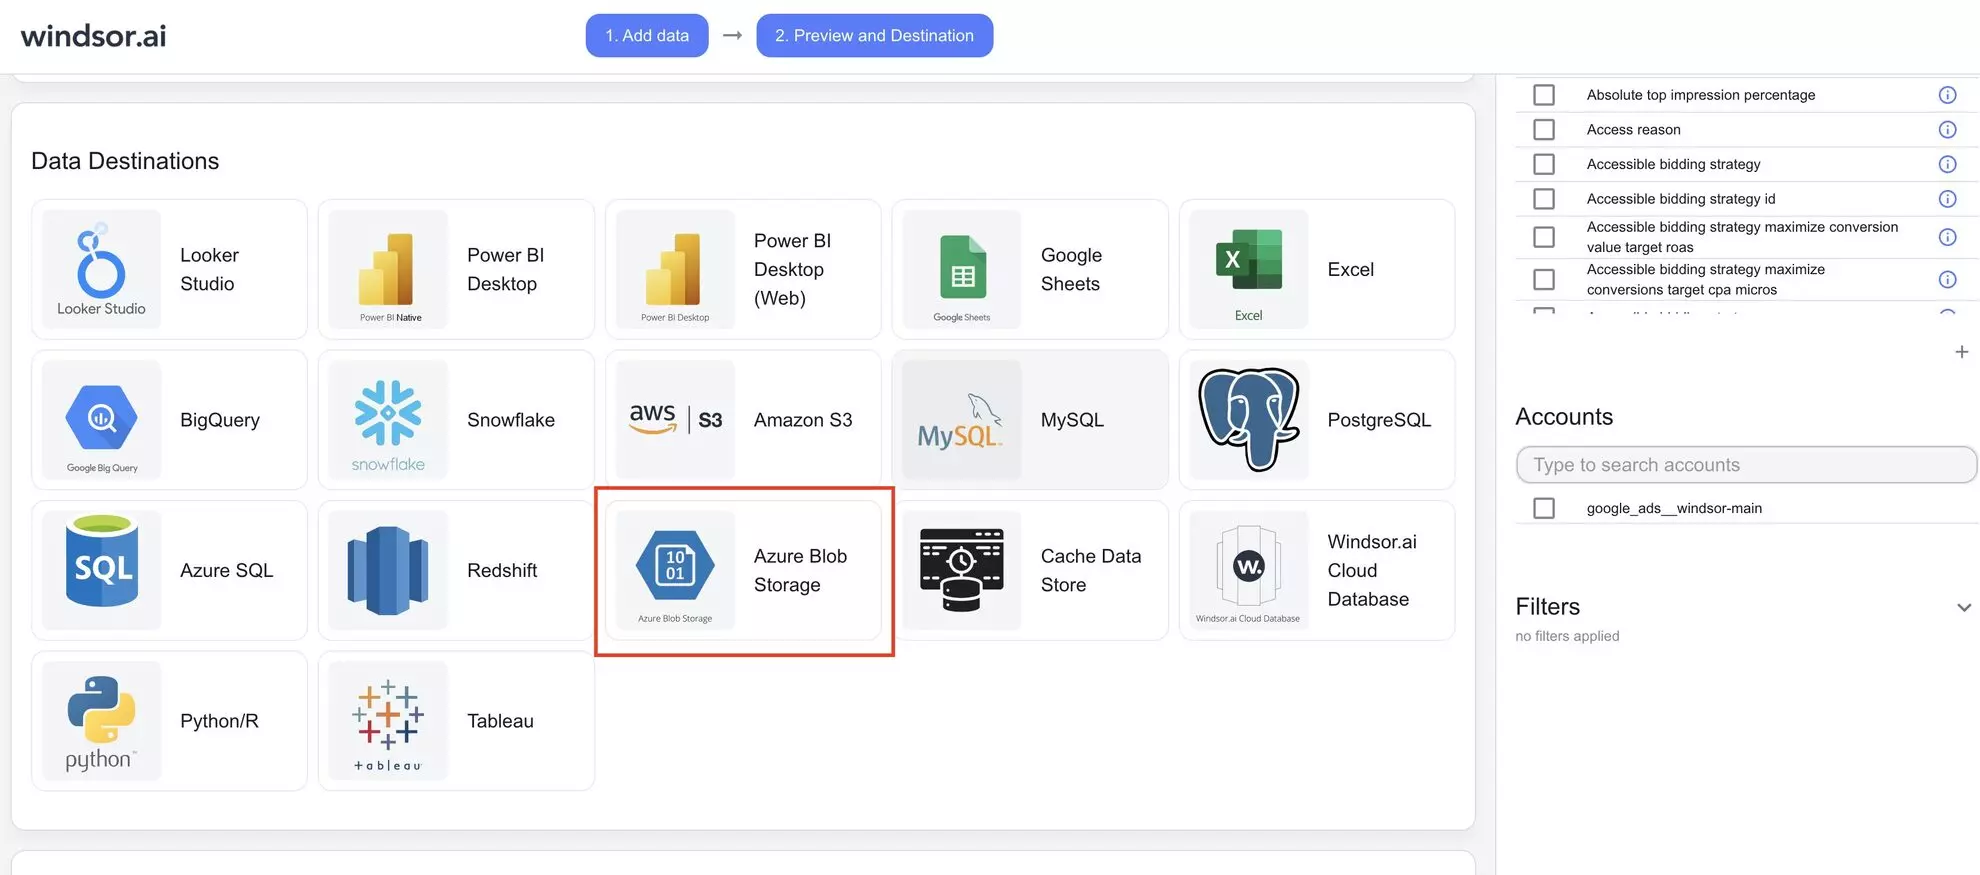
1. Go to your Windsor.ai account and move to the Google Analytics 4 data preview page. Scroll down to data destinations and select Azure Blob Storage.
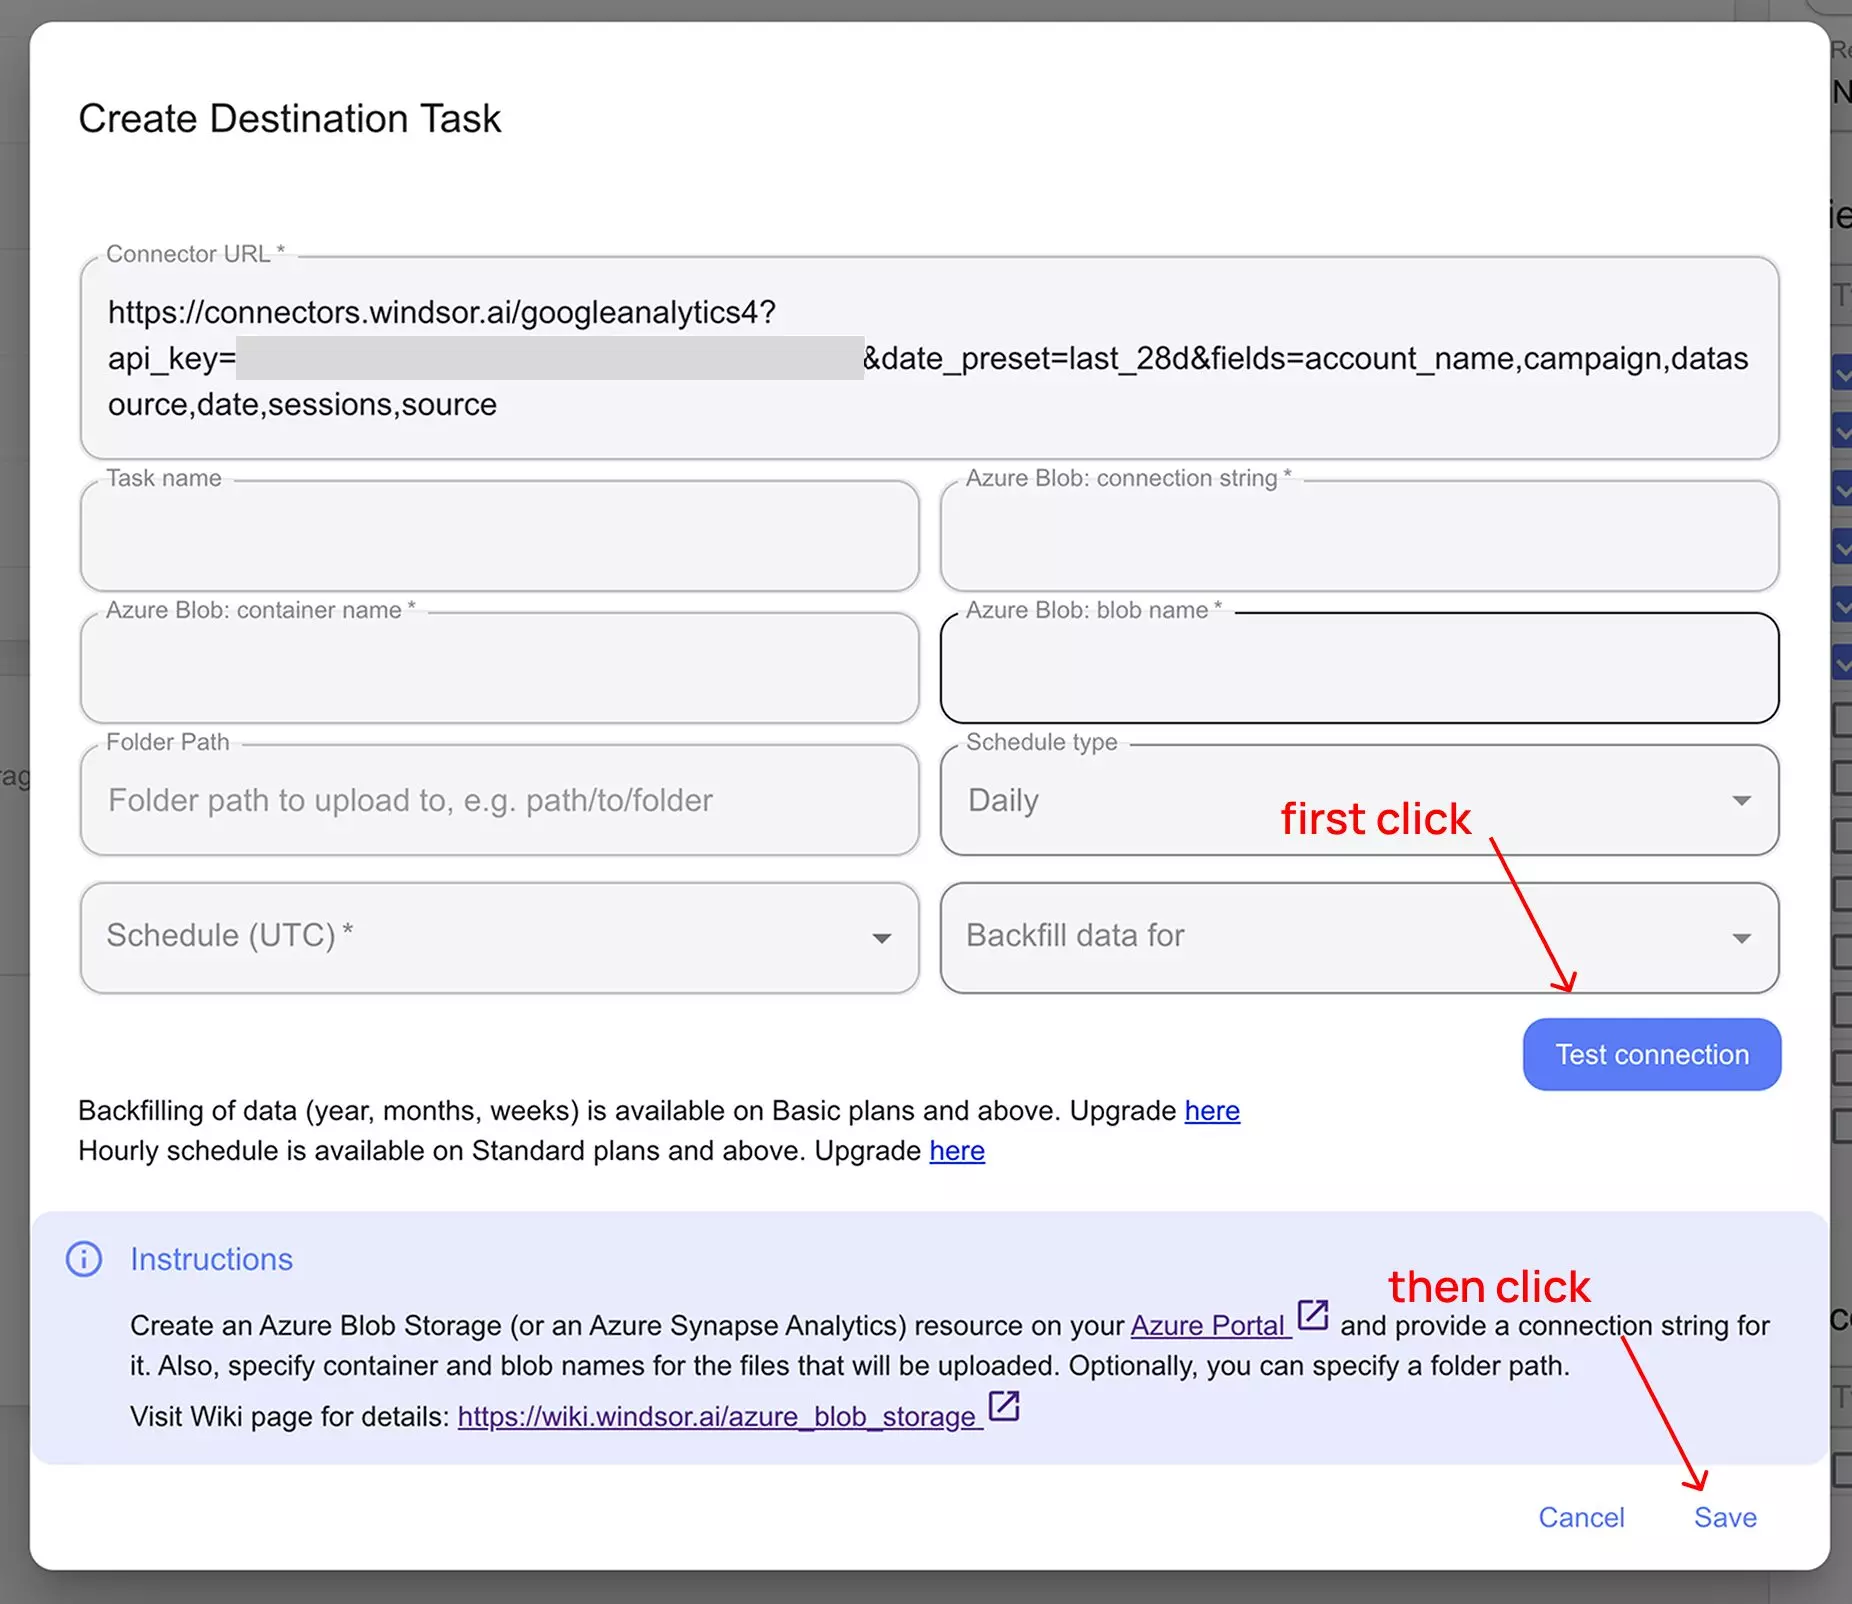
2. Click “Add Destination Task” and enter all the required credentials:
- You can use a container name of the one that has been created before. If you want to use a new container, you can input its name on the onboard page, and it will be created automatically
- Blob name is a prefix that all your files (blobs) will have in this container. You may choose whatever you want, but the one that reflects the data being stored fits best.
- Folder path is a path that all your files (blobs) will be uploaded to in this container. It’s optional but useful if you have many Azure Blob Storage destinations to categorize uploaded files. Folder paths shouldn’t begin or end with a slash character (/), but you can use them in the middle if you want to specify a subfolder, e.g., folder/subfolder.
When all data is entered, click “Test Connection.”
If the connection is set properly, you’ll see a success message at the bottom; otherwise, an error message will appear. When successful, click “Save” in the lower right corner of the form. The data stream to Azure Blob Storage has started.
3. You can now see the task running in the selected data destination section. The green ‘upload‘ button with the status ‘ok‘ indicates that the task is active and running successfully.

4. Verify that your data is being added to the Azure Blob Storage by observing the CSV files in your storage account container.
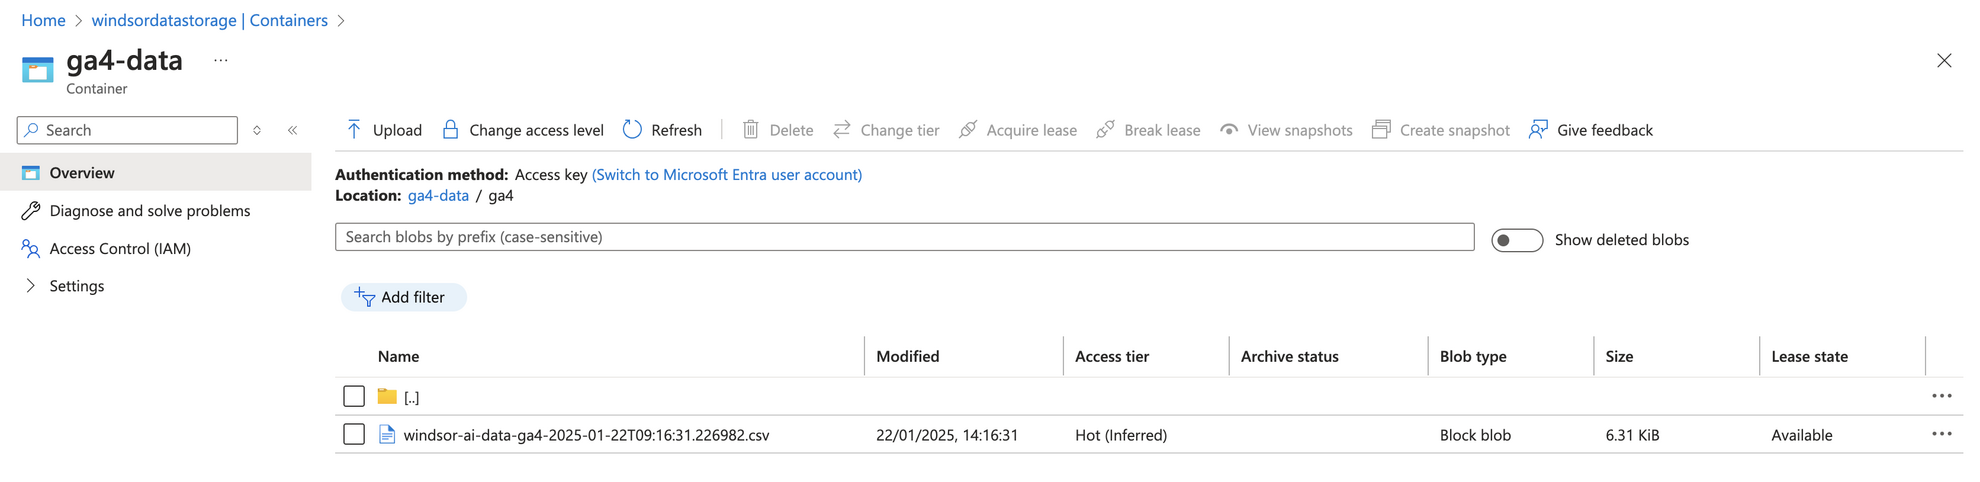
5. You can also download this file and preview the data.
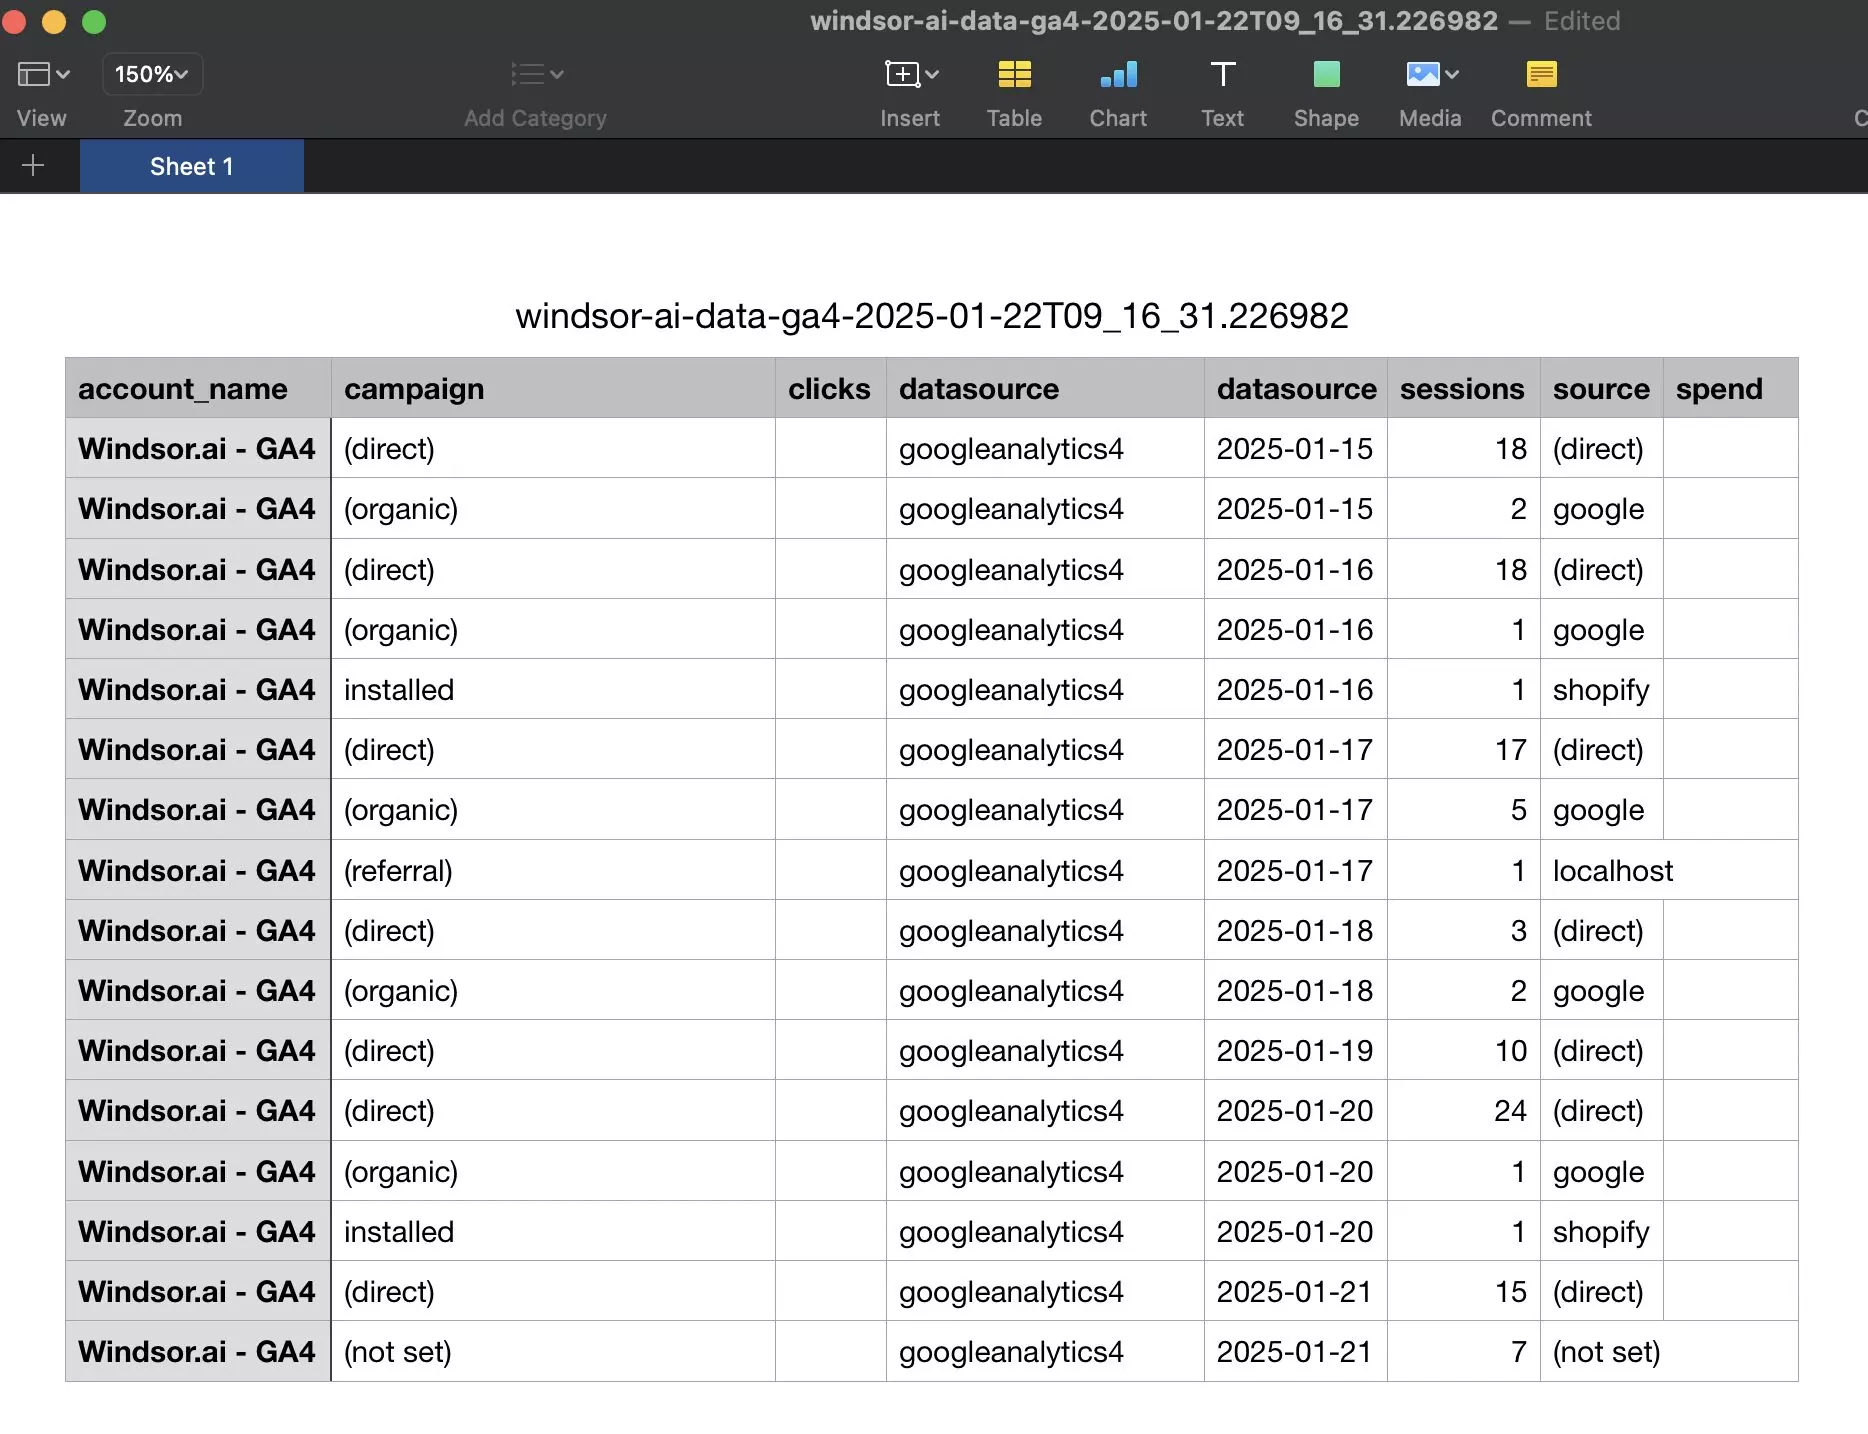
Cheers! Your Google Analytics 4 data is now integrated into the Azure Blob Storage and ready for detailed analysis.
FAQs
What prerequisites do I need to set up Azure Blob Storage?
To perform data integration into Azure Blog Storage with Windsor.ai, you will need:
- An active Azure subscription.
- Access to the Azure Portal.
- Basic knowledge of resource groups, storage accounts, and containers in Azure.
Can I schedule automated reports from Windsor.ai to Azure Blob Storage?
Yes, while connecting Windsor.ai to Azure Blob Storage, you can schedule automated data streams by specifying the schedule type and time.
What credentials do I need to connect Azure Blob Storage with Windsor.ai?
You’ll need to provide the following information:
- Connection string of your storage account
- Container name
- Blob name
- Folder path
Can I organize data within Azure Blob Storage?
Yes, you can use the Folder Path field in Windsor.ai to create a directory structure within your container. For example, you can define paths like marketing/google-analytics or analytics/sales data to categorize files effectively.
What should I do if the connection test between Windsor.ai and Azure Blob Storage fails?
Make sure you have the following things in place:
- Correct connection string and container name are provided.
- Azure subscription and storage accounts are active.
How can I ensure the security of my data when using Windsor.ai?
Windsor.ai uses secure OAuth authentication and encrypted data transfer protocols. Configure your Azure roles and privileges to limit access to sensitive data.
Is it possible to integrate additional data sources with Azure Blob Storage via Windsor.ai?
Yes, Windsor.ai supports 315+ data sources, including Facebook Ads, Google Analytics, Salesforce, and other popular platforms. You can connect any data source to Azure Blob storage by following a similar procedure for effective cross-channel analysis.
Tired of manually transferring data to Azure Blob Storage? Try Windsor.ai today to automate the process

