 AI insights
 About us
 Careers
 Security
 Customer reviews
 Contact us
 Affiliate program
 Solution partners
 Looker Studio templates
 Tableau templates
 Facebook Ads templates
 Google Ads templates
 Data fields & Metrics
 AI prompt library & Guides
 Product documentation
 API documentation
 Case studies
 Blog
Blog Data models
 Windsor vs Supermetrics
 Windsor vs Fivetran
 Windsor vs Portermetrics
How to integrate data into Azure SQL with Windsor.ai
What is Azure SQL?
Azure SQL is a managed, cloud-based database from Microsoft designed to simplify database management. It can be easily integrated with other Azure services for secure and scalable data solutions.
The key benefits of Azure SQL include its cost-effectiveness, as it eliminates the need for managing physical hardware, excellent performance optimization with features like automatic tuning and query performance insights, enhanced security with built-in transparent data encryption, advanced threat protection, and compliance with global standards. It also supports high availability and disaster recovery, ensuring minimal downtime and data loss.
By integrating Azure SQL with the Windsor.ai data movement platform, you can:
- Consolidate data from multiple marketing and business platforms (e.g., Facebook Ads, Google Ads, Google Analytics, Salesforce) into a single, secure Azure SQL database.
- Automate data synchronization to ensure the latest metrics are always available.
- Automate data workflows, saving time and reducing manual effort.
Explore our video tutorial and a step-by-step guide to automatically integrate your data into Azure SQL with the Windsor.ai no-code ELT connector.

How to connect Azure SQL to Windsor.ai
Connecting data in Windsor.ai
1. Create a Windsor.ai account and log in.
2. Select the data source which you want to stream data from, e.g., Google Analytics 4 (GA4). Sign in with your associated Google account and select the next step, “Data preview.”
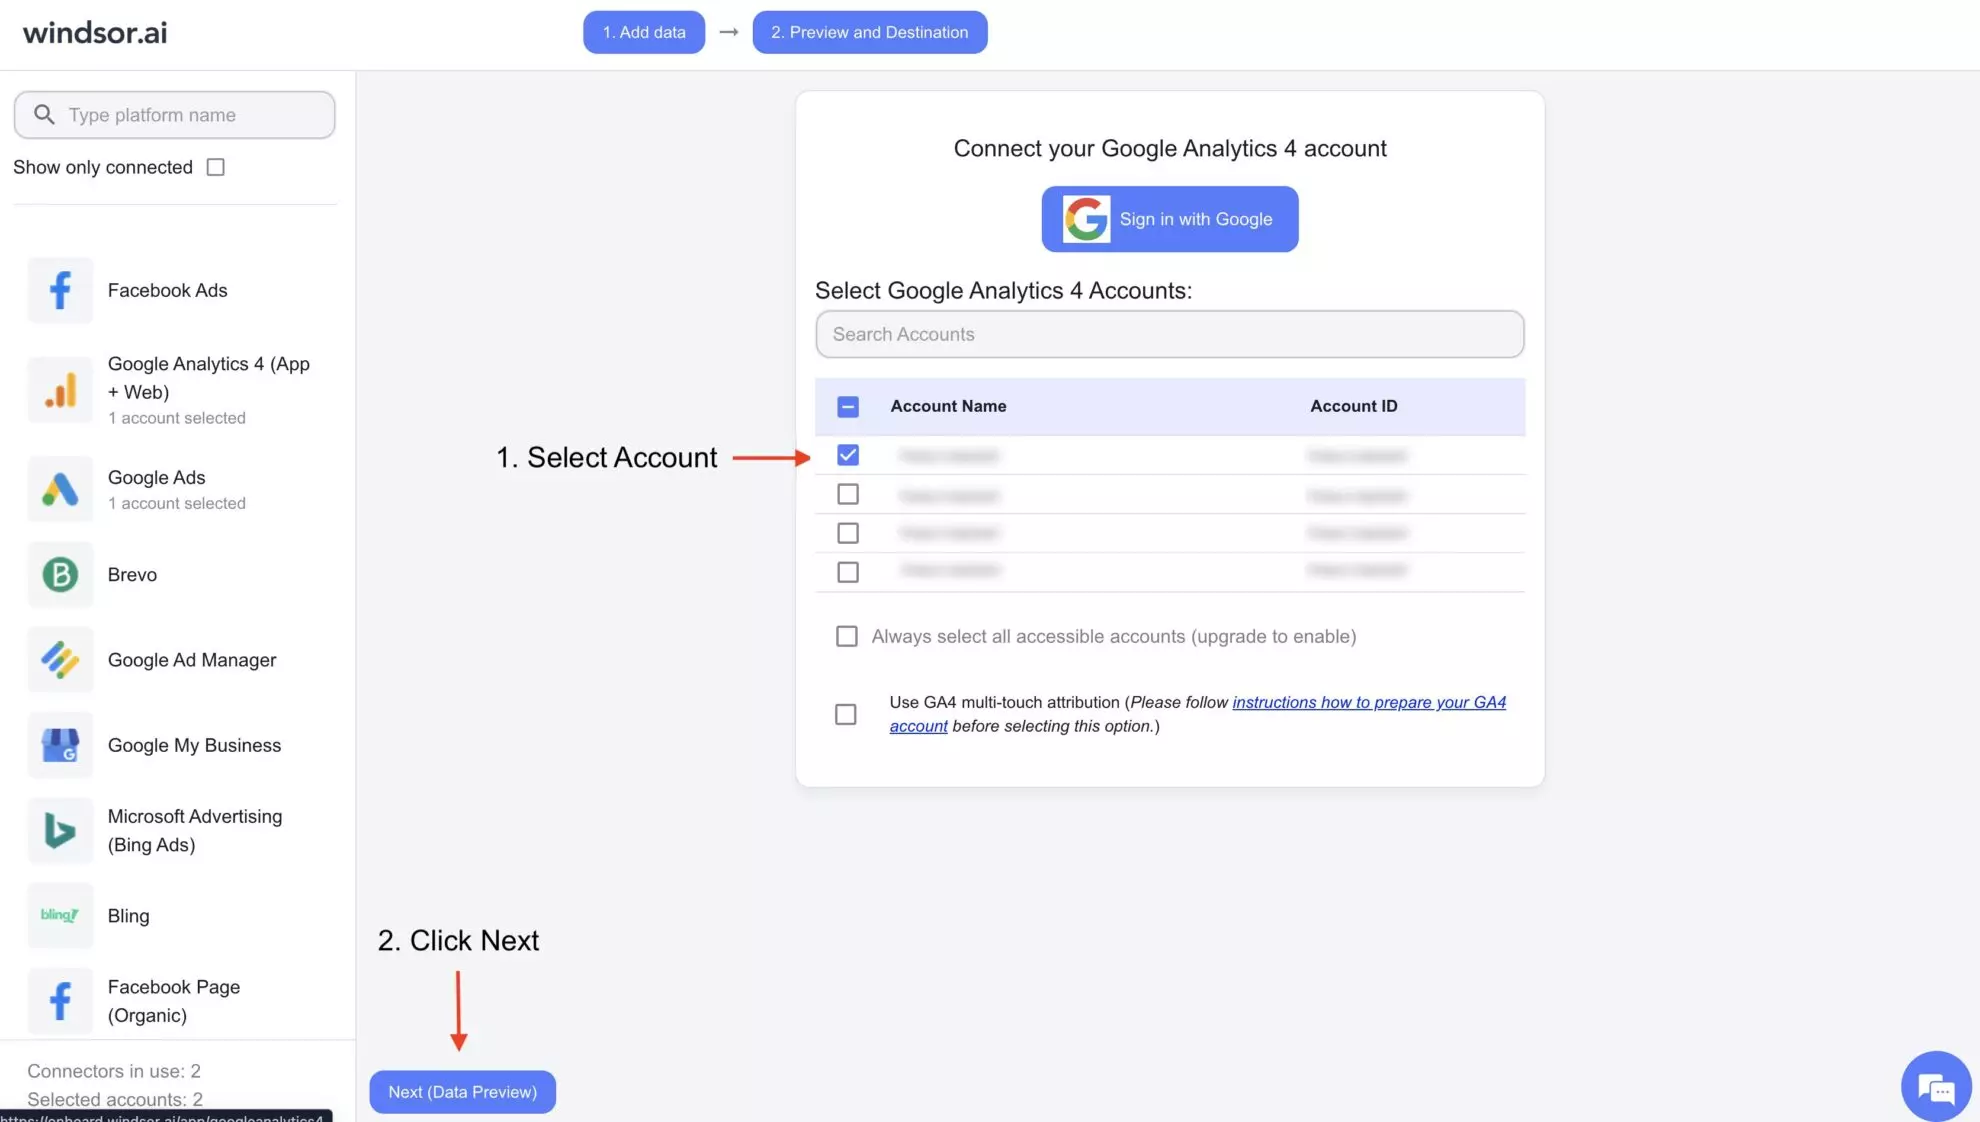
3. You’ll see your Google Analytics 4 data displayed in your Windsor.ai account.
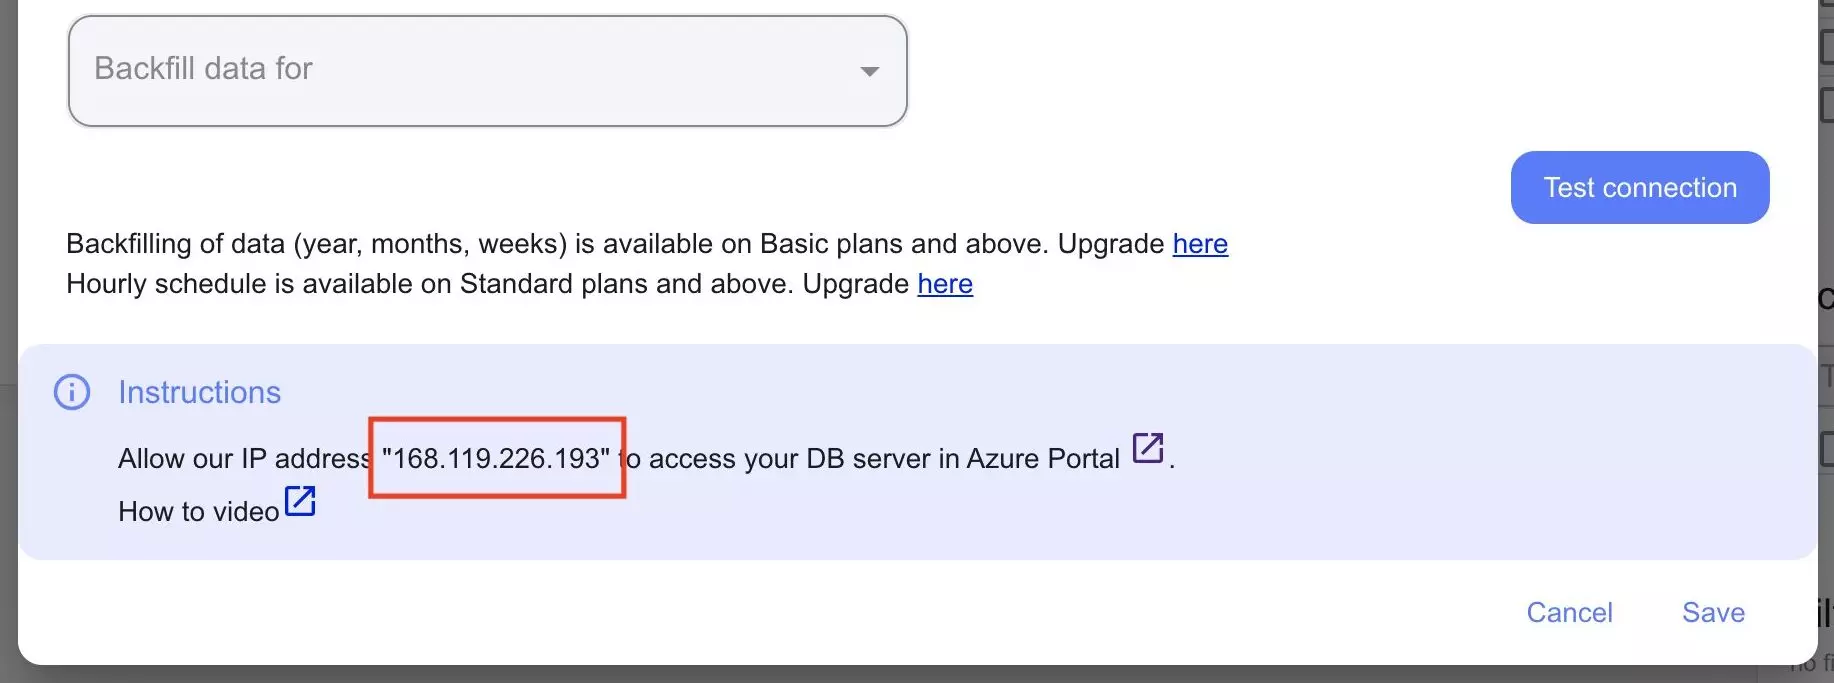
4. At this step, you need to copy the IP address of Windsor.ai, as it will be used in the Azure SQL setup process to get access to the database.
For this, scroll down to data destinations, select Azure SQL, and click “Add Destination Task.” Copy the IP address listed at the bottom of the instructions and save it for future use.
Now, let’s proceed with setting up Azure SQL for data integration.
Setting up Azure SQL server
1. First of all, make sure you have an active Azure subscription.
Go to Azure Portal and create a resource group. Select your Azure subscription and region, and enter the name of the resource group (anything you wish).
2. In the search tab, find and select “Azure SQL.”

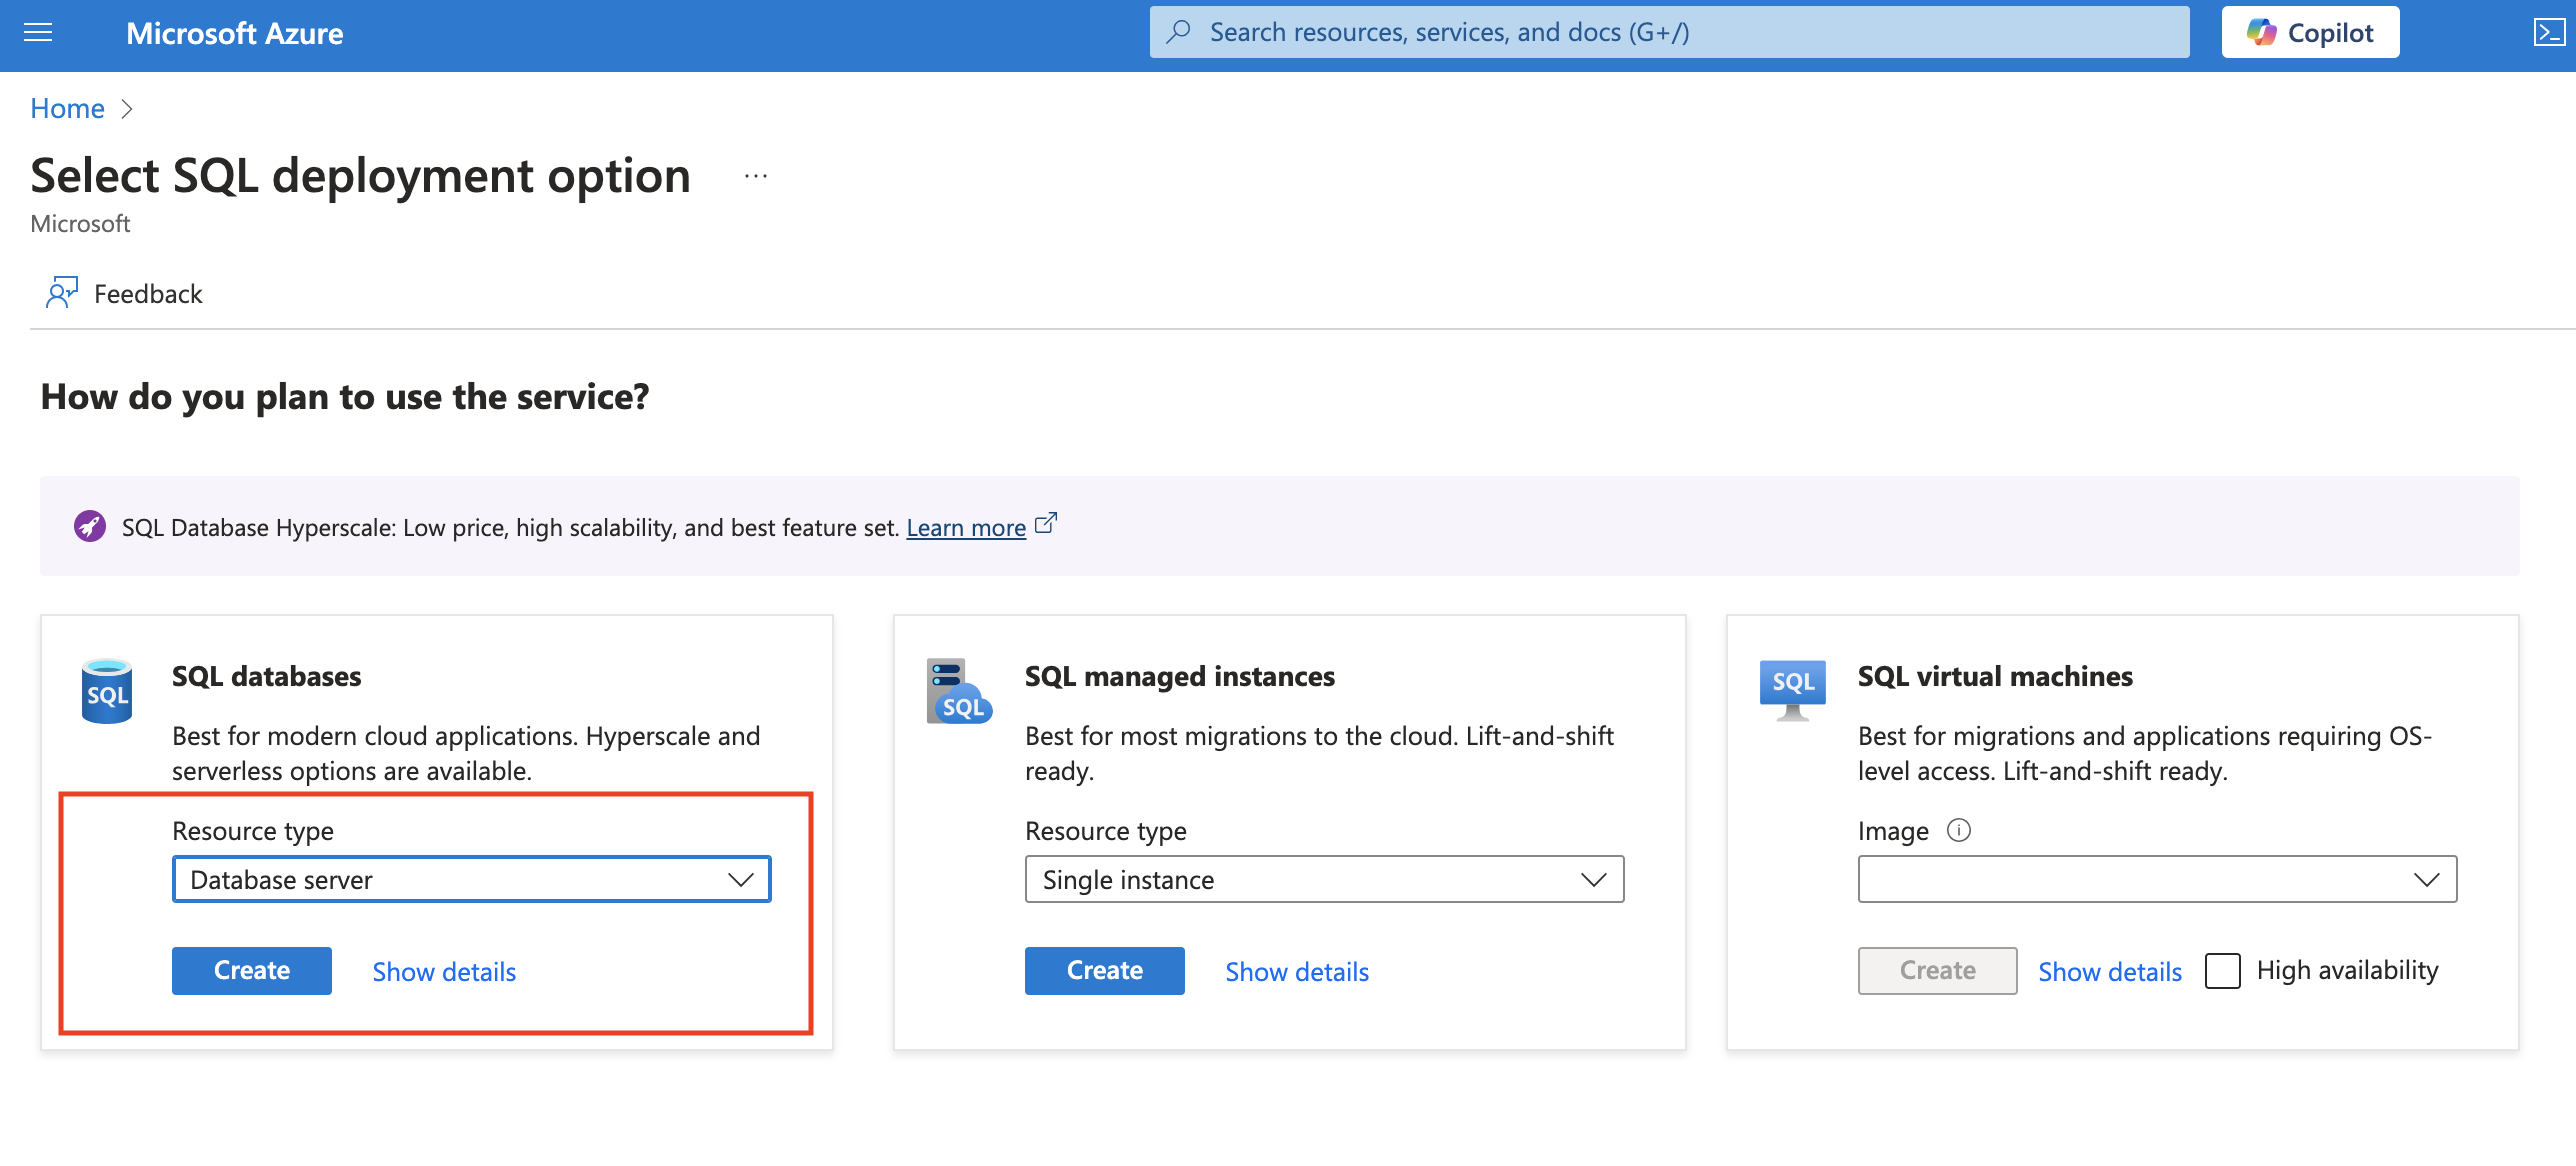
3. Now, you have to create a database server.
On the Azure SQL page, click “Create.” In the SQL Databases section, open the Resource type dropdown and select “Database Server” -> “Create.”
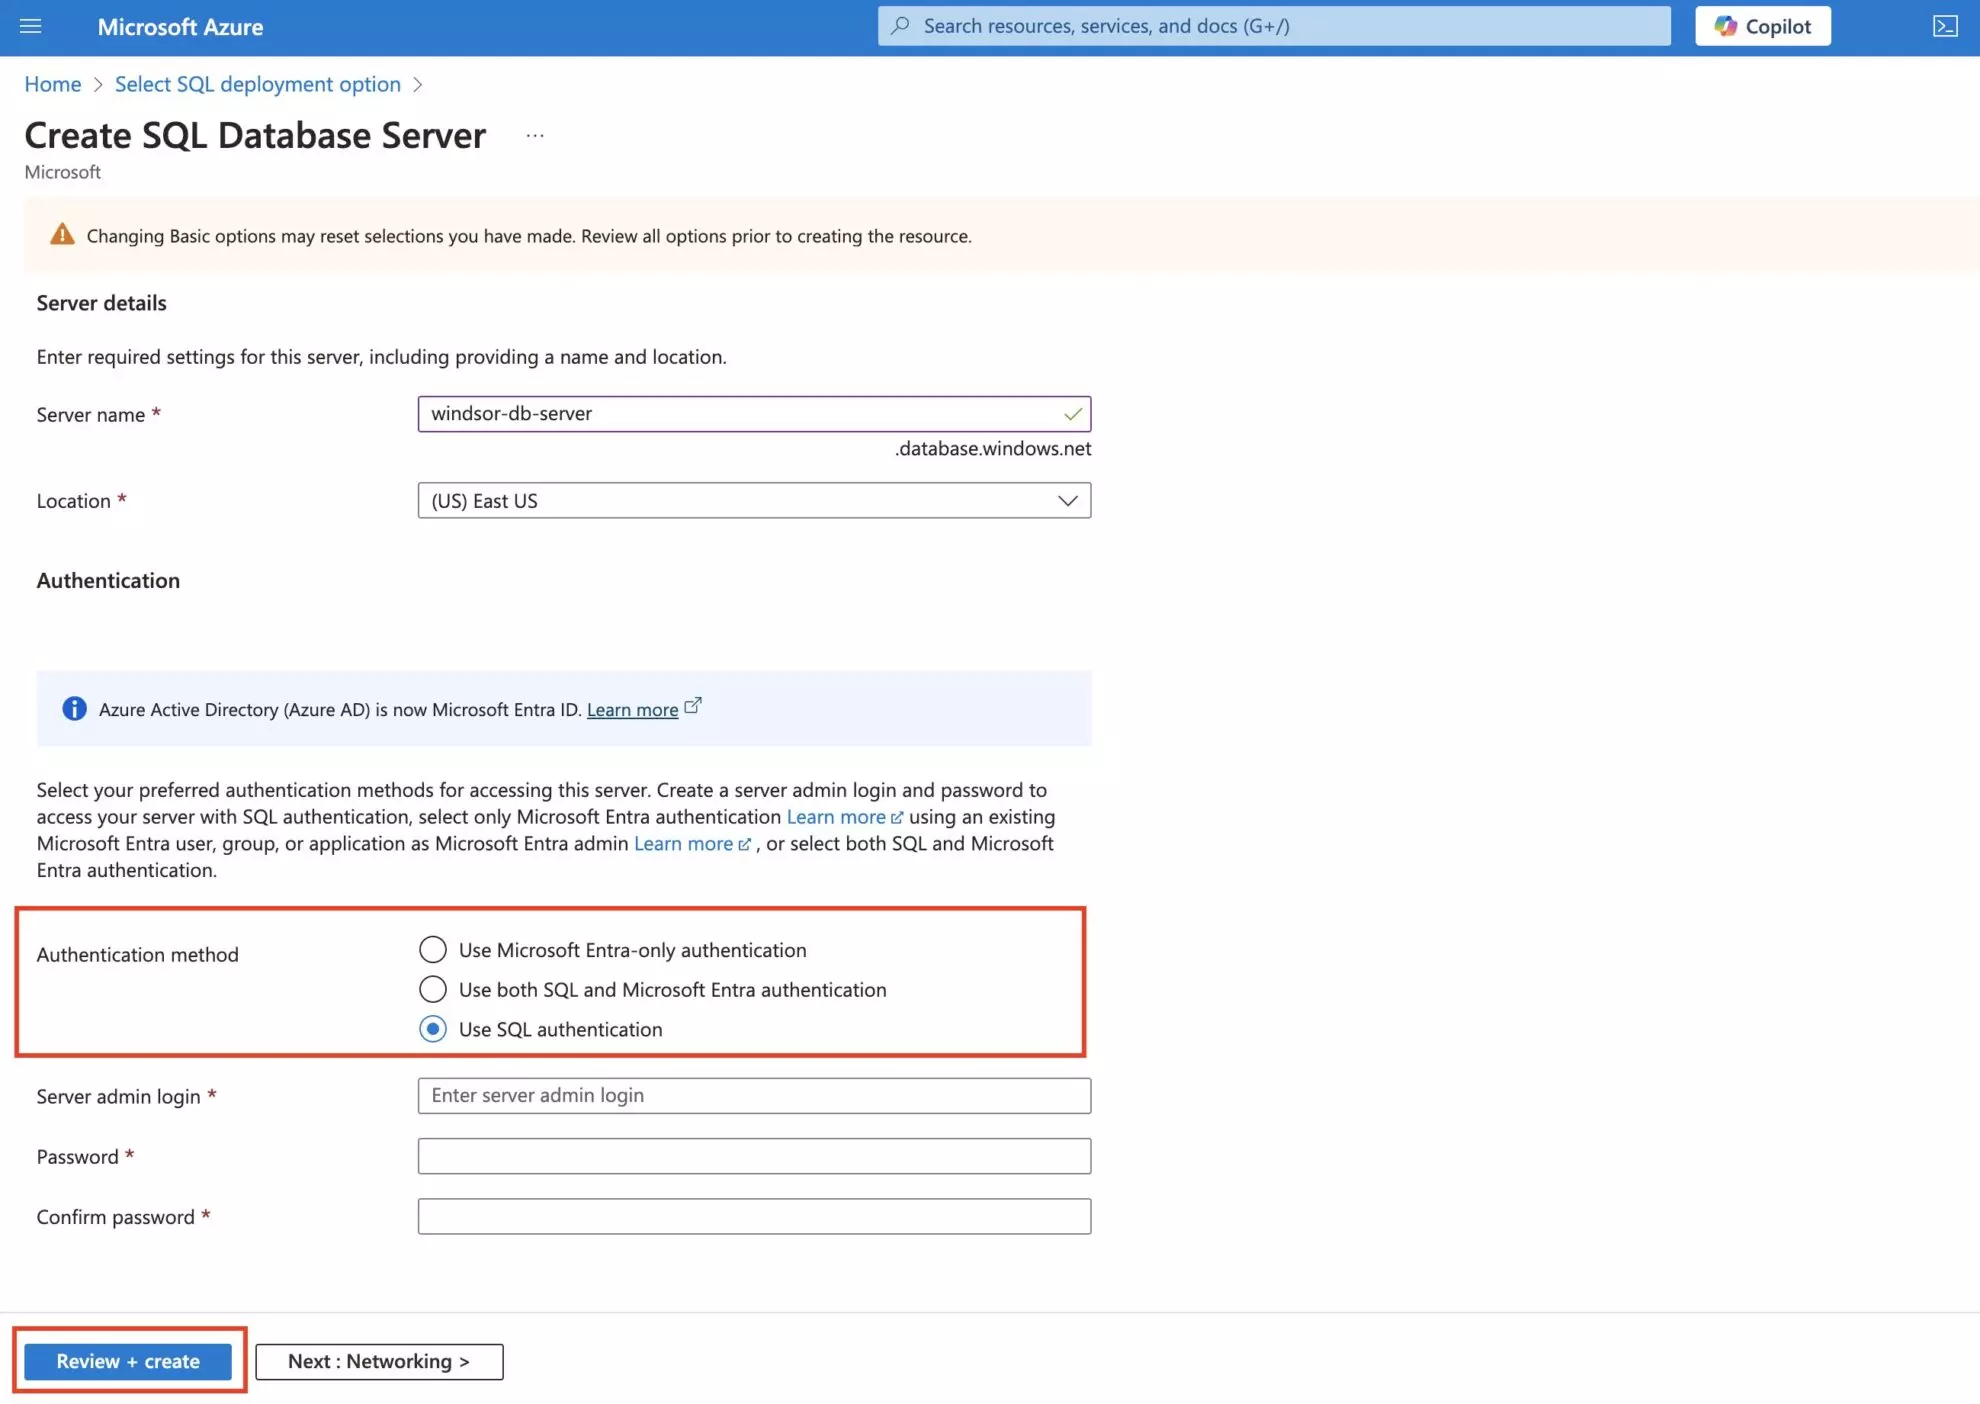
4. Select the resource group you’ve created previously and enter the name of the server (anything you wish).
In the Authentication Method, select Use SQL Authentication, enter the server admin login name (anything you want to), and enter a password. Make sure to remember this password, as you’ll use it when connecting Windsor.ai with Azure SQL.
Then click “Review + create.”
5. Let’s change the network configuration of the server so that it can be accessed from Windsor.ai.
- Go to your created server, open the Security dropdown in the sidebar, and click “Networking.”
- Open the Public Access tab. In the Public Network Access options, choose “Selected networks.”
- In the Firewall Rules section, click “Add a firewall rule,” enter the rule name (anything you wish), and enter the Windsor IP Address that you’ve saved previously in the start IP and end IP fields.
- Also, click “Add your client IPv4 address” to allow your machine to connect to the server to view database content later. Complete with the “Save” button.
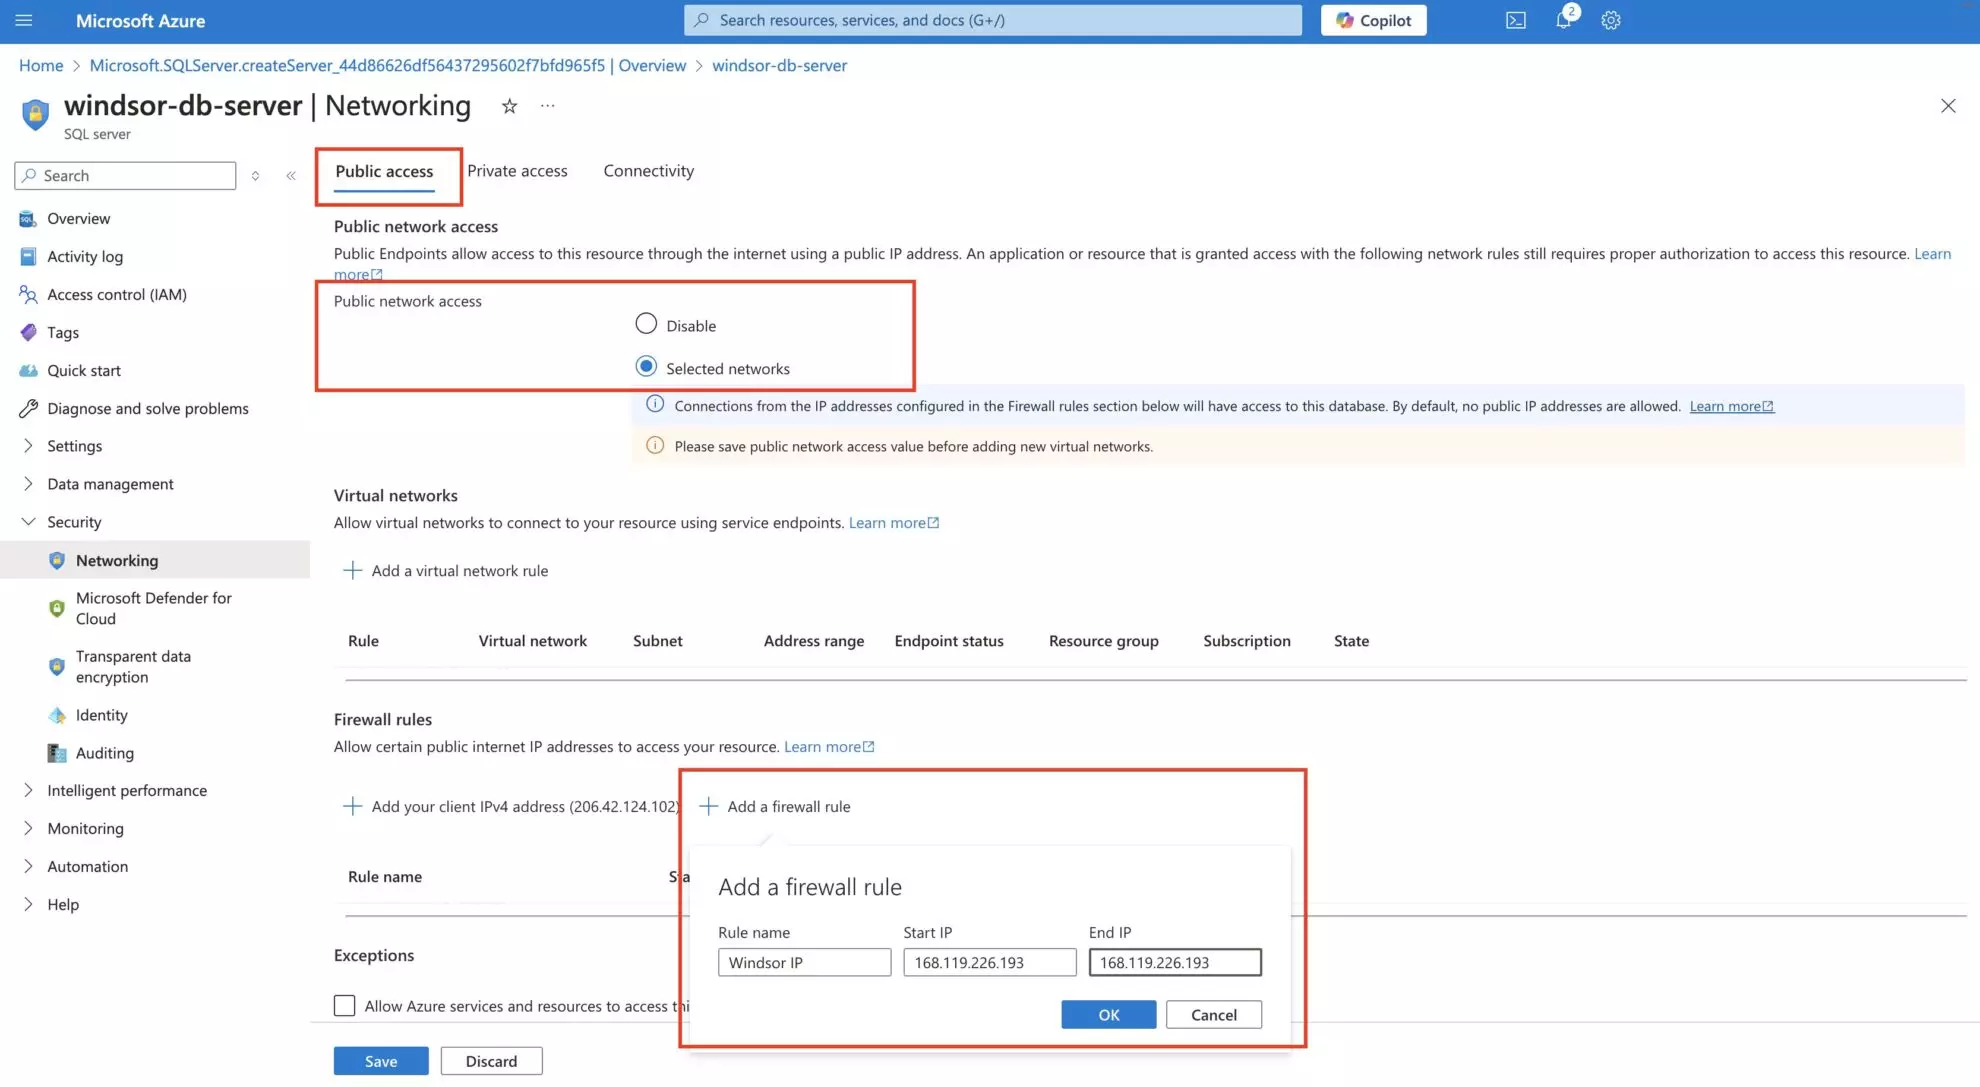
Your Azure SQL server is now created and configured. Let’s proceed with creating a database for uploading connected Google Analytics 4 data from Windsor.ai.
Setting up Azure SQL database
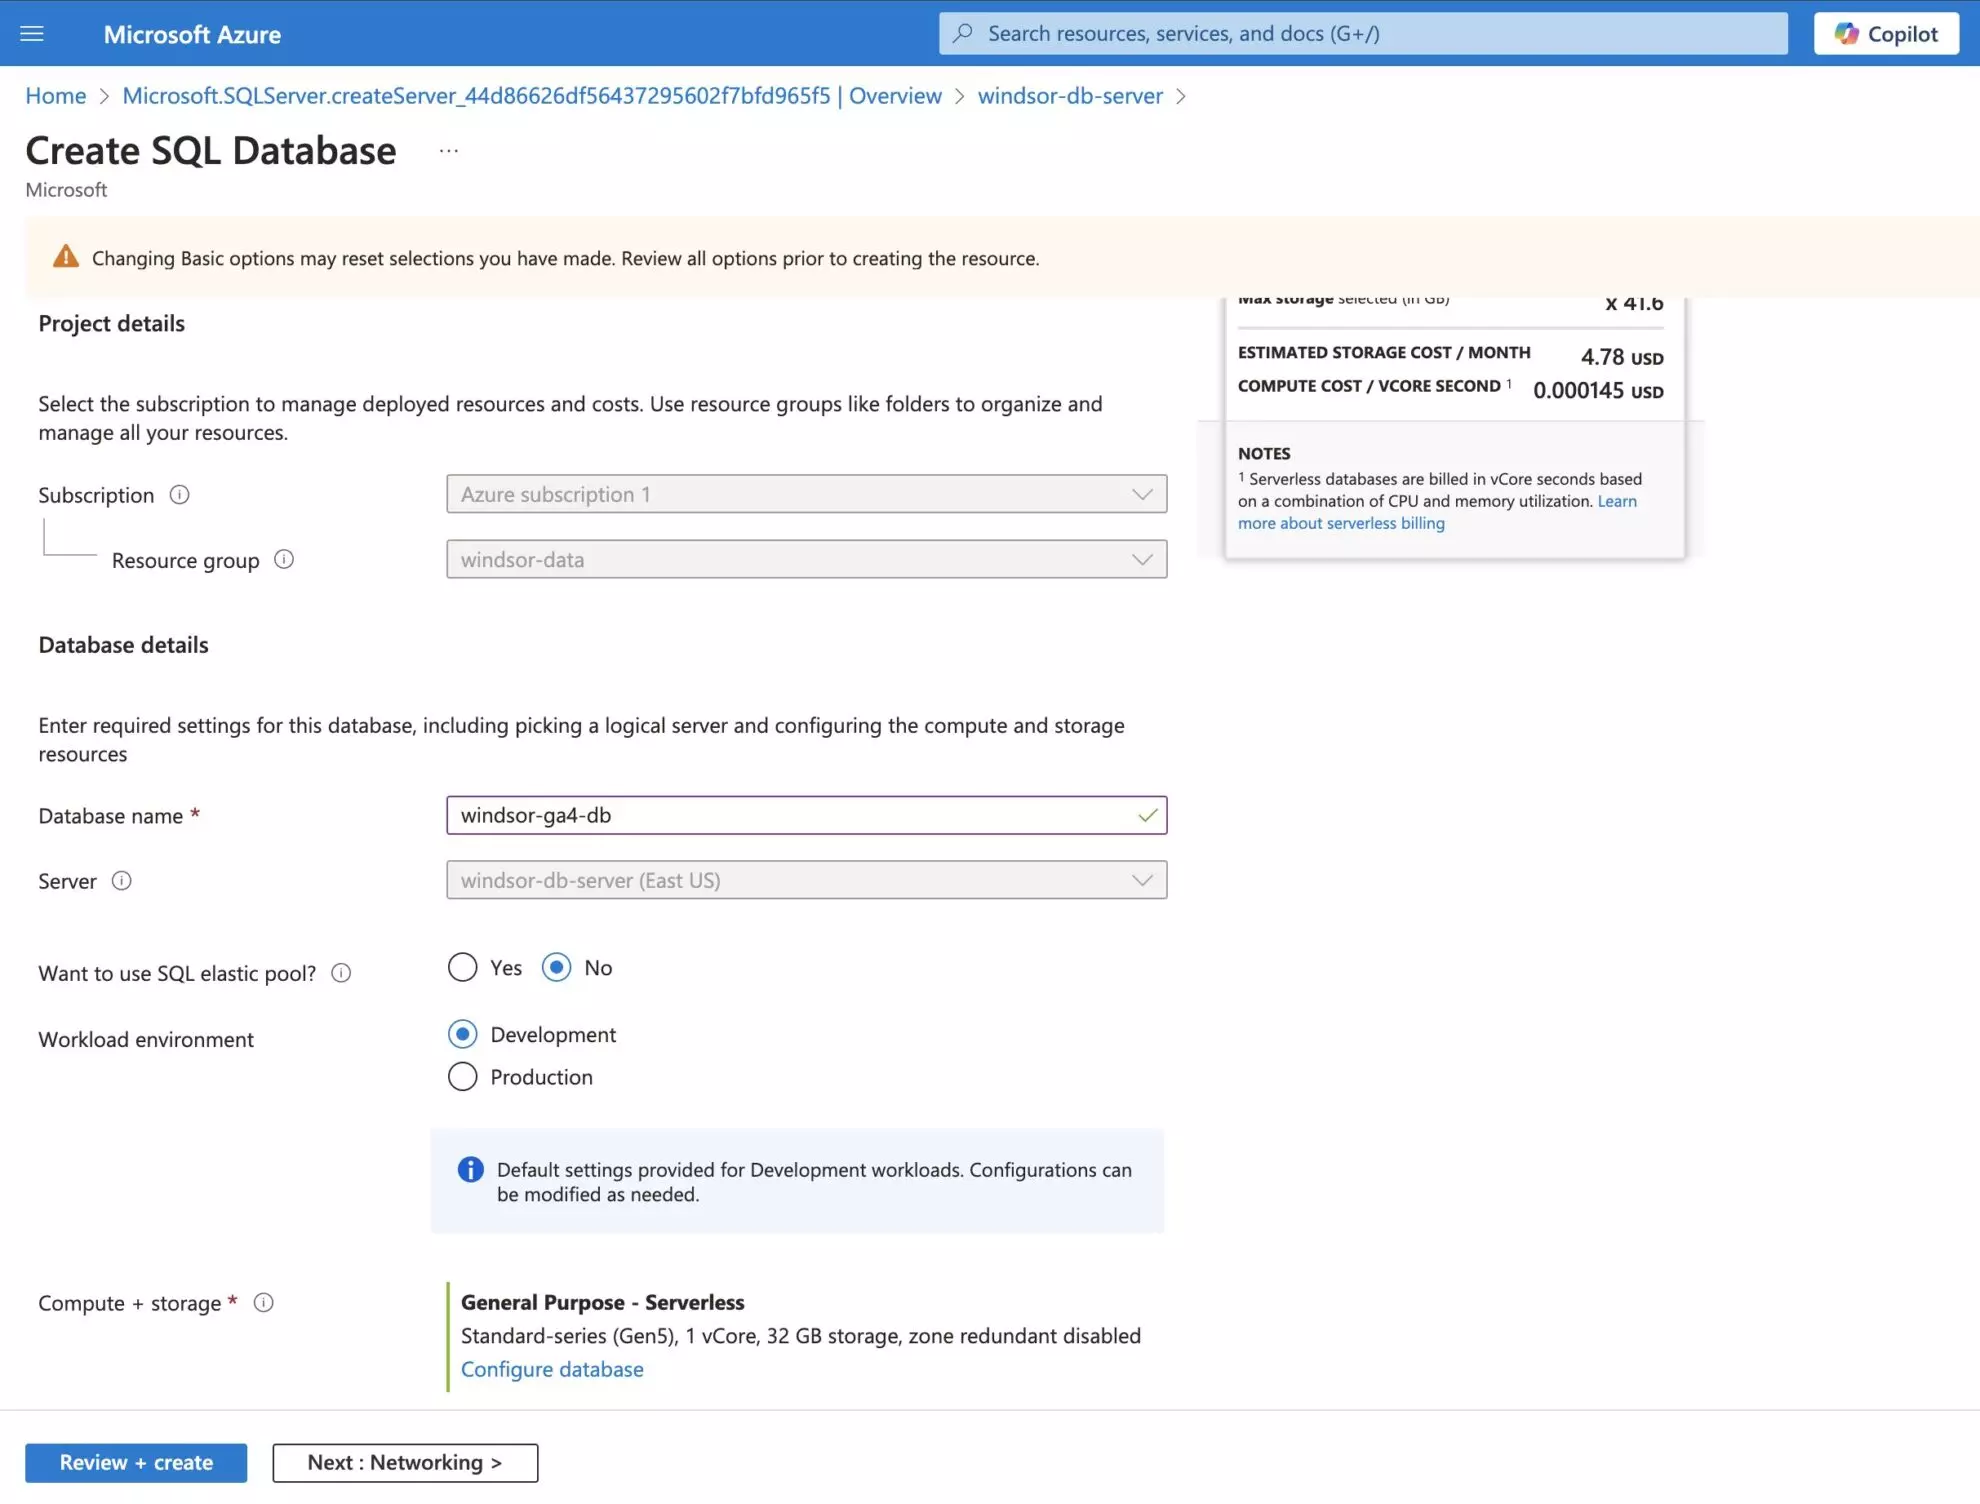
1. Go to your SQL server’s overview page and click “Create Database.” Enter the name of your database, select the compute and storage you want, and click “Review + create.” Your database is now created and running.
2. Get the required fields from the Azure portal to create the connection between Azure SQL and Windsor.ai:
- Get the Azure SQL Server, Azure SQL User Name (Admin Login), and Database Name. Go to your created database, and in the sidebar, open the Settings dropdown and click “Properties.”

- Get the Azure SQL Port. Go to your created database. In the sidebar, open the Settings dropdown, click “Connection Strings,” and select the Go tab. Copy the port number (Azure SQL uses “1433” by default).
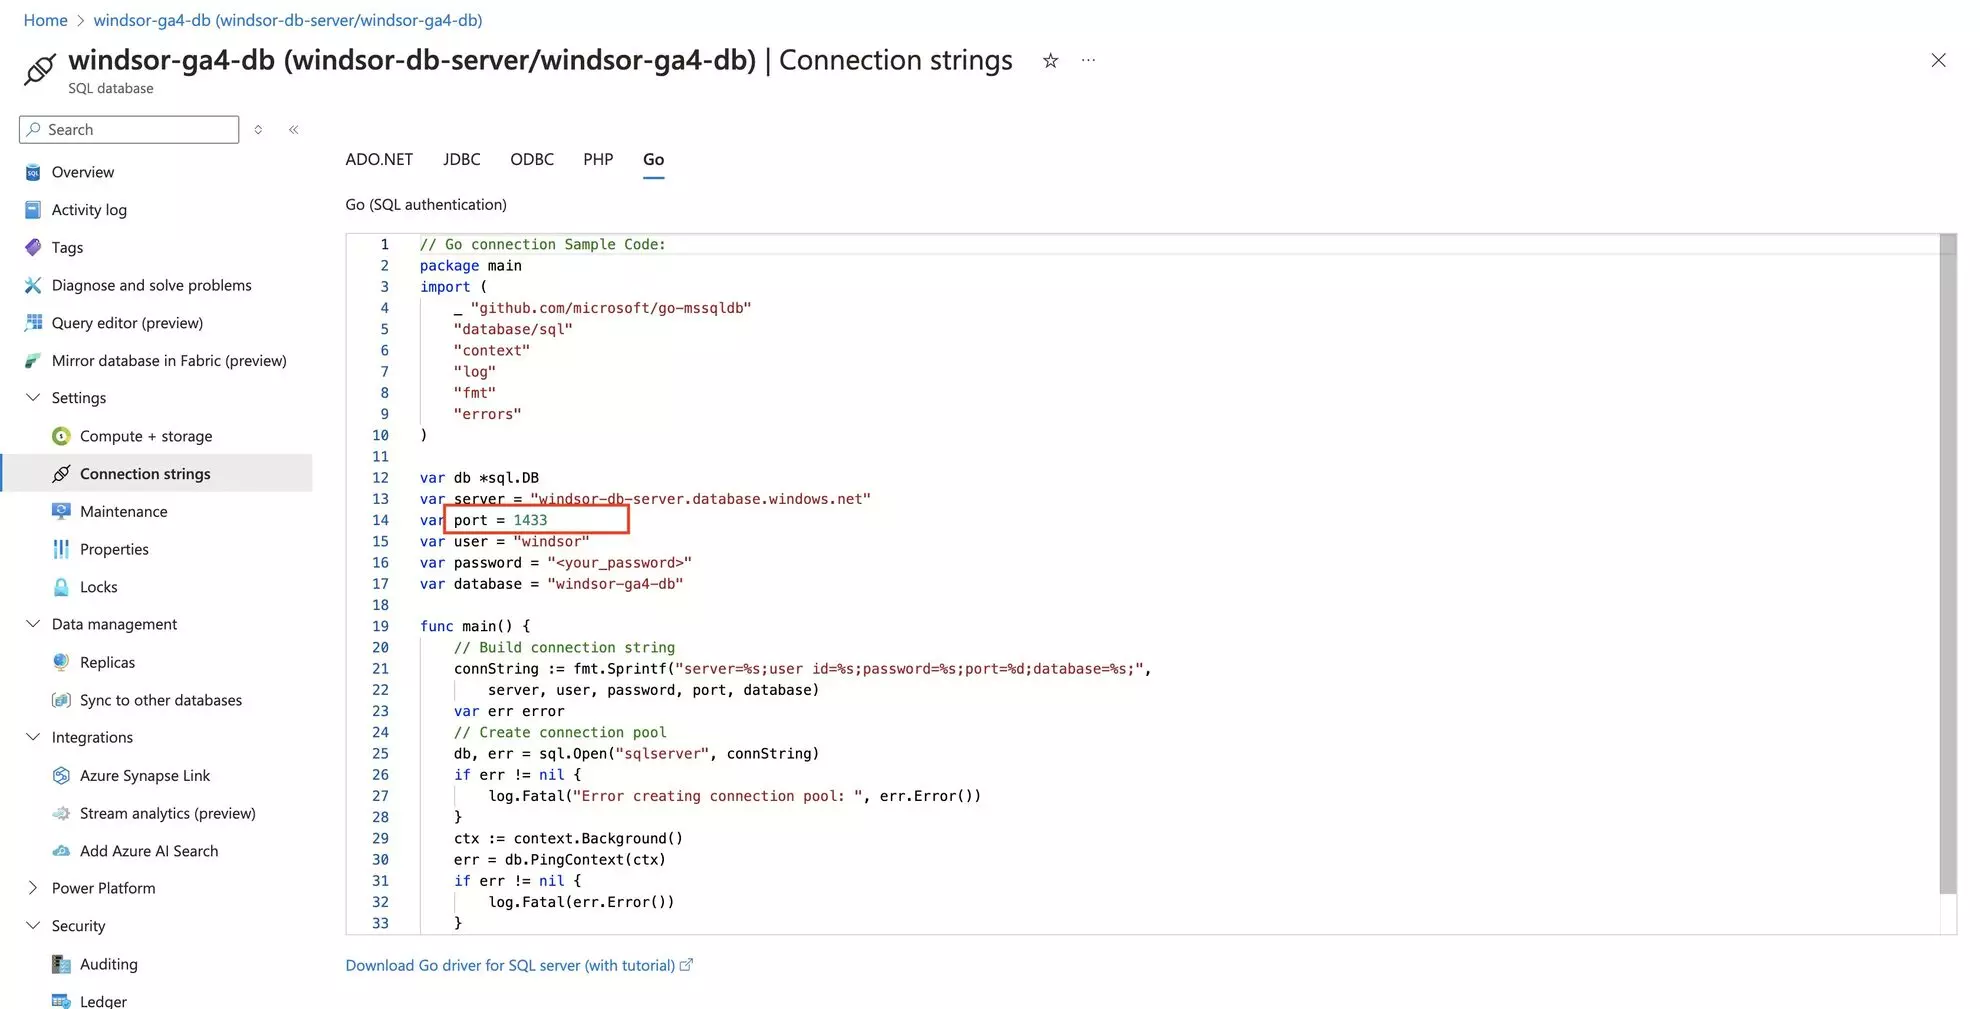
Here we go, you have set up the Azure SQL server and database on the Azure portal side.
Now, let’s import your data from Windsor.ai into this Azure SQL database.
Sending Windsor.ai data to Azure SQL
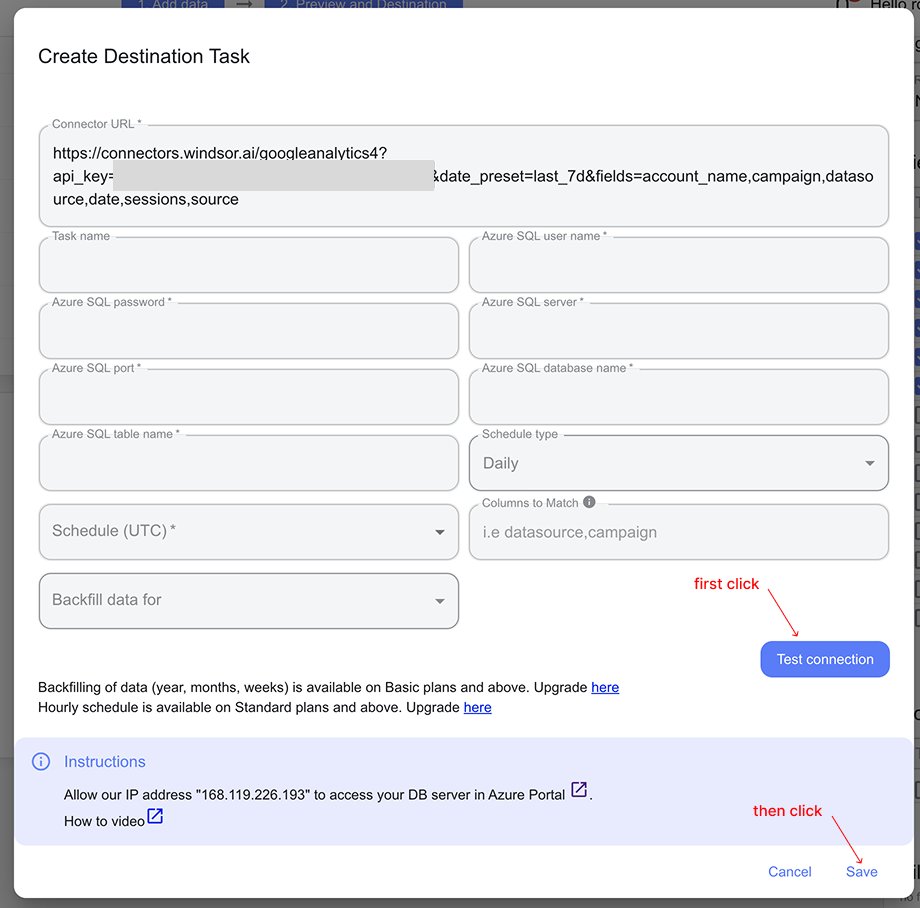
1. Return to your destination task for Azure SQL data integration in the Windsor.ai dashboard.
Enter all the required credentials in the destination task form:
- Task name (you can provide any based on the data integration purpose).
- User name, server, port and database name that you got from Azure Portal.
- The password you set while creating the Azure SQL server.
- Table name (you can provide any based on the data integration purpose); it will be created in your database automatically. If you already have a table for your Google Analytics data, you can enter that table name.
Click “Test Connection.”
If the connection is set properly, you’ll see a success message at the bottom; otherwise, an error message will appear. When successful, click “Save” in the lower right corner of the form. The data stream to the Azure SQL database has started.
2. You can now see the task running in the selected data destination section. The green ‘upload‘ button with the status ‘ok‘ indicates that the task is active and running successfully.

3. Verify that your data is being added to the Azure SQL database.
Go to your Azure portal database and select “Query Editor” from the sidebar. Enter your Azure SQL login and password, and you’ll see the new table there. You can preview the data by querying that table.
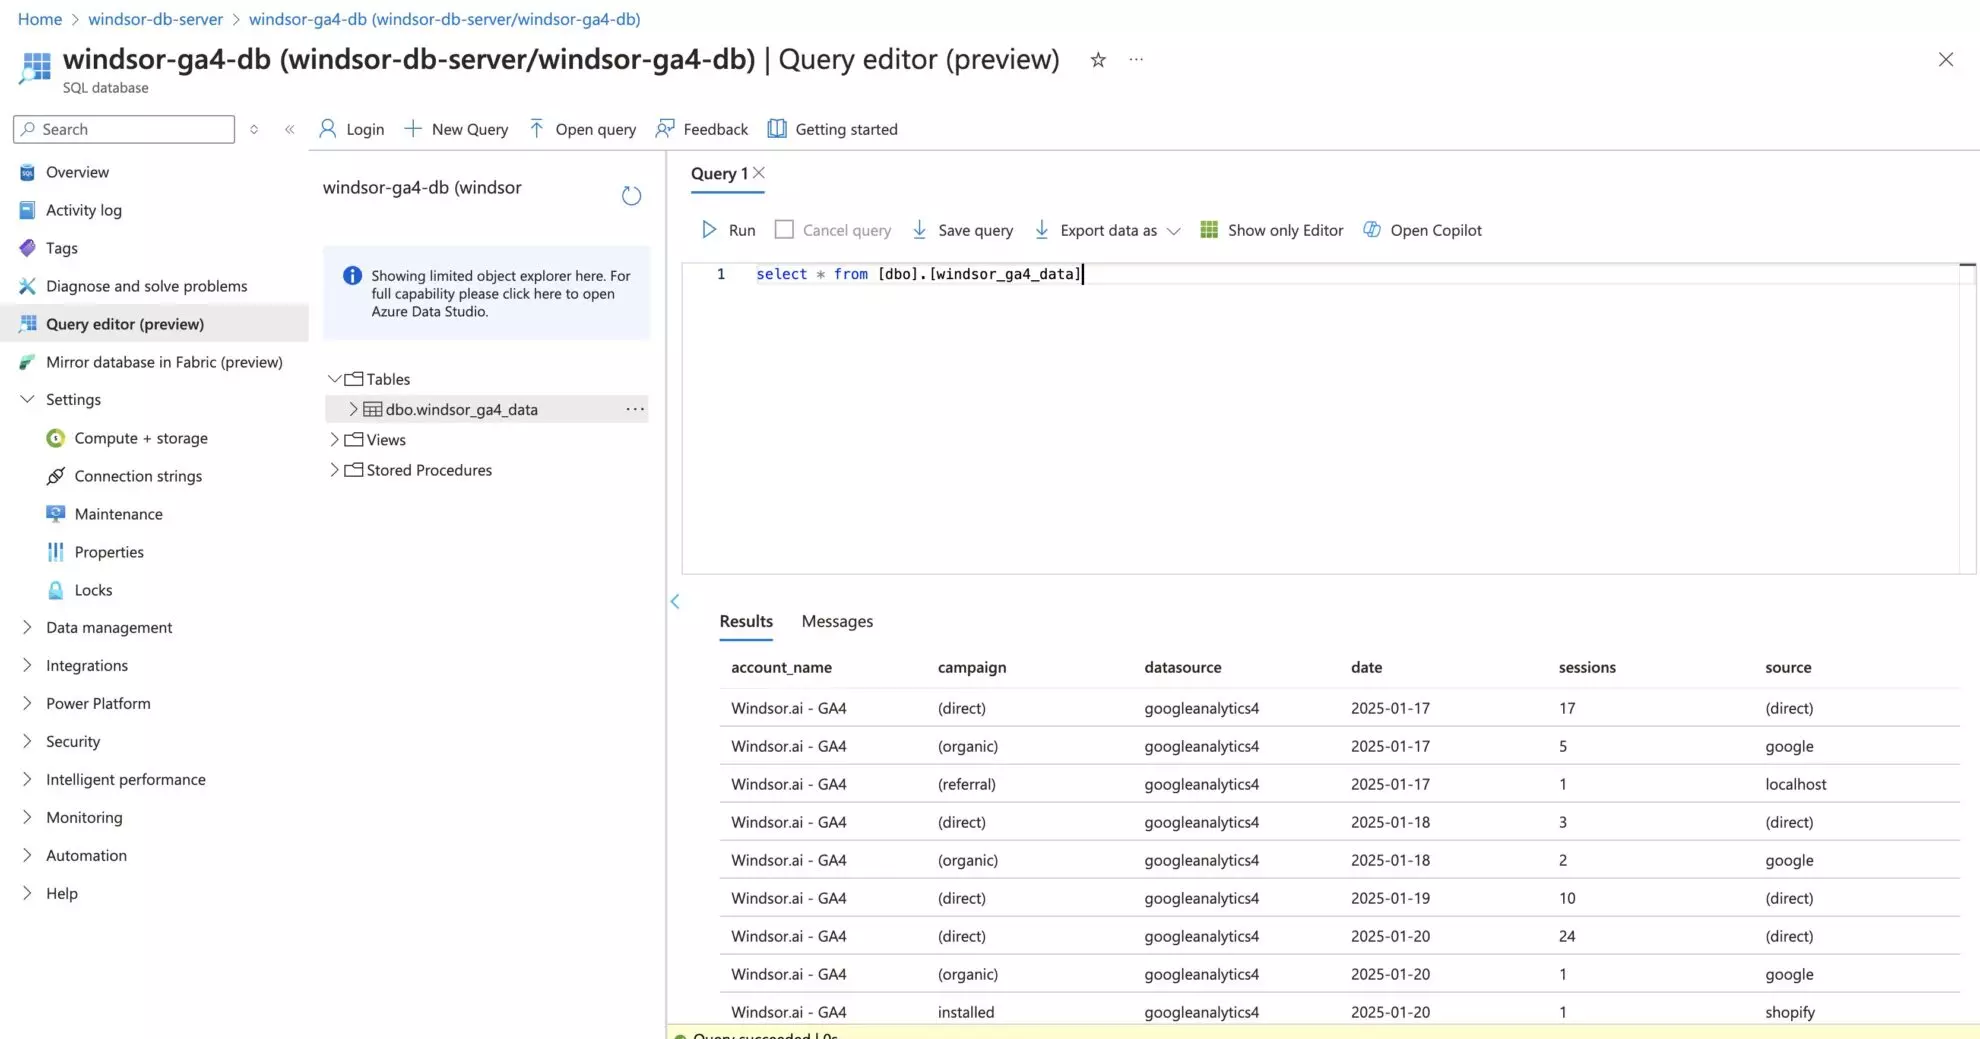
Cheers! Your Google Analytics 4 data is now integrated into the Azure SQL and ready for detailed analysis.
FAQs
What prerequisites do I need to set up Azure SQL data integration?
To begin your data integration through Windsor.ai, you will need:
- An active Azure subscription.
- Access to the Azure Portal.
- Basic knowledge of resource groups, Azure SQL server, and database, as well as giving public access through specific IP addresses.
- An active Windsor.ai account.
Can I schedule automated reports from Windsor.ai to Azure SQL?
Yes, while connecting Windsor.ai to Azure SQL, you can schedule automated data streams by specifying the schedule type and time.
What credentials do I need to connect Azure SQL with Windsor.ai?
You’ll need to provide the information about the Azure SQL server, username, password, port, and database name.
What is the port for Azure SQL?
The default port for Azure SQL is 1433. While it is possible to configure custom network rules, Azure SQL uses this port for communication by default.
What should I do if the connection test between Windsor.ai and Azure SQL fails?
Make sure you have the following things in place:
- The correct server, username, and password are provided.
- The database is already present, and access to the Windsor.ai IP address is provided in the firewall rules of the SQL server.
- An active Azure subscription.
What are some best practices for managing IP addresses in Azure SQL firewall rules?
Only allow necessary IP addresses, such as Windsor.ai’s IP and your client machine’s IP. Regularly review and update firewall rules to minimize security risks.
How can I ensure the security of my data when using Windsor.ai?
Windsor.ai uses secure OAuth authentication and encrypted data transfer protocols. Configure your Azure roles and privileges to limit access to sensitive data.
Is it possible to integrate additional data sources with Azure SQL via Windsor.ai?
Yes, Windsor.ai supports 315+ data sources, including Facebook Ads, Google Analytics, Salesforce, and other popular platforms. You can connect any data source to Azure SQL by following a similar procedure for effective cross-channel analysis.
Tired of manually transferring data to Azure SQL? Try Windsor.ai today to automate the process

