Destinations
 Data sources
 AI insights
 About us
 Careers
 Security
 Customer reviews
 Contact us
 Affiliate program
 Solution partners
 Template gallery
 Looker Studio templates
 Power BI templates
 Excel templates
 Google Sheets templates
 Tableau templates
 Facebook Ads templates
 Google Ads templates
 Data fields & Metrics
 AI prompt library & Guides
 Product documentation
 API documentation
 Case studies
 Blog
Blog Data models
 Windsor vs Supermetrics
 Windsor vs Funnel.io
 Windsor vs Fivetran
 Windsor vs Rivery
 Windsor vs Portermetrics
 Windsor vs Coupler.io
How to integrate data into Snowflake with Windsor.ai
What is Snowflake?
Snowflake is a cloud-based data platform designed for data warehousing, data lakes, and analytics. It enables organizations to store, manage, and analyze large volumes of data efficiently.
With a scalable architecture that separates storage and computing functions, Snowflake allows users to scale resources independently, optimizing both performance and cost-efficiency. Unlike traditional on-premise solutions, Snowflake operates entirely in the cloud on AWS, Azure, and Google Cloud, supporting both structured and semi-structured data formats, such as JSON and Parquet.
By integrating Snowflake with Windsor.ai data connectors, you can:
- Unify marketing, sales, and CRM data (e.g., Facebook Ads, Google Ads, Google Analytics, Salesforce) in one centralized location.
- Apply data-driven attribution to evaluate the impact of each touchpoint on the conversion, campaign, or ad level.
- Combine costs from all connected channels to calculate metrics like cost per acquisition (CPA) or return on ad spend (ROAS).
- Leverage cross-channel analytics for informed, data-driven decision-making.
Check out our video tutorial and a step-by-step guide to connect Snowflake with Windsor.ai.

How to connect Snowflake to Windsor.ai
Connecting data in Windsor.ai
- Create a Windsor.ai account and log in.
- Select the data source from which you want to stream data, e.g., Google Ads. Sign in with your associated Google account and click “Next”.
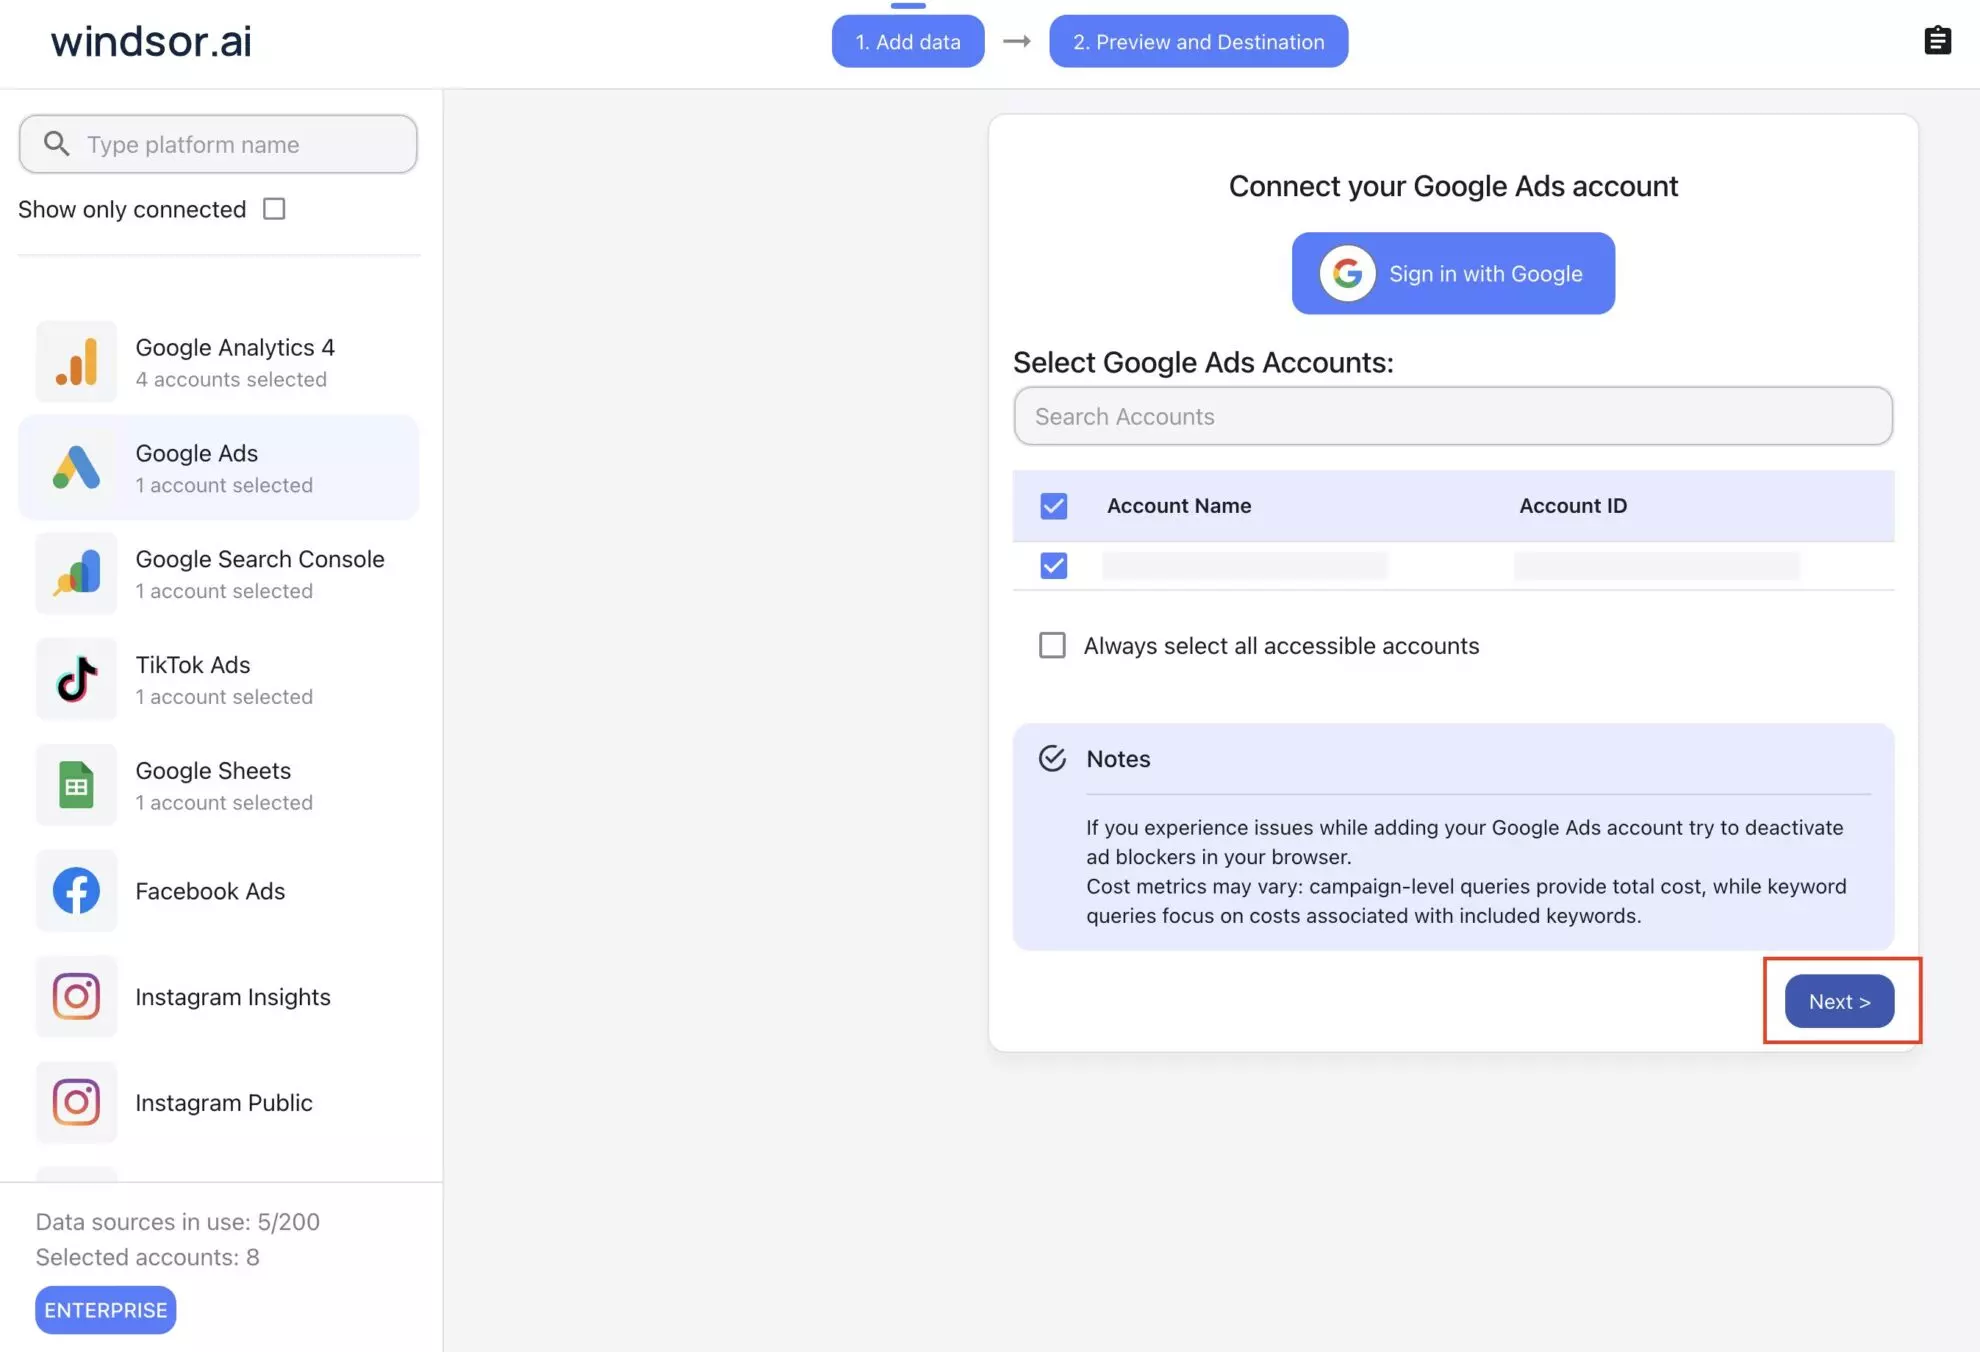
You’ll see your Google Ads data in your Windsor.ai account.
Now, let’s proceed with setting up a Snowflake database for data integration if you haven’t done it yet.
Setting up a Snowflake database
If the User role and Database setup are already done in your Snowflake account, you can skip this part and jump directly to the next step of setting up a connection with Windsor.ai.
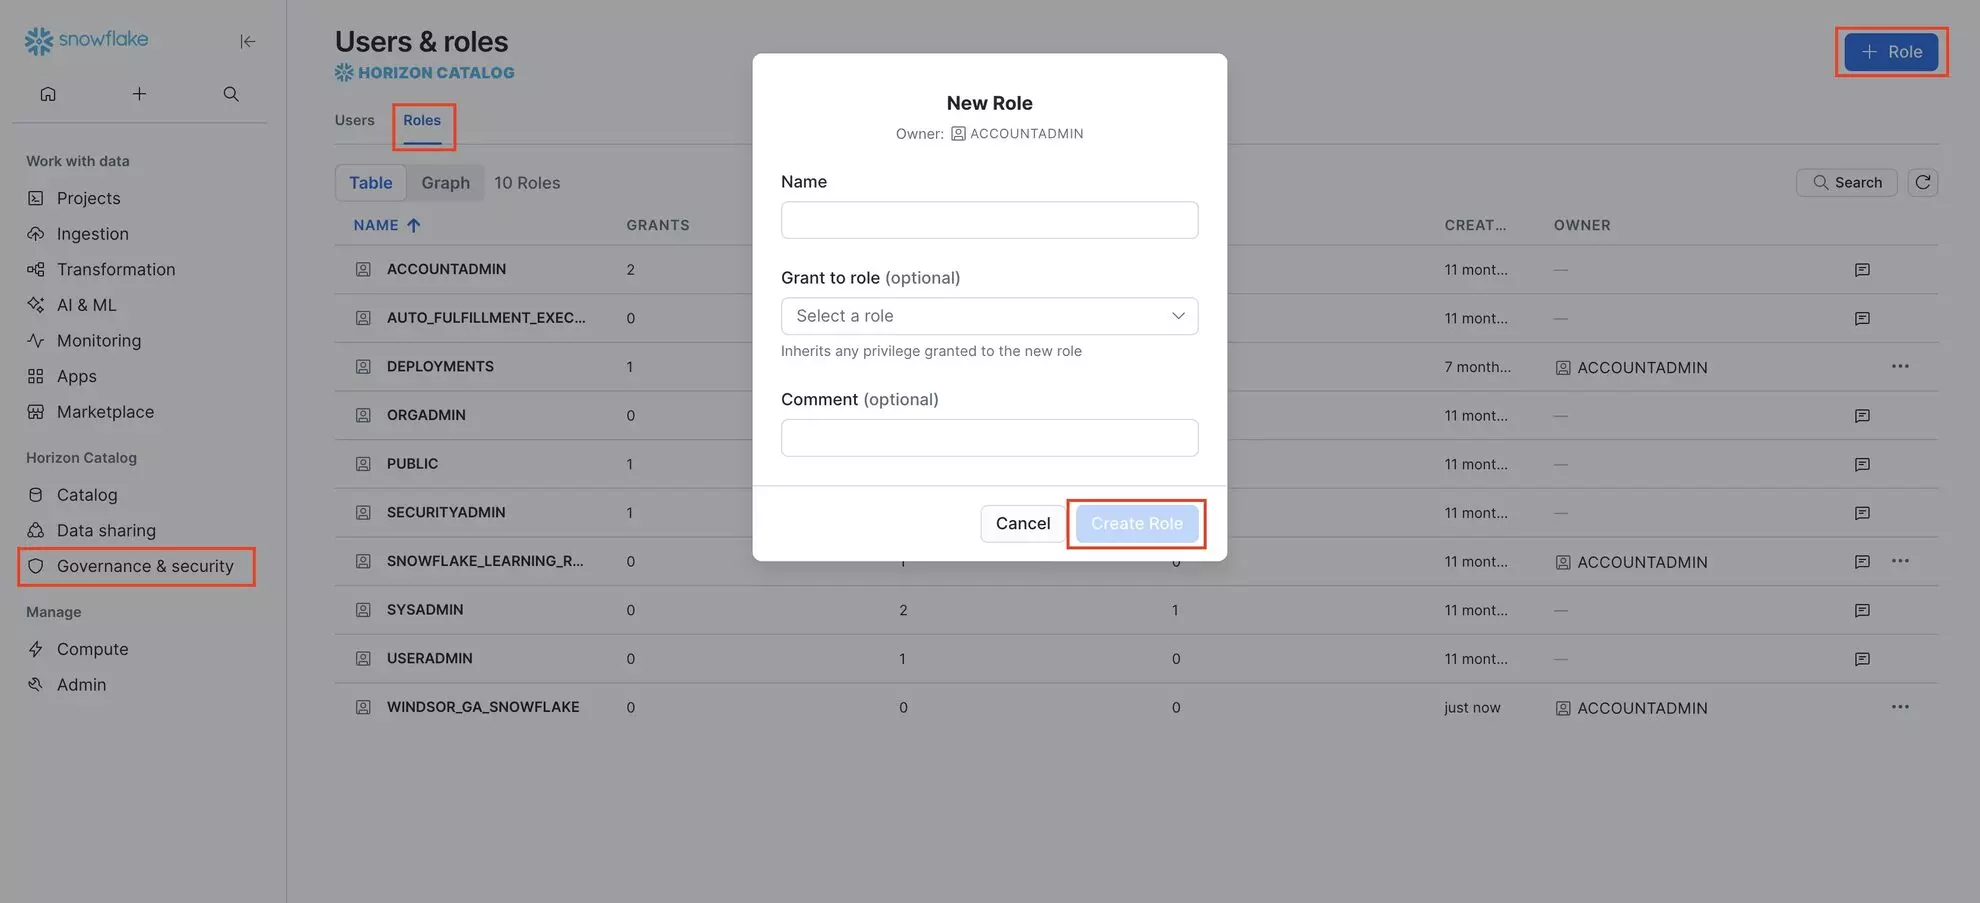
Go to your Snowflake account and create a new user role, e.g. Windsor_GA_Snowflake (you can type any name).
Governance & Security -> User & Roles -> Roles -> + Role
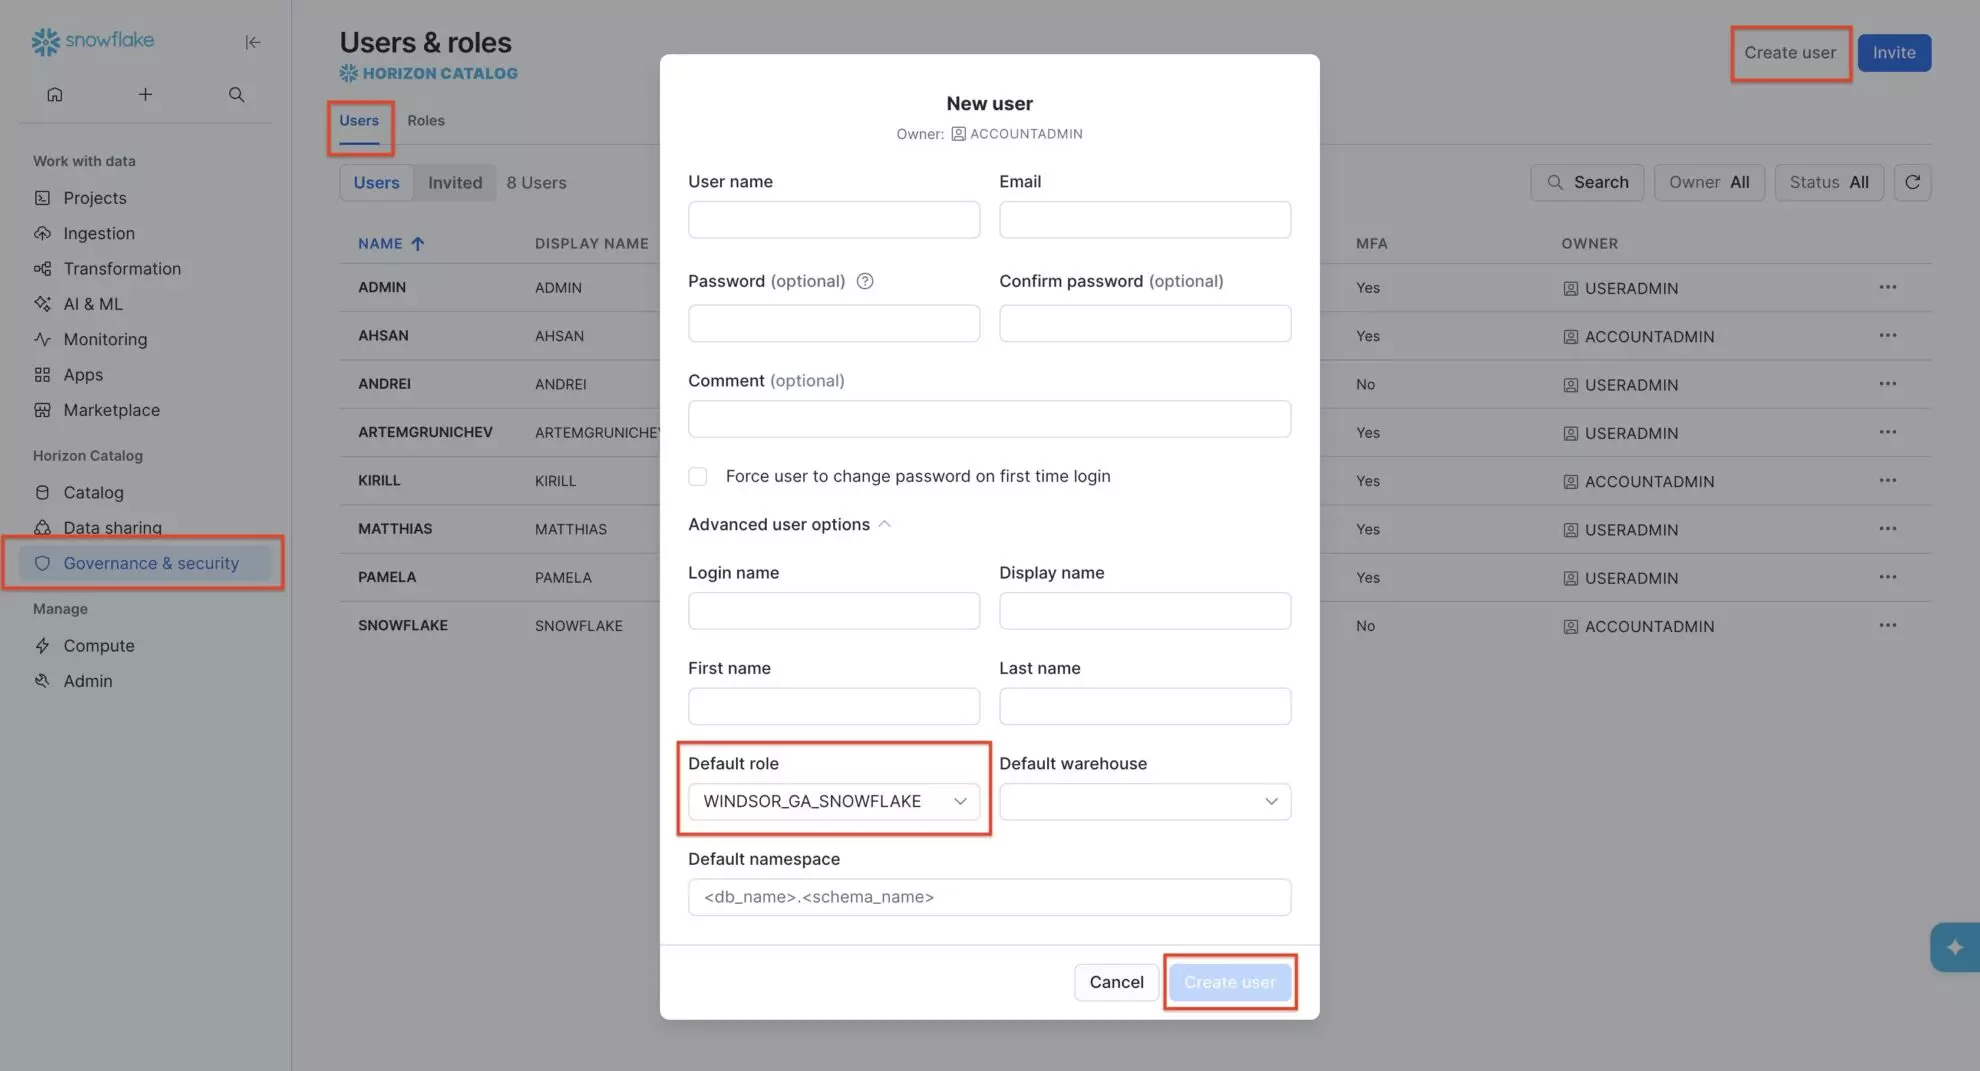
2. Then, create a new user and assign the previously created role to it.
Governance & Security -> User & Roles -> Users -> + User
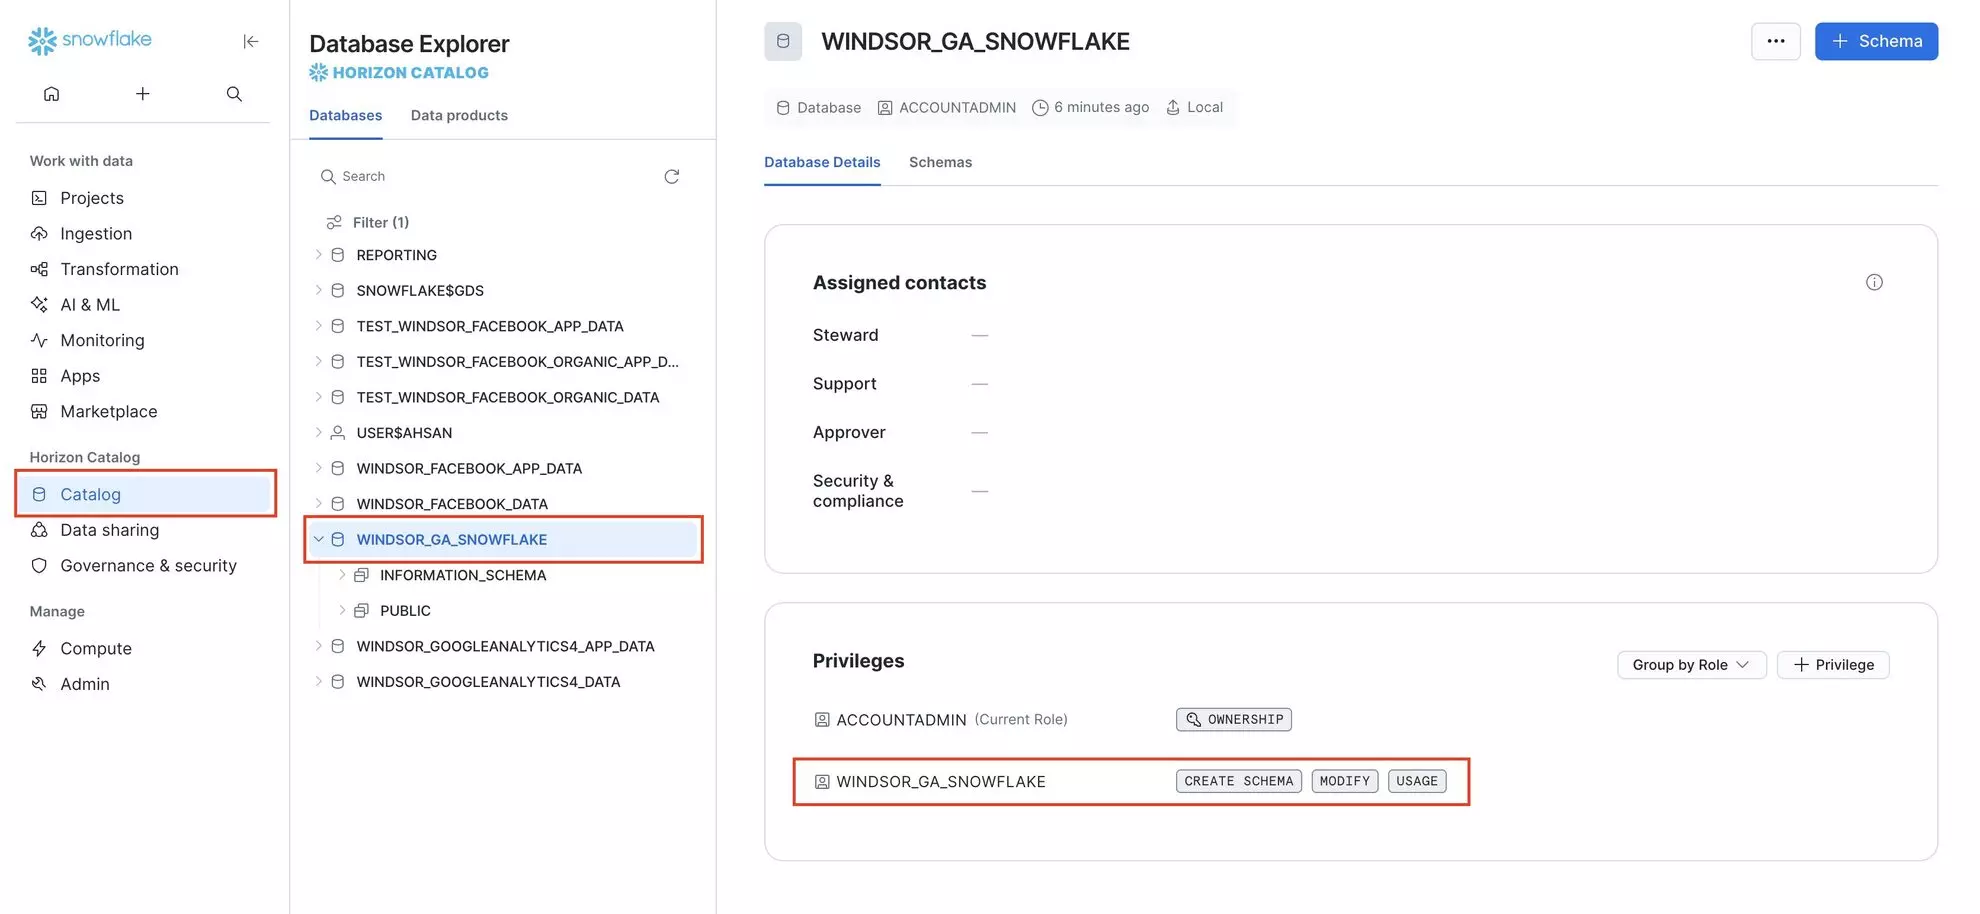
3. Grant necessary database privileges to the created role. Create a database if there is none present for Google Ads data.
Catalog -> Database Explorer -> Select Database-> + Privilege-> Select Role and Privileges
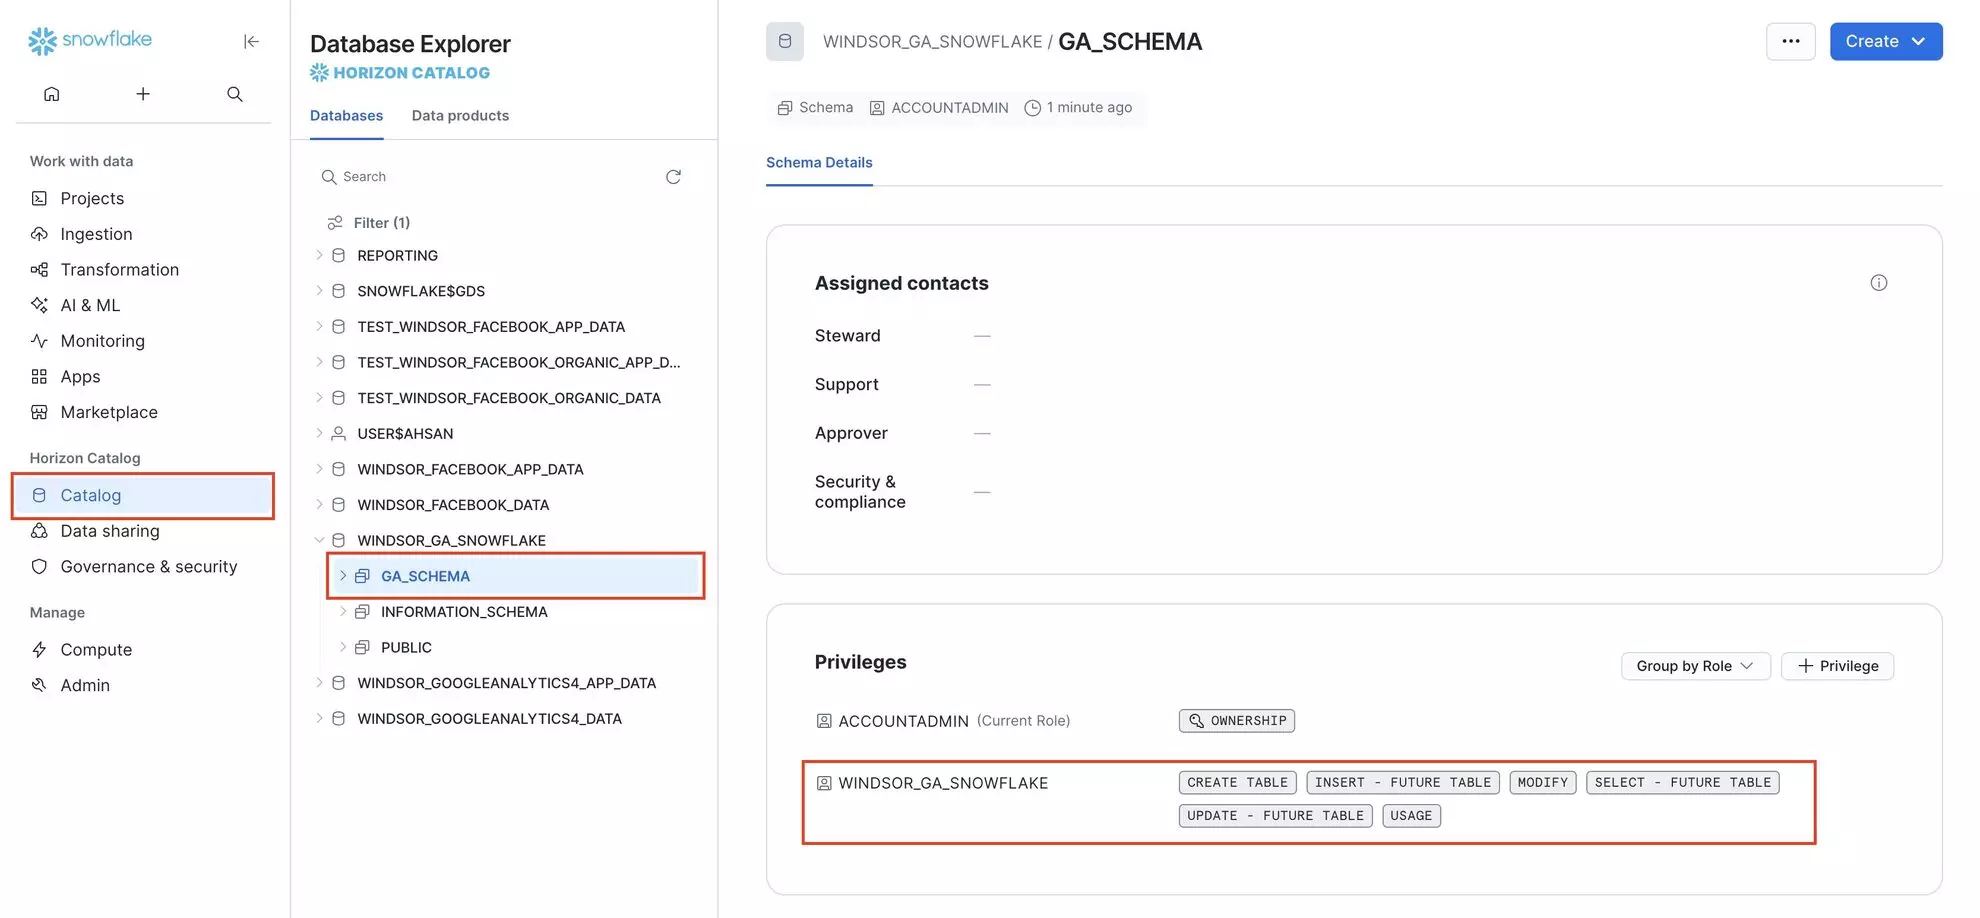
4. Grant necessary privileges of the schema to the created role. Create schema if there is none present for Google Ads data.
Catalog -> Database Explorer -> Select Database-> Select Schema-> + Privilege-> Select Role and Privileges
5. Get the required fields from Snowflake to create the connection between Snowflake and the Windsor.ai platform.
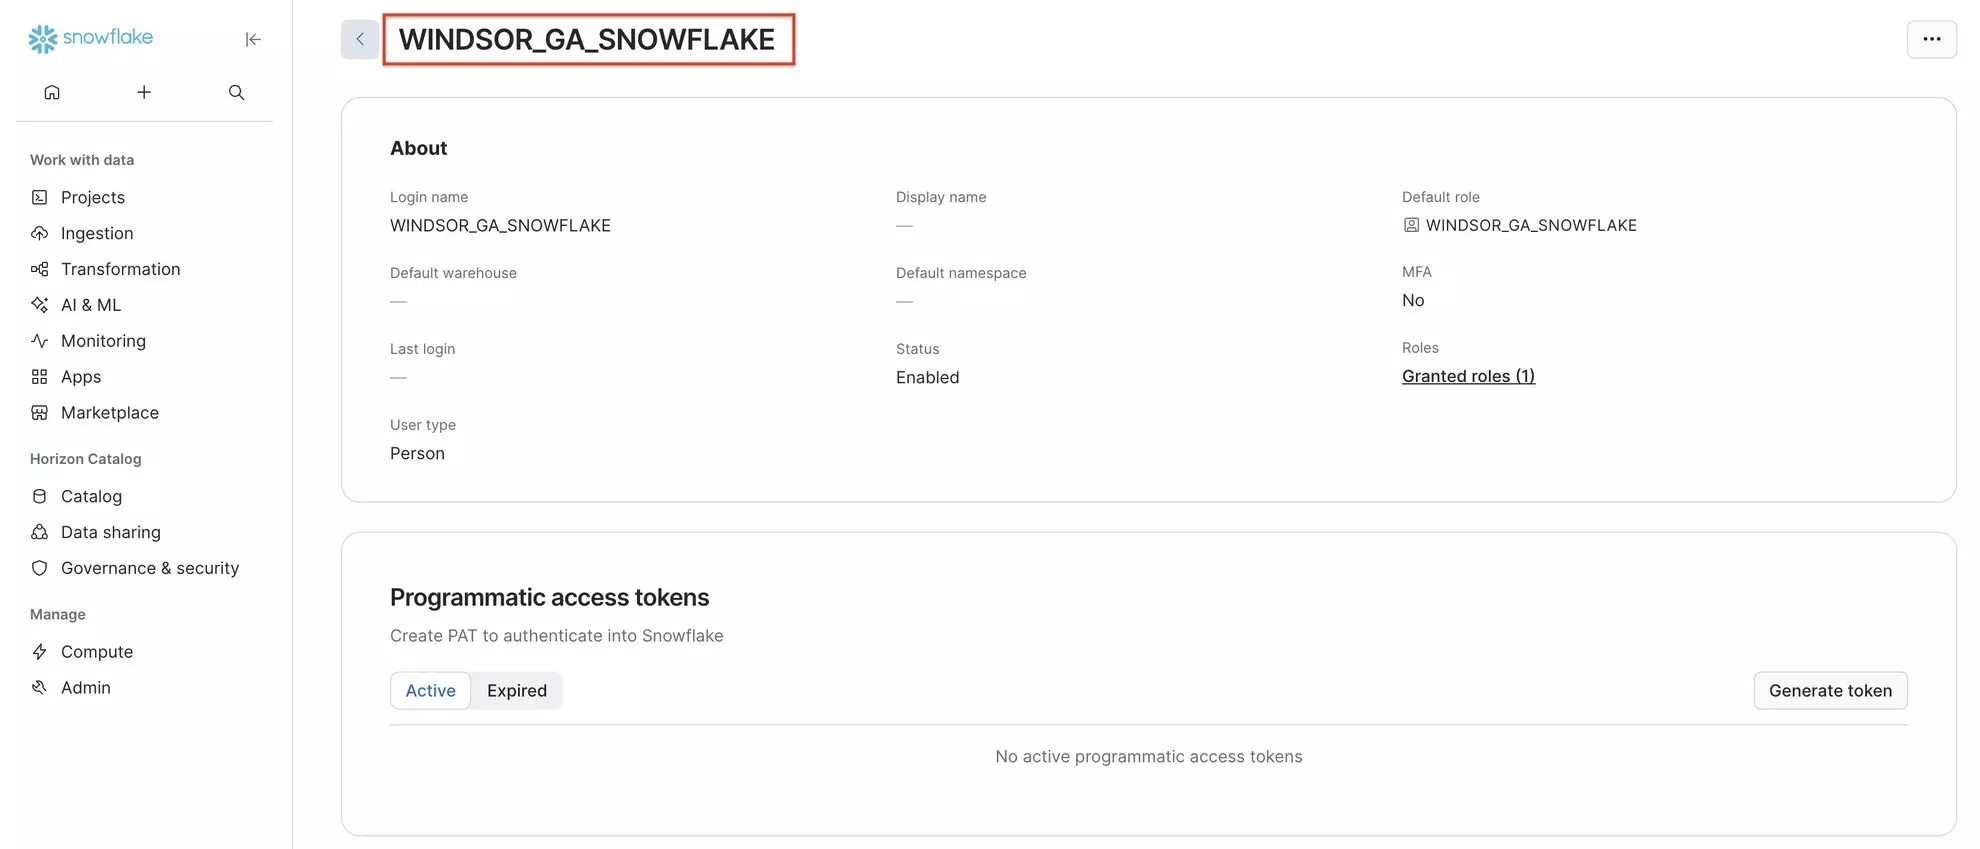
- Get the username of the newly created user.
Governance & Security -> User & Roles -> Users -> Select User
- Get the password of the newly created user. If you don’t remember the password you set while creating the user, you can reset it. Note: This password is needed when you want to connect using the Authentication Type = Password method; otherwise, skip this step.
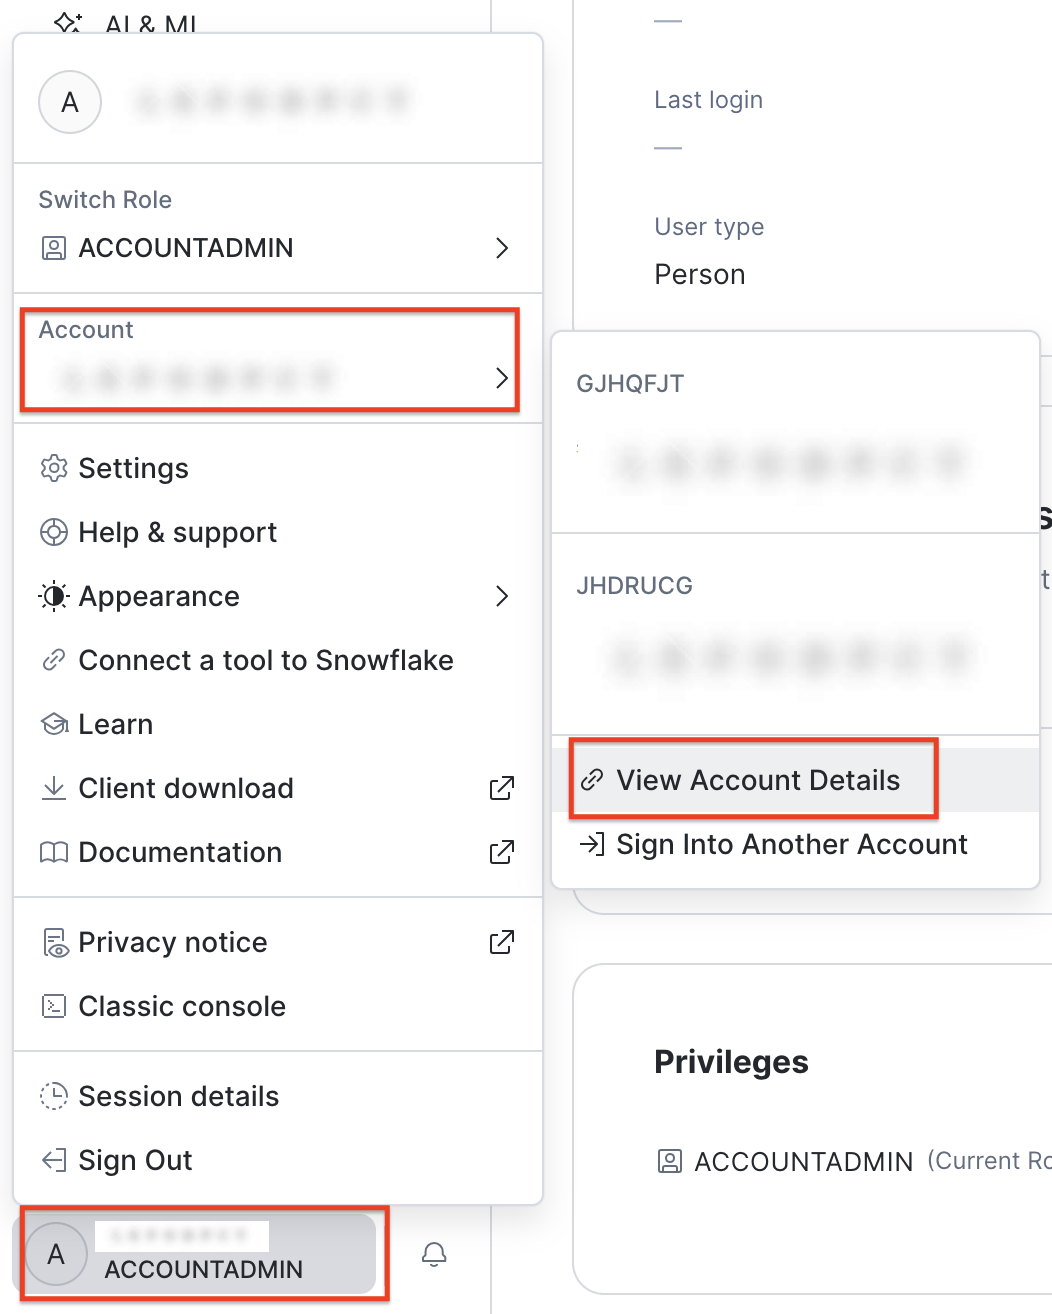
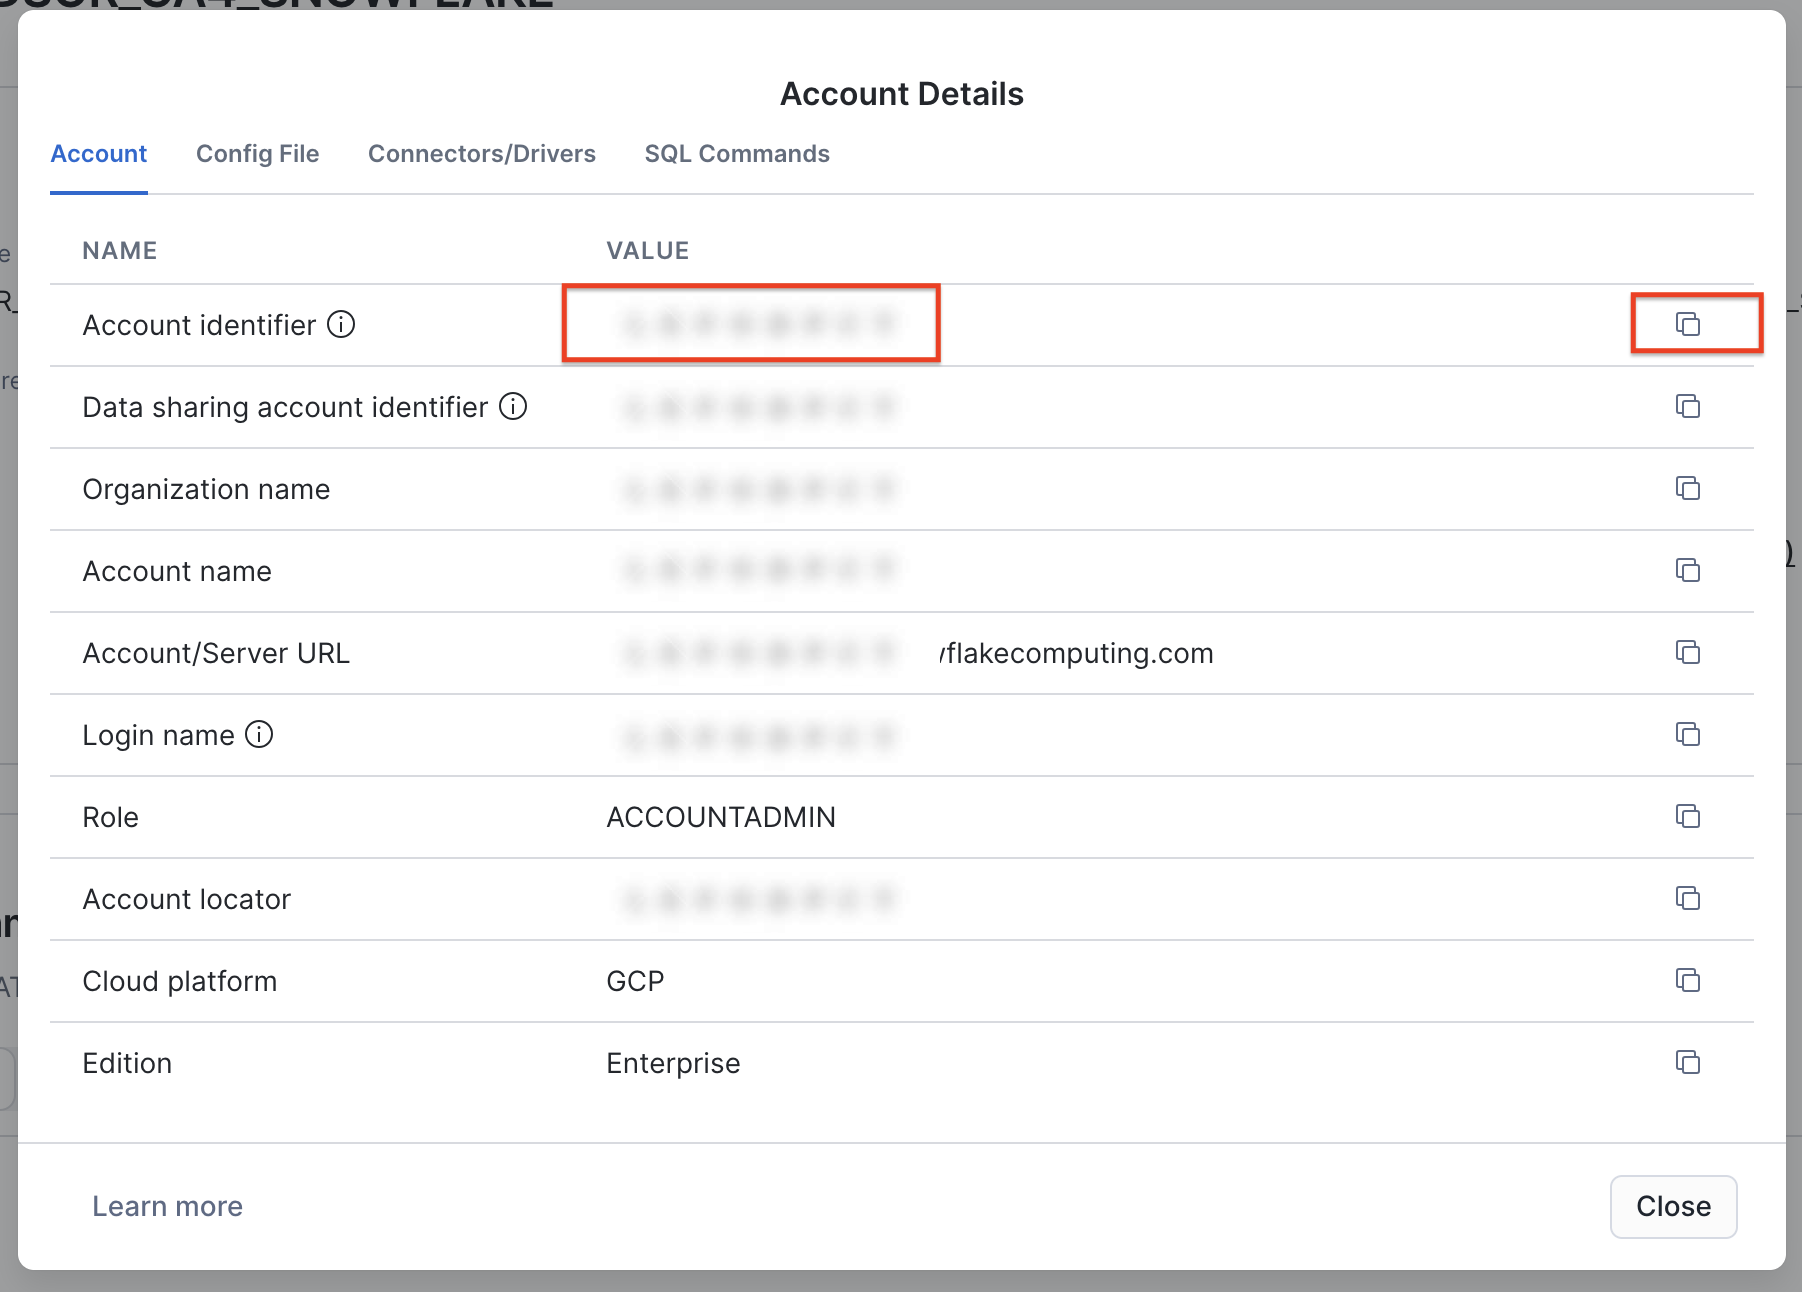
- Get the account.
Click Bottom Left Profile Menu -> Account -> View Details -> Copy Account Identifier
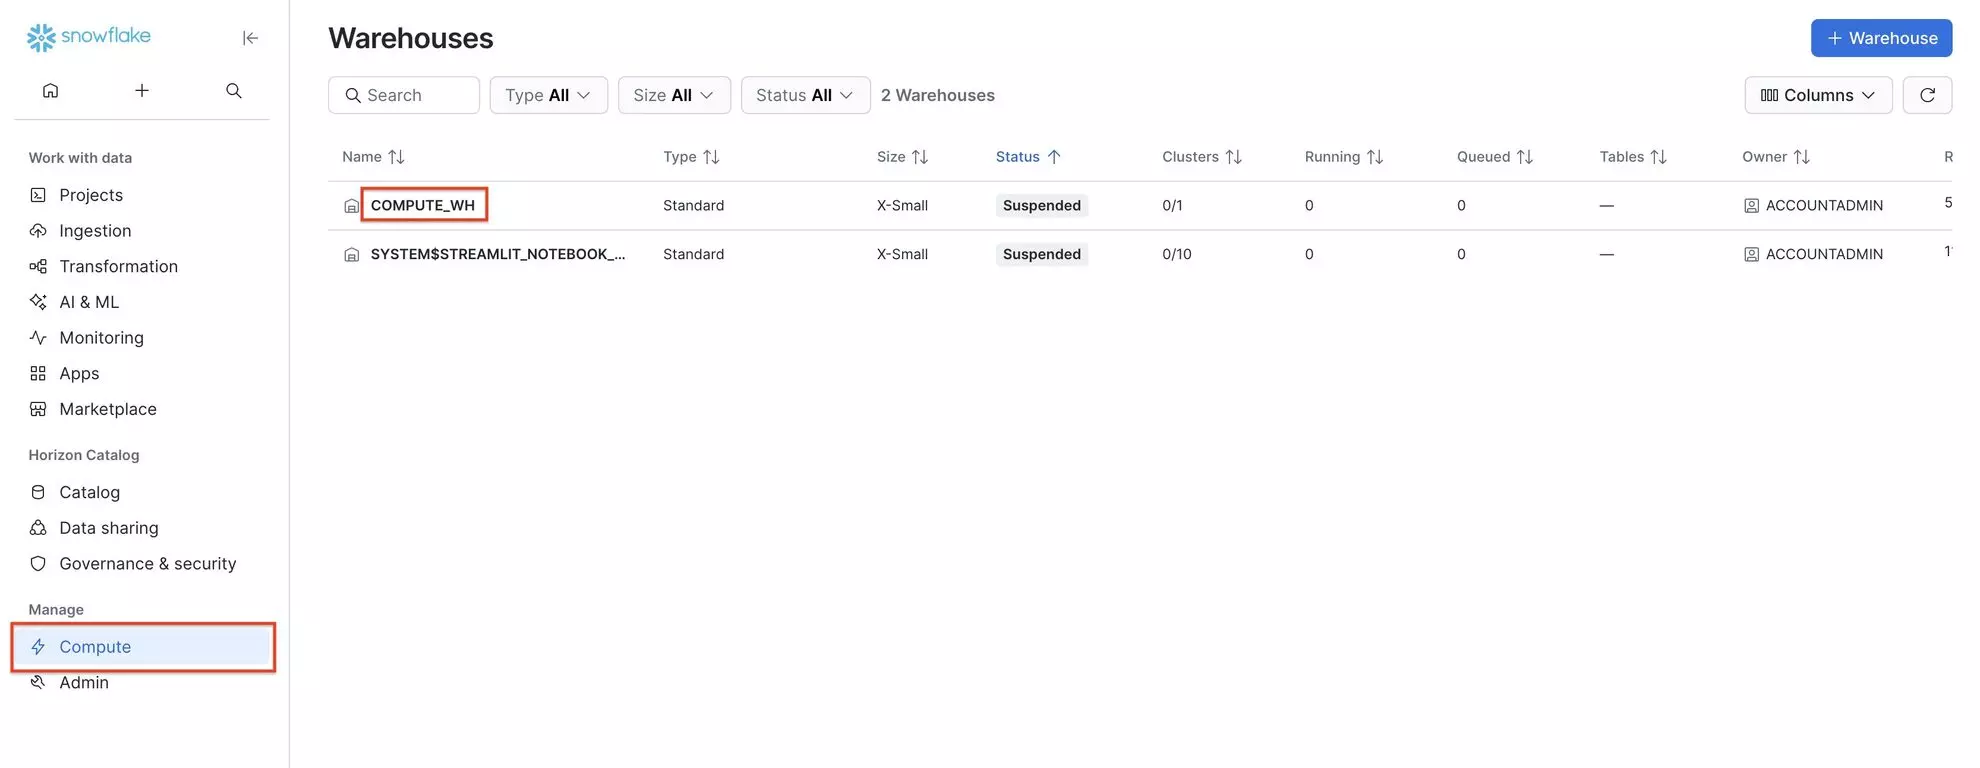
Get the warehouse.
Compute -> Warehouses
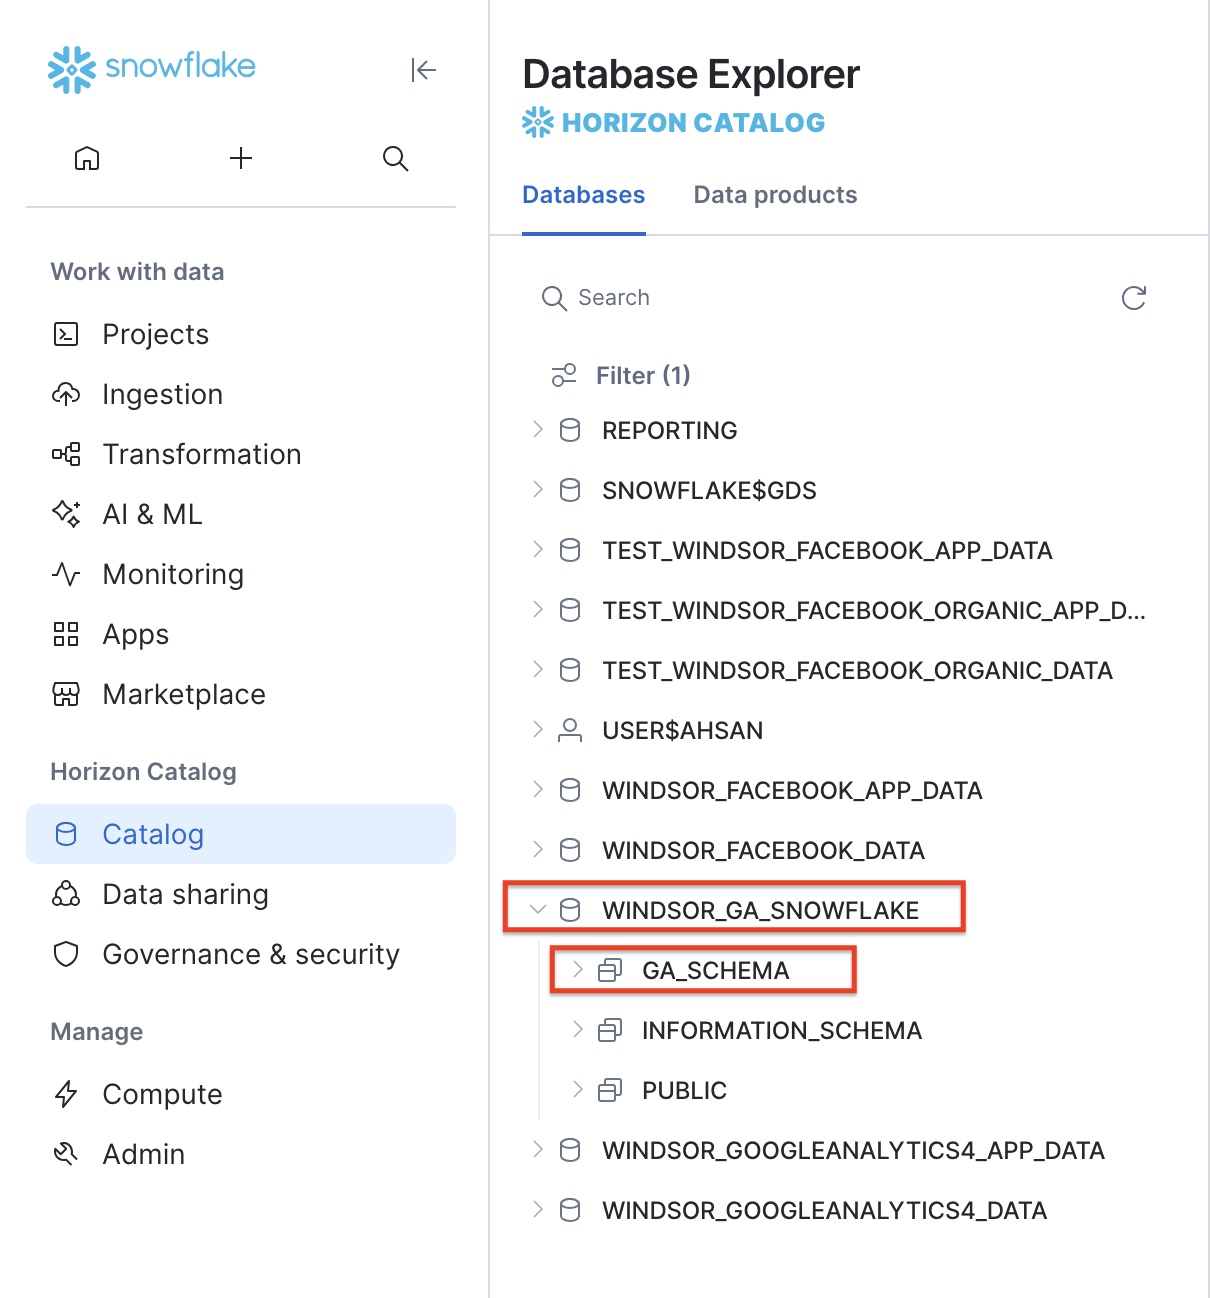
Get the database and schema names.
Catalog -> Database Explorer -> Select Database-> Select Schema
6. If you want to use the Authentication Type = RSA Key method for connection, then follow these steps; otherwise, skip them.
- Create an RSA key pair. Open the terminal window on your machine and paste this command.
openssl genrsa 2048 | openssl pkcs8 -topk8 -v2 des3 -inform PEM -out rsa_key.p8
(rsa_key is the key name; you can name it anything). It generates a private key in PEM format. It will prompt you to add a password for the key. Add the password and save it for later use.
- Generate the public key using this command:
openssl rsa -in rsa_key.p8 -pubout -out rsa_key.pub
- Open this public key using a text editor and copy the key excluding the ‘—–BEGIN PUBLIC KEY—–‘ and ‘—–END PUBLIC KEY—–‘ lines.
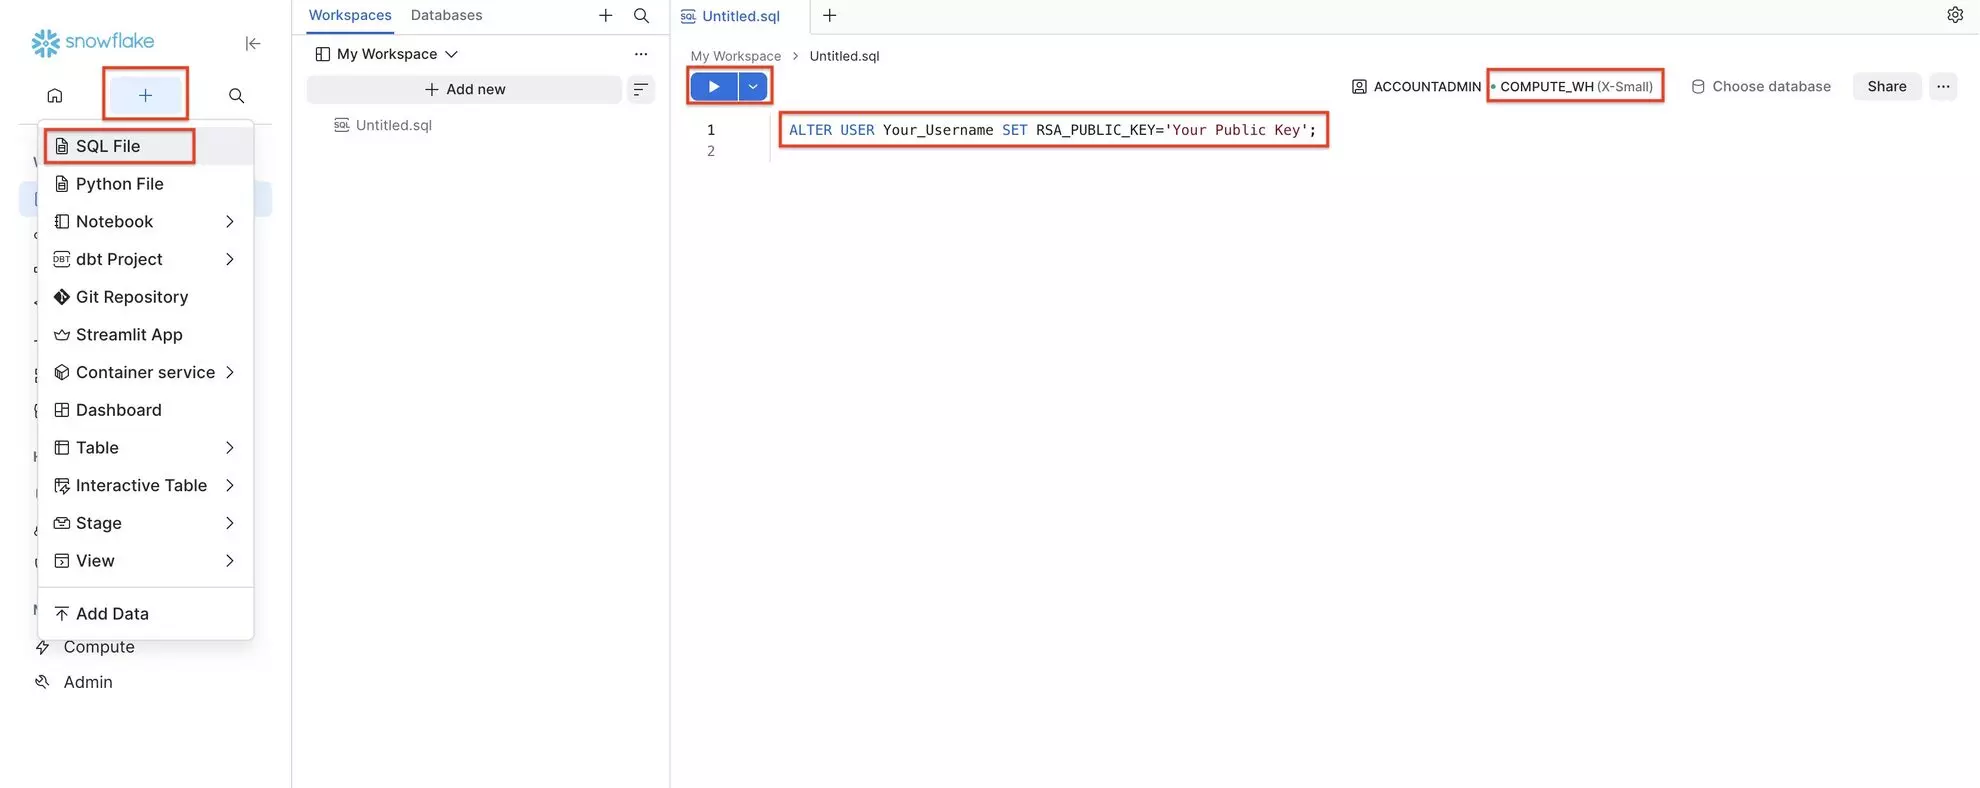
- Now, go to your Snowflake account and add the public key to your user. Click the ‘+‘ icon in the sidebar and select SQL File. It will open a SQL query editor. Paste this query into the editor and run it.
ALTER USER Your_Username SET RSA_PUBLIC_KEY=’Your_Public_Key’;
Replace Your_Username with your user and Your_Public_Key with the rsa public you copied in the previous step. This will add the public key to your user account. Make sure the query executes successfully.
Here it is; you have set up the database on the Snowflake side. Now, let’s import your data from Windsor.ai to this database.
Sending Windsor.ai data to Snowflake
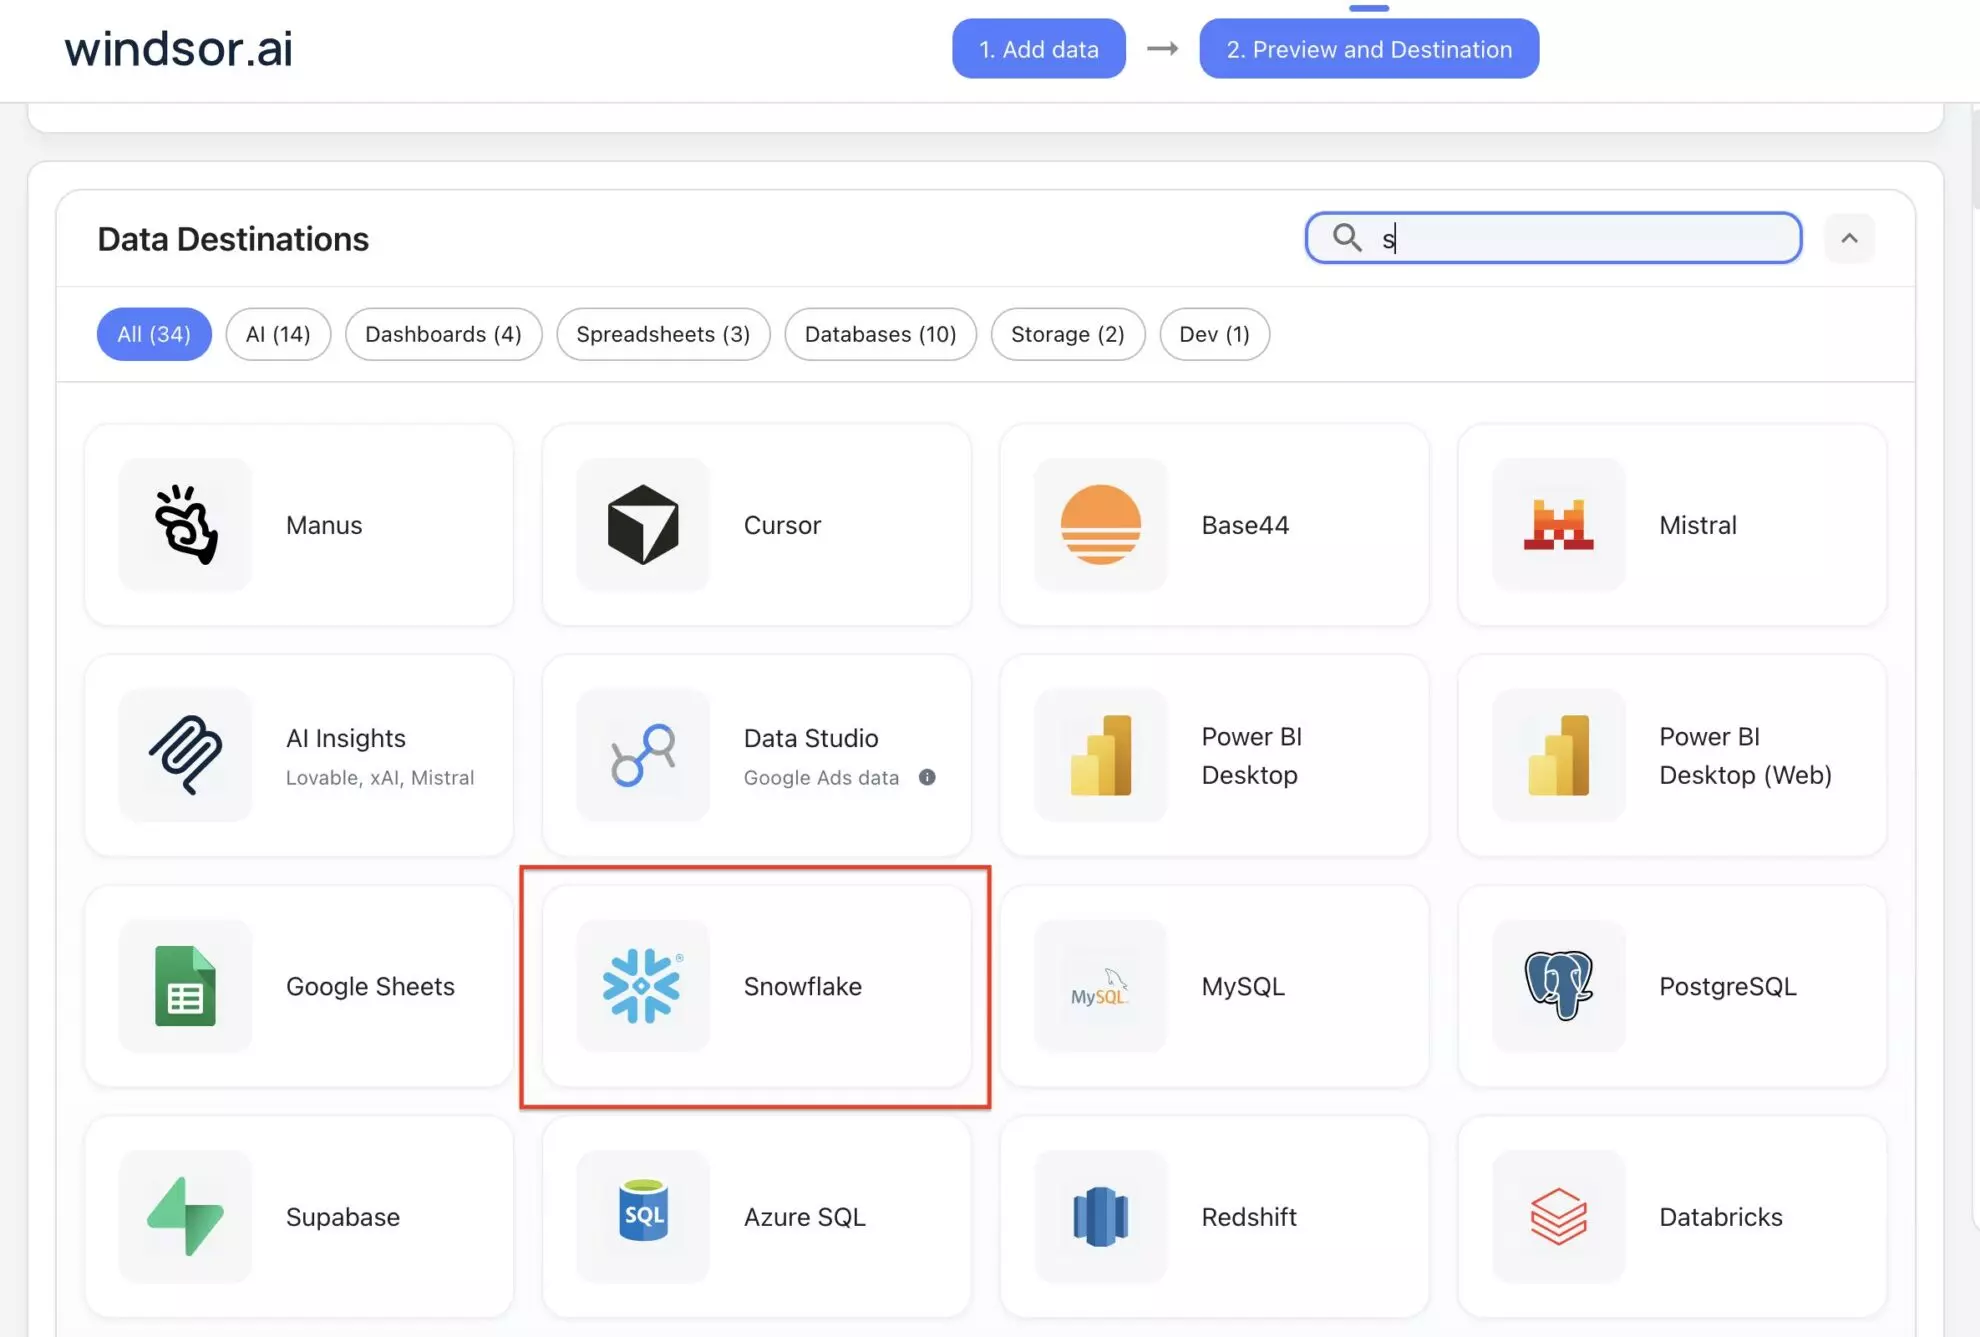
1. Go to your Windsor.ai account and move to the Google Ads data preview page. Select Snowflake as your data destination and add a destination task.
Preview and Destination -> Data Destinations “Snowflake”-> Add Destination Task
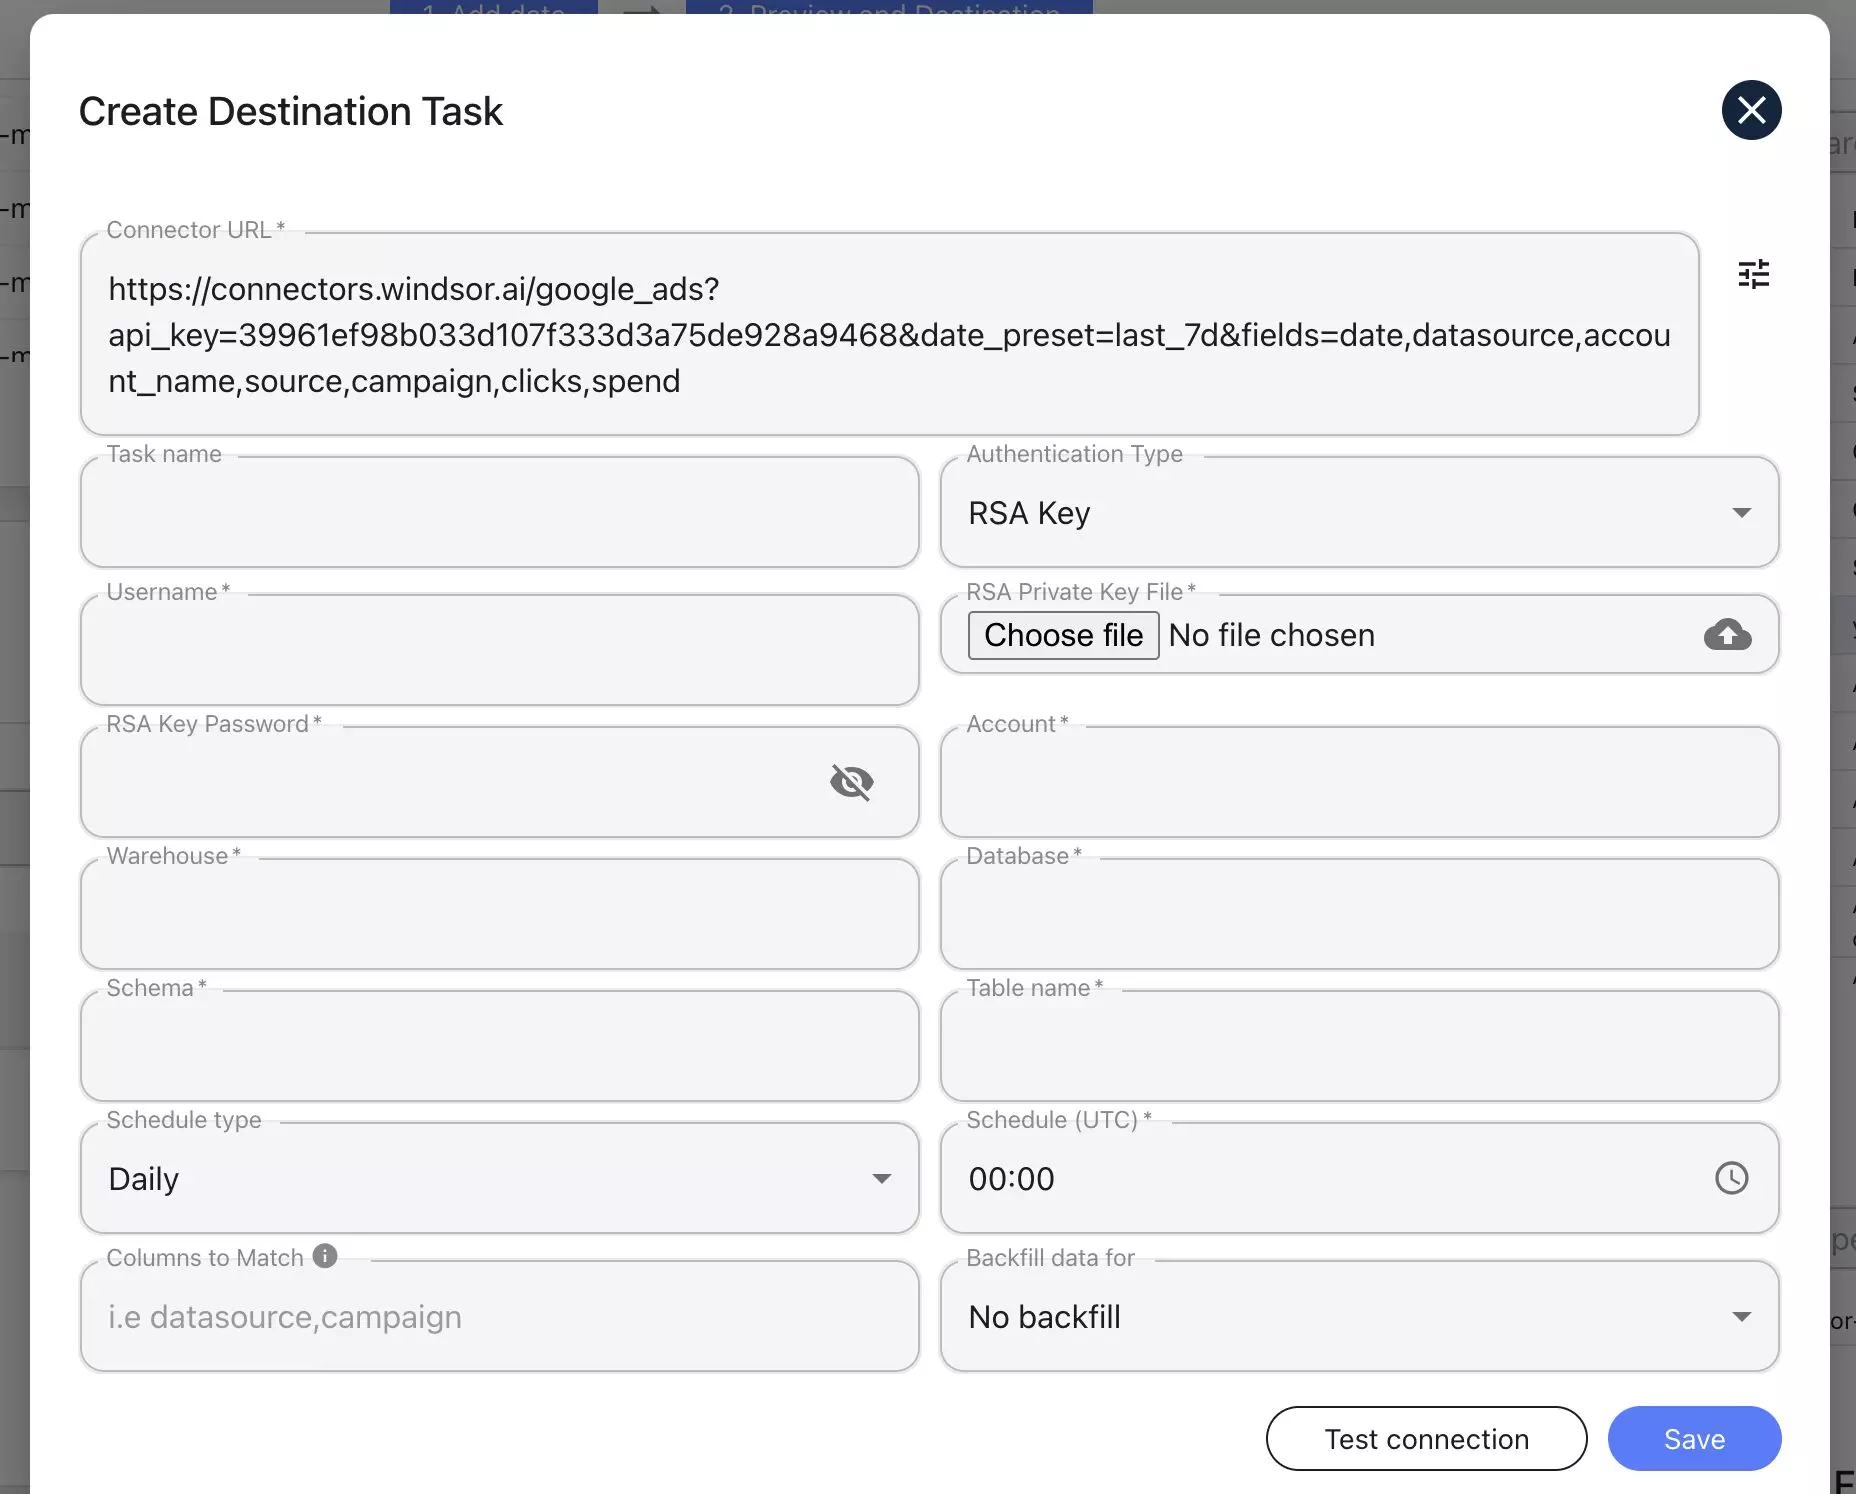
2. Enter all the credentials required:
- Task Name: Enter any name you wish.
- Authentication Type: Password or RSA key.
- Username: This can be found in your Snowflake dashboard.
- Password: Enter the password of the Snowflake account. (This option will only appear if Authentication Type=Password is selected)
- RSA Private Key and RSA Key Password: Upload the RSA private key file and its password, which you set while creating it. (This option will only appear if Authentication Type=RSA Key is selected)
- Account: Enter your Snowflake Account Identifier.
- Warehouse: Enter the warehouse name.
- Database and Schema: Enter the database and schema names.
- Table Name: You can give any name. Windsor.ai will create this table for you if it doesn’t exist.
- Backfill: You can backfill historical data when setting up the task (available only on the paid plans).
- Schedule: Define how often data should be updated in Snowflake (e.g., hourly or daily; available on Standard plans and above) and when.
3. Click on “Test connection.”
4. You’ll see a success message at the bottom if the connection is set properly; otherwise, the error message will be displayed. When successful, click “Save” in the lower-right corner of the form. The data stream to Snowflake has started.
5. You can now see the task running in the selected data destination section. The green ‘upload’ button with the status ‘ok’ indicates that the task is active and running successfully.

6. You can also verify that your data is being added to the database by previewing the data table in your Snowflake account.
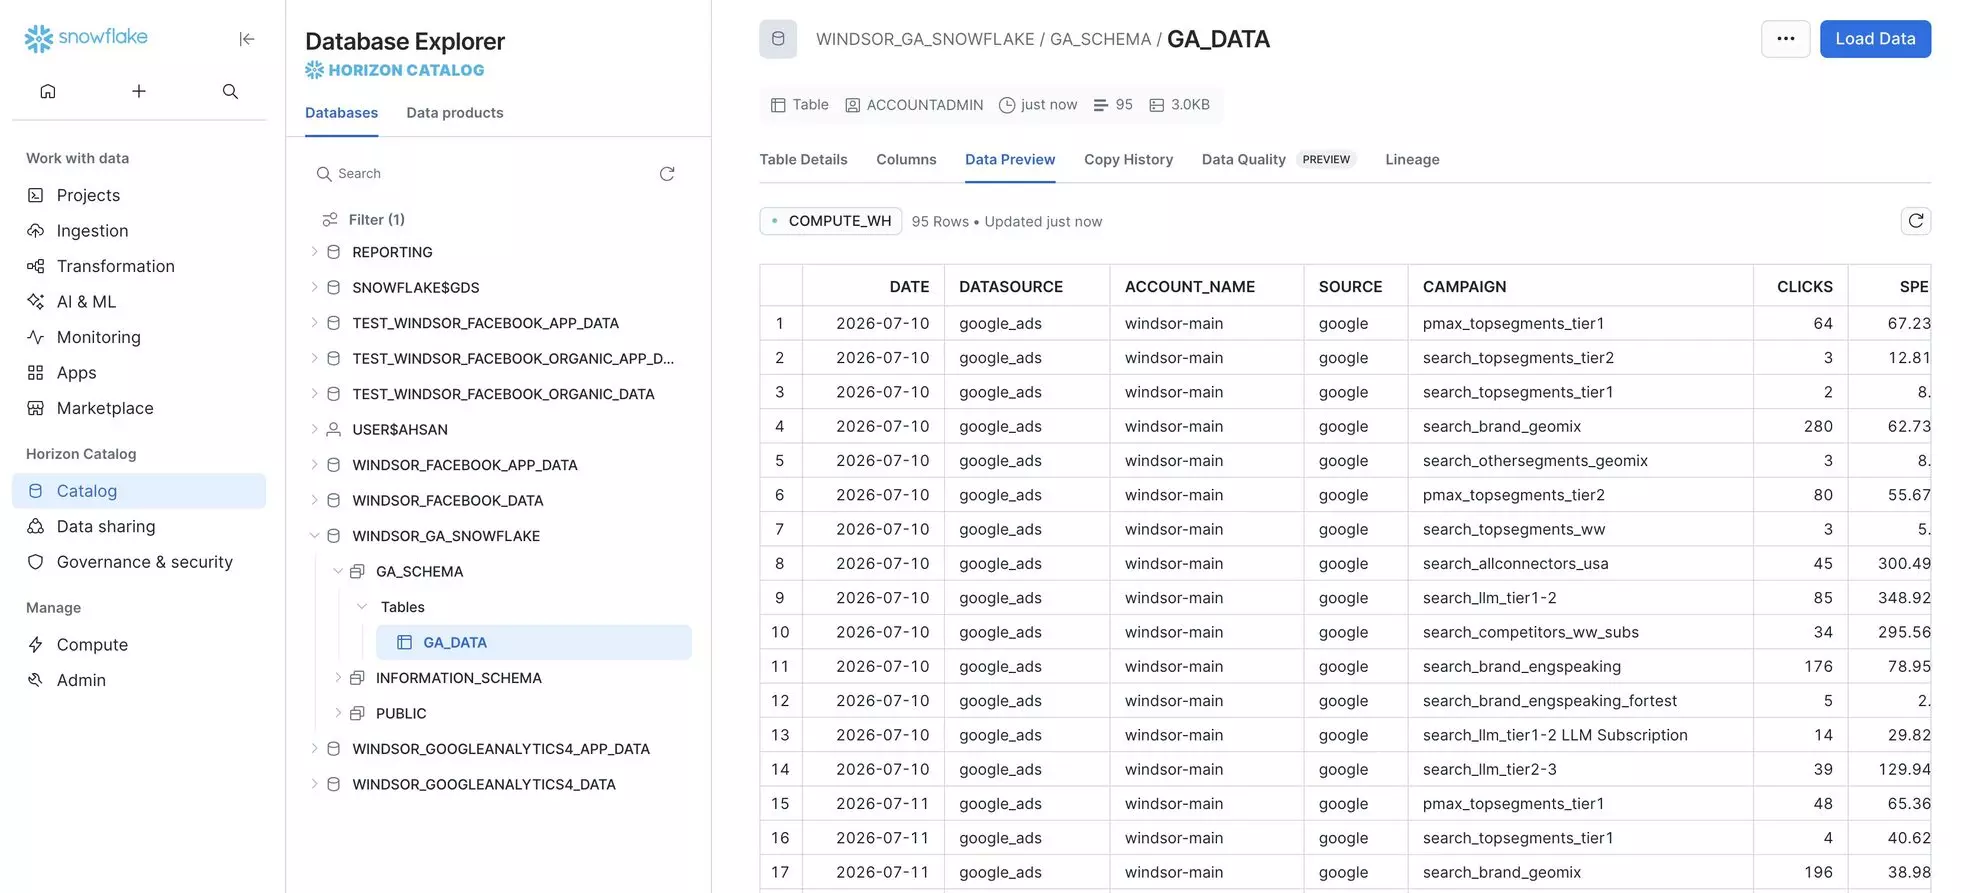
Cheers! Your Google Ads data is now integrated into the Snowflake database and ready for analysis.
FAQs
Can I schedule automated reports from Windsor.ai to Snowflake?
Yes, while connecting Windsor.ai to Snowflake, you can schedule automated data streams by specifying the schedule type and time.
What advanced settings are available in Windsor.ai for Snowflake integration?
Our advanced settings include configuring specific schemas and tables, mapping additional fields, and setting data refresh intervals to optimize performance and reduce storage costs.
What should I do if the connection test between Windsor.ai and Snowflake fails?
Make sure you have the following things in place:
- The correct username, password, or RSA key pair and account details are entered.
- A valid database and schema are provided.
- Required privileges are assigned to the user role in Snowflake.
- The ‘Save’ button at the end of the form is clicked.
How can I ensure data security when using Windsor.ai?
Windsor.ai uses secure OAuth authentication and encrypted data transfer protocols. Ensure your Snowflake roles and privileges are configured to limit access to sensitive data.
Is it possible to integrate additional data sources with Snowflake via Windsor.ai?
Yes, Windsor.ai supports a great number of data sources, including Facebook Ads, Google Analytics, Salesforce, and other popular platforms. You can connect any data source to Snowflake following a similar procedure and create a unified Snowflake environment for centralized analytics.
Tired of manually transferring data to Snowflake? Try Windsor.ai today to automate the process