 AI insights
 About us
 Careers
 Security
 Customer reviews
 Contact us
 Affiliate program
 Solution partners
 Looker Studio templates
 Tableau templates
 Facebook Ads templates
 Google Ads templates
 Data fields & Metrics
 AI prompt library & Guides
 Product documentation
 API documentation
 Case studies
 Blog
Blog Data models
 Windsor vs Supermetrics
 Windsor vs Fivetran
 Windsor vs Portermetrics
 Last updated: 20 March 2026

Shopify’s built-in analytics make it easy to manage your online store by tracking sales trends, customer behavior, product performance, and order data. However, when it comes to large-scale reporting or deeper business intelligence, its native capabilities often fall short.
That’s where Google BigQuery comes in—a powerful cloud data warehouse designed to handle large datasets with speed and precision.
BigQuery lets you:
- Run complex queries and create custom KPIs
- Combine data from various channels
- Leverage predictive analytics to forecast demand, churn, and other trends
- Gain data insights that go far beyond Shopify’s native reporting tools
The challenge? Integrating Shopify with BigQuery isn’t always straightforward. You may encounter API limitations, complex data schemas, or syncing issues.
If you’re looking for the best ways to load Shopify data into BigQuery, we’ve got you covered. In this guide, we will explore the top four methods to make this integration easy, along with expert tips and best practices.
What is Shopify?
Shopify is one of the leading e-commerce platforms, known for its user-friendly setup and intuitive interface that make it accessible even for non-technical users. It allows anyone to build and manage a fully functional online store without needing to write code.
With an all-in-one toolkit, Shopify enables users to:
- Apply free, customizable templates and themes
- Extend store functionality through a vast library of apps and plugins
- Handle payments securely and seamlessly
- Manage inventory and track stock in real time
Its simplicity, scalability, and extensive app ecosystem make Shopify a popular choice for both small businesses and large enterprises looking to grow in the e-commerce market.
What is Google BigQuery?
BigQuery is Google’s cloud data warehouse. It enables users to run advanced SQL queries and perform checks on massive datasets, allowing for quick access to stored information.
Its underlying Dremel technology works on column-based storage and tree layout. Hence, it gives faster data reading for better results during checks.
Why sync Shopify to Google BigQuery?
While Shopify is a powerful e-commerce platform, its built-in reporting tools can fall short, especially when it comes to custom metrics, growth analysis, and real-time insights.
Linking Shopify data to BigQuery is a must for any team that wants to go beyond basic reports and build a fast, live data system.
Connecting Shopify to Google BigQuery transforms how you work with your data. It allows you to run SQL queries, build dynamic dashboards in tools like Looker, and analyze your store’s performance without relying on manual CSV exports or outdated reports.
So, the key benefit of transferring Shopify data to BigQuery is that your data becomes centralized, scalable, and ready for deeper, more flexible analysis, empowering your team to make smarter, faster decisions.
How to extract your data from Shopify
Shopify offers a robust API that gives developers full access to the platform’s functionality. It’s widely used to build custom integrations and apps, many of which are distributed through the Shopify App Store. When utilizing the API for extraction, ensuring the accuracy and organization of your product data, including variants and image assets, is a critical preliminary step for successful analysis in BigQuery. In many cases, teams rely on Shopify experts to help plan the website structure before extracting data.
Like most modern APIs, the Shopify API works over HTTP and adheres to standard web protocols. Developers can interact with it using tools like cURL, Postman, or any programming language with HTTP support, such as Apache HttpClient for Java, Hyper for Rust, or Python’s built-in HTTP client.
Official toolkits include:
- iOS and Android Buy SDKs
- JavaScript Buy SDK
- Embedded App SDK
- POS App SDK
- Sales Channel SDK
These make it easier to add Shopify features to your apps.
Things to keep in mind when pulling data from Shopify
Authentication options
Shopify supports two types of apps: private and public, each with different authentication methods.
A private app is intended for a single store. You don’t need OAuth for this. API keys can be obtained from your Partner Dashboard or Store Admin. These credentials enable you to access the Shopify API and test requests using tools such as the Shopify API Console.
Public apps created through the Partner dashboard utilize OAuth. As long as you meet Shopify’s rules, you can publish your app on the App Store.
Rate limits
A “leaky bucket” system controls how Shopify limits the number of calls to its services. You are allowed to make 40 calls at once, but only two every second. If your app stays within the set limits, you won’t get errors.
Accessing data
You might wonder what data you can move from Shopify to BigQuery.
In fact, Shopify exposes over 35 API endpoints. The most important ones include:
- Orders
- Products
- Customers
- Events
- Blogs
- Transactions
To retrieve specific event data (e.g., for products or orders), you can use the following GET request:
GET /admin/api/2023-10/events.json?filter=Product,Order
The API returns data in JSON format. Example response:
HTTP/1.1 200 OK

{

 "events": [

   {

     "id": 677313116,

     "subject_id": 921728736,

     "created_at": "2008-01-10T08:00:00-05:00",

     "subject_type": "Product",

     "verb": "create",

     "arguments": [

       "IPod Touch 8GB"

     ],

     "body": null,

     "message": "created a new product: <a href=\"\/admin\/products\/921728736\">IPod Touch 8GB<\/a>.",

     "author": "Shopify",

     "description": "created a new product: IPod Touch 8GB.",

     "path": "\/admin\/products\/921728736"

   },

   {

     "id": 365755215,

     "subject_id": 632910392,

     "created_at": "2008-01-10T07:00:00-05:00",

     "subject_type": "Product",

     "verb": "create",

     "arguments": [

       "IPod Nano - 8GB"

     ],

     "body": null,

     "message": "created a new product: <a href=\"\/admin\/products\/632910392\">IPod Nano - 8GB<\/a>.",

     "author": "Shopify",

     "description": "created a new product: IPod Nano - 8GB.",

     "path": "\/admin\/products\/632910392"

   }

 ]

}
To limit the dataset and avoid duplicates, use filters like:
- created_at_min – retrieves events after a specific date
- created_at_max – retrieves events before a specific date
These filters facilitate incremental extraction, which is crucial for scalability.
Once the data is pulled, it can be cleaned, transformed, and loaded into Google BigQuery. However, extracting data from all 35+ endpoints reliably requires a fully automated ETL (Extract, Transform, Load) process—often using third-party tools like Windsor.ai or a custom pipeline.
What are the data format requirements before exporting data from Shopify to BigQuery?
When moving data from Shopify to BigQuery, ensure the data is in a format BigQuery can process. For example, if the API returns XML, you’ll need to convert it to a supported format before loading it into BigQuery. Currently, BigQuery supports two primary data formats for import:
- CSV
- JSON
Additionally, make sure that the data types you use match BigQuery’s supported types. These include:
- STRING
- INTEGER
- FLOAT
- BOOLEAN
- RECORD (nested or repeated fields)
- TIMESTAMP
Using the correct data types ensures your data loads properly and queries perform efficiently.
Why connecting Shopify to BigQuery isn’t simple
Connecting Shopify to BigQuery involves multiple challenges that require careful planning and technical expertise.
- First, Shopify lacks a built-in connector for BigQuery, so you must set up your own integration manually. The data from Shopify is typically delivered in a nested JSON format, which is not ready for direct analysis. For instance, a single order can contain multiple products, discounts, and notes, which means the data needs to be decomposed into separate tables—such as Orders, Line Items, and Discounts—and linked through keys for effective analysis.
- Moreover, Shopify does not track certain important marketing data, such as UTM codes, by default. To capture this information, custom changes to your store’s theme are necessary. Without these data transformations and enhancements, it becomes difficult to answer critical business questions such as, “Which advertising campaign generated the most sales?”
- Data formatting is another major hurdle. Shopify’s raw data is often messy and requires cleaning and structuring before it can be loaded into BigQuery. The ETL (extract, transform, load) process can be time-consuming, particularly when working with large datasets.
- Real-time or near-real-time syncing adds further complexity. Shopify’s store data—orders, customers, and products—updates frequently, sometimes every minute. Manual exports or slow syncing tools will result in outdated reports, limiting the ability to make timely decisions. Reliable tools that support frequent syncing are essential for maintaining data accuracy.
- Additionally, Shopify’s API has rate limits, which restrict the number of requests you can send within a specified period. Overloading these limits can cause delays or failures in data retrieval; therefore, implementing strategies such as throttling or scheduled incremental data pulls is essential.
- Another challenge is historical data management. Shopify doesn’t provide easy access to long-term archived data, making it hard to track trends over time. Therefore, you need a system that stores past records and continuously updates them.
- Ultimately, working with BigQuery requires a solid understanding of SQL and data warehousing concepts. Without this expertise, building custom dashboards and reports can be difficult, often necessitating support from data professionals or developers.
4 proven ways to move data from Shopify to BigQuery
To overcome the major challenges of connecting Shopify to BigQuery, consider using these integration methods for a quick and straightforward process:
Method 1. Middleware via Cloud Functions or Workflows
Method 2. Shopify’s Admin API + custom scripts
Method 3. Manual CSV export & BigQuery upload
Method 4. Using ETL/ELT tools for automated Shopify to BigQuery data integration
Method 1. Middleware via Cloud Functions or Workflows
Prerequisites:
- A Google Cloud Platform (GCP) account with billing enabled
- Node.js or Python programming knowledge
- Access to Shopify’s Admin API, including an API access token with appropriate permissions
- A BigQuery dataset and table created to receive Shopify data
- Familiarity with Google Cloud SDK, Cloud Functions, Cloud Scheduler, and Workflows
- Understanding of JSON data parsing and data cleaning concepts
Google Cloud Functions and Workflows allow you to build a serverless, automated pipeline to move data from Shopify to BigQuery. This method fetches data from Shopify’s Admin API, processes it via Cloud Functions, and loads it into BigQuery. Workflows can be used to orchestrate multiple steps and tasks, such as splitting data fetches, transforming data, and loading it efficiently.
This method is ideal for large-scale environments where pipelines require fine control and customization.
Implementation steps:
- Create a Google Cloud Function using Node.js or Python.
- Call Shopify’s Admin API to fetch data. These steps will require an access token.
- Parse and clean the data. For example, converting the JSON data.
- Use the BigQuery client library to upload data into your table.
- Schedule the function using Cloud Scheduler or orchestrate with Workflows.
Pros:
- Highly customizable
- Scalable and automated
- Low cost (pay-per-use)
Cons:
- Requires programming and technical skills
- Extensive setup and debugging are needed
Method 2. Shopify’s Admin API + custom scripts
Prerequisites:
- Python 3.x installed
- requests and google-cloud-bigquery libraries installed (pip install requests google-cloud-bigquery)
- Google Cloud service account JSON key with BigQuery permissions and GOOGLE_APPLICATION_CREDENTIALS environment variable set
- Shopify API credentials (API key and password or access token)
- BigQuery dataset and table created with an appropriate schema matching the data you want to upload
Another method to transfer data from Shopify to BigQuery involves creating a custom script using Python or Node.js to connect with the Shopify admin API. The custom script can get data from the admin API and upload it to BigQuery for further data analysis. Custom scripts give complete control over field-level changes, duplicates, and edits.
This approach can be beneficial if you prefer to perform repetitive tasks, such as string cleaning steps, within a single Python script. It can also help people who prefer version-controlled pipelines.
Implementation steps:
1. Write a script using Python, Node.js, or another programming language to access the Shopify Admin API.
Script sample:
import requests

import time

from google.cloud import bigquery


# Shopify API credentials and store info

SHOPIFY_STORE = "your-store-name"

API_VERSION = "2023-07"

API_KEY = "your-api-key"

PASSWORD = "your-api-password"  # Or use access token with headers if using OAuth


# BigQuery info

BQ_PROJECT = "your-gcp-project-id"

BQ_DATASET = "your_dataset"

BQ_TABLE = "your_table"


# Shopify API endpoint

BASE_URL = f"https://{API_KEY}:{PASSWORD}@{SHOPIFY_STORE}.myshopify.com/admin/api/{API_VERSION}/orders.json"


# BigQuery client

bq_client = bigquery.Client(project=BQ_PROJECT)


def fetch_shopify_orders():

    all_orders = []

    url = BASE_URL

    params = {

        "limit": 250,  # max per request

        "status": "any",  # fetch all orders (open, closed, cancelled)

    }


    while url:

        print(f"Fetching: {url}")

        response = requests.get(url, params=params)

        if response.status_code != 200:

            print(f"Error fetching data: {response.status_code}, {response.text}")

            break


        data = response.json()

        orders = data.get("orders", [])

        all_orders.extend(orders)


        # Handle pagination

        link_header = response.headers.get("Link")

        if link_header and 'rel="next"' in link_header:

            # Extract next URL from the Link header

            links = link_header.split(",")

            next_url = None

            for link in links:

                if 'rel="next"' in link:

                    next_url = link[link.find("<")+1:link.find(">")]

                    break

            url = next_url

            params = {}  # reset params for next URL as it has params embedded

            # Respect rate limit

            time.sleep(0.5)

        else:

            url = None


    print(f"Total orders fetched: {len(all_orders)}")

    return all_orders


def clean_orders_data(orders):

    # Simplified: Flatten only some key fields for demo; extend as needed

    cleaned = []

    for order in orders:

        cleaned.append({

            "id": order["id"],

            "email": order.get("email"),

            "created_at": order["created_at"],

            "total_price": float(order["total_price"]),

            "currency": order["currency"],

            "financial_status": order["financial_status"],

            "fulfillment_status": order["fulfillment_status"],

            "customer_id": order["customer"]["id"] if order.get("customer") else None,

            "line_items_count": len(order.get("line_items", []))

        })

    return cleaned


def upload_to_bigquery(data):

    table_id = f"{BQ_PROJECT}.{BQ_DATASET}.{BQ_TABLE}"

    errors = bq_client.insert_rows_json(table_id, data)

    if errors:

        print(f"Errors occurred while inserting rows: {errors}")

    else:

        print(f"Successfully inserted {len(data)} rows into {table_id}")

def main():

    orders = fetch_shopify_orders()

    cleaned_data = clean_orders_data(orders)

    upload_to_bigquery(cleaned_data)


if __name__ == "__main__":

    main()
2. Fetch the desired data, such as/orders.json or/customers.json.
3. Handle pagination, rate limits, and formatting.
4. Connect to BigQuery via Google Cloud’s client libraries.
5. Run the script manually or automate via cron jobs. This will import data from Shopify to BigQuery.
Pros:
- Full control over data flow
- Customizable to fit unique requirements
- No third-party tool dependency
Cons:
- Requires coding and maintenance
- API limits must be managed
- Not beginner-friendly
Method 3. Manual CSV Export & BigQuery upload
Prerequisites:
- A Google Cloud Platform (GCP) account with billing enabled
- Access to Shopify’s Admin API, including an API access token with appropriate permissions
- A BigQuery dataset and table created to receive Shopify data
- CSV file handling
- Optional: local development tools. If you’re using the command line (via the bq tool), install and initialize the Google Cloud SDK: https://cloud.google.com/sdk/docs/install
It’s one of the most straightforward manual methods to connect Shopify to Google BigQuery.
Shopify allows you to export order, product, and customer data to CSV files, which can then be uploaded to BigQuery using the Cloud Console or the bq command line.
Implementation steps:
- In Shopify Admin, go to “Orders,” “Customers,” or “Products.”Under “Data,” click on Export and choose CSV for Excel or Numbers.
- Go to Google Cloud Console, then to BigQuery, and click Create Table.
- Choose the Upload option, pick your CSV, and either let it guess the data format or write it yourself.
- Press Create Table to add the data. This step will load data from Shopify to BigQuery.
Pros:
- Simple and quick
- No coding required
- Suitable for basic analytics
Cons:
- Manual and time-consuming
- No automation or scheduling
- Not suitable for large or frequent data transfers
Bonus tip: Many use this method for quick and simple data checks or to provide demo data to clients. It’s fast and not too hard.
Method 4. Using ETL/ELT tools for automated Shopify to BigQuery data integration
While the aforementioned methods of syncing Salesforce data with BigQuery can be time-consuming and require technical expertise, using third-party ETL (extract, transform, load) or ELT tools makes the process much faster, easier, and fully managed.
In fact, using ETL/ELT tools to move data from Shopify to BigQuery is the most reliable and straightforward method. The reason? These tools automate the entire data integration process, saving you time and effort.
Windsor.ai is a robust ETL/ELT platform that handles all the work required to sync Shopify data to BigQuery via its Admin API. Windsor promotes automatic integration, where data is fetched, cleaned, and sent to the target BigQuery tables at your preferred schedule.
This approach is ideal both for marketing teams and data engineers who want to transfer large-scale Shopify data without getting bogged down in the code.
Why use ELT/ETL tools:
- These tools build complex data pipelines for you, eliminating manual data exports and uploads.
- Set up automated data syncing on your preferred schedule—no more manual updates.
- Custom data structures and hierarchies can be easily defined and mapped.
- Get monitoring dashboards and real-time error alerts.
- Avoid human error or the burden of writing scripts or cron jobs.
- Prepare for growth with easy scaling as your data expands.
Pros:
- No coding required
- Fast and simple setup
- Scheduled refreshes
- Auto-handles schema changes
Cons:
- Subscription fee
- Dependency on a third-party tool
Using Windsor.ai’s no-code ELT/ETL connectors, you can automatically import your Shopify data into BigQuery in minutes without programming skills.
Here’s how Windsor.ai handles the integration between Shopify and BigQuery:
✅ Instantly accesses Shopify’s Admin API, pulling hundreds of Shopify metrics and dimensions, using OAuth for secure access.
✅ Automatically converts data into BigQuery-friendly formats, such as JSON and Avro.
✅ Supports nested structures and custom fields.
✅ Auto-refreshes data in BigQuery tables according to the set schedule.
Below is an overview of the benefits and steps for integrating Shopify data into BigQuery using Windsor.ai.
Implementation steps:
Windsor.ai’s BigQuery Integration Documentation: https://windsor.ai/documentation/how-to-integrate-data-into-google-bigquery/.
1. Sign up for Windsor.ai and start your 30-day free trial.
2. In the data sources list, select Shopify and connect your account(s):
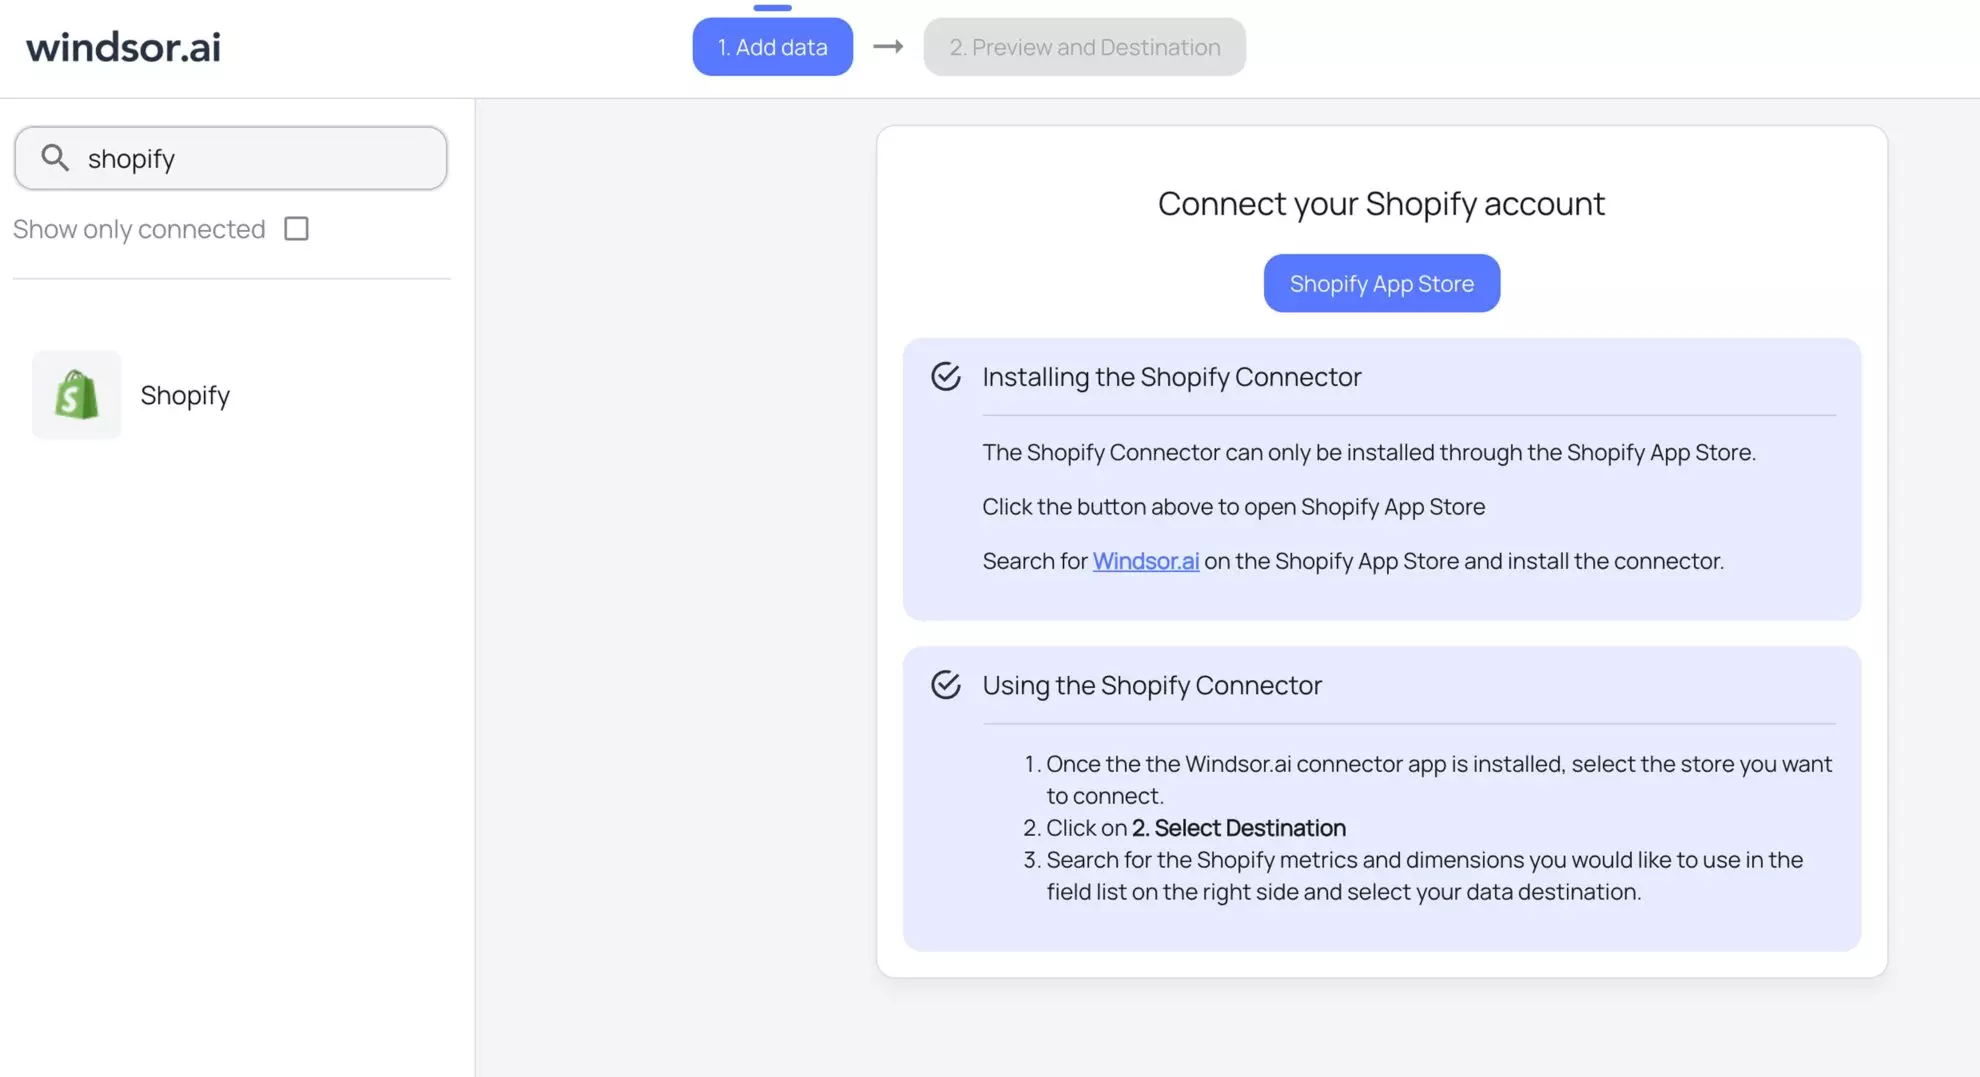
3. The connection is completed. View the list of your available Shopify account(s) and select the necessary one(s) from which you want to pull data.
4. Click on the “Next” button to proceed with moving Shopify data to BigQuery.
5. Next, configure your dataset by selecting the desired date range and specific fields you want to stream into BigQuery. Click on Get Data to preview your extracted data in Windsor.

6. Scroll down to the Data Destinations section and choose BigQuery from these options:

7. Click on the Add Destination Task and authorize your BigQuery account. In the destination task, add the following details from your BigQuery project:
- Task name: Enter any name you wish.
- Authentication type: You can authorize via a Google Account (OAuth 2.0) or a Service Account file.
- Project ID: This can be found in your Google Cloud Console.
- Dataset ID: This can be found in your BigQuery project.
- Table name: Windsor.ai will create this table for you if it doesn’t exist.
- Backfill: You can backfill historical data when setting up the task (available only on the paid plans).
- Schedule: Define how often data should be updated in BigQuery (e.g., hourly, daily; available on Standard plans and above).
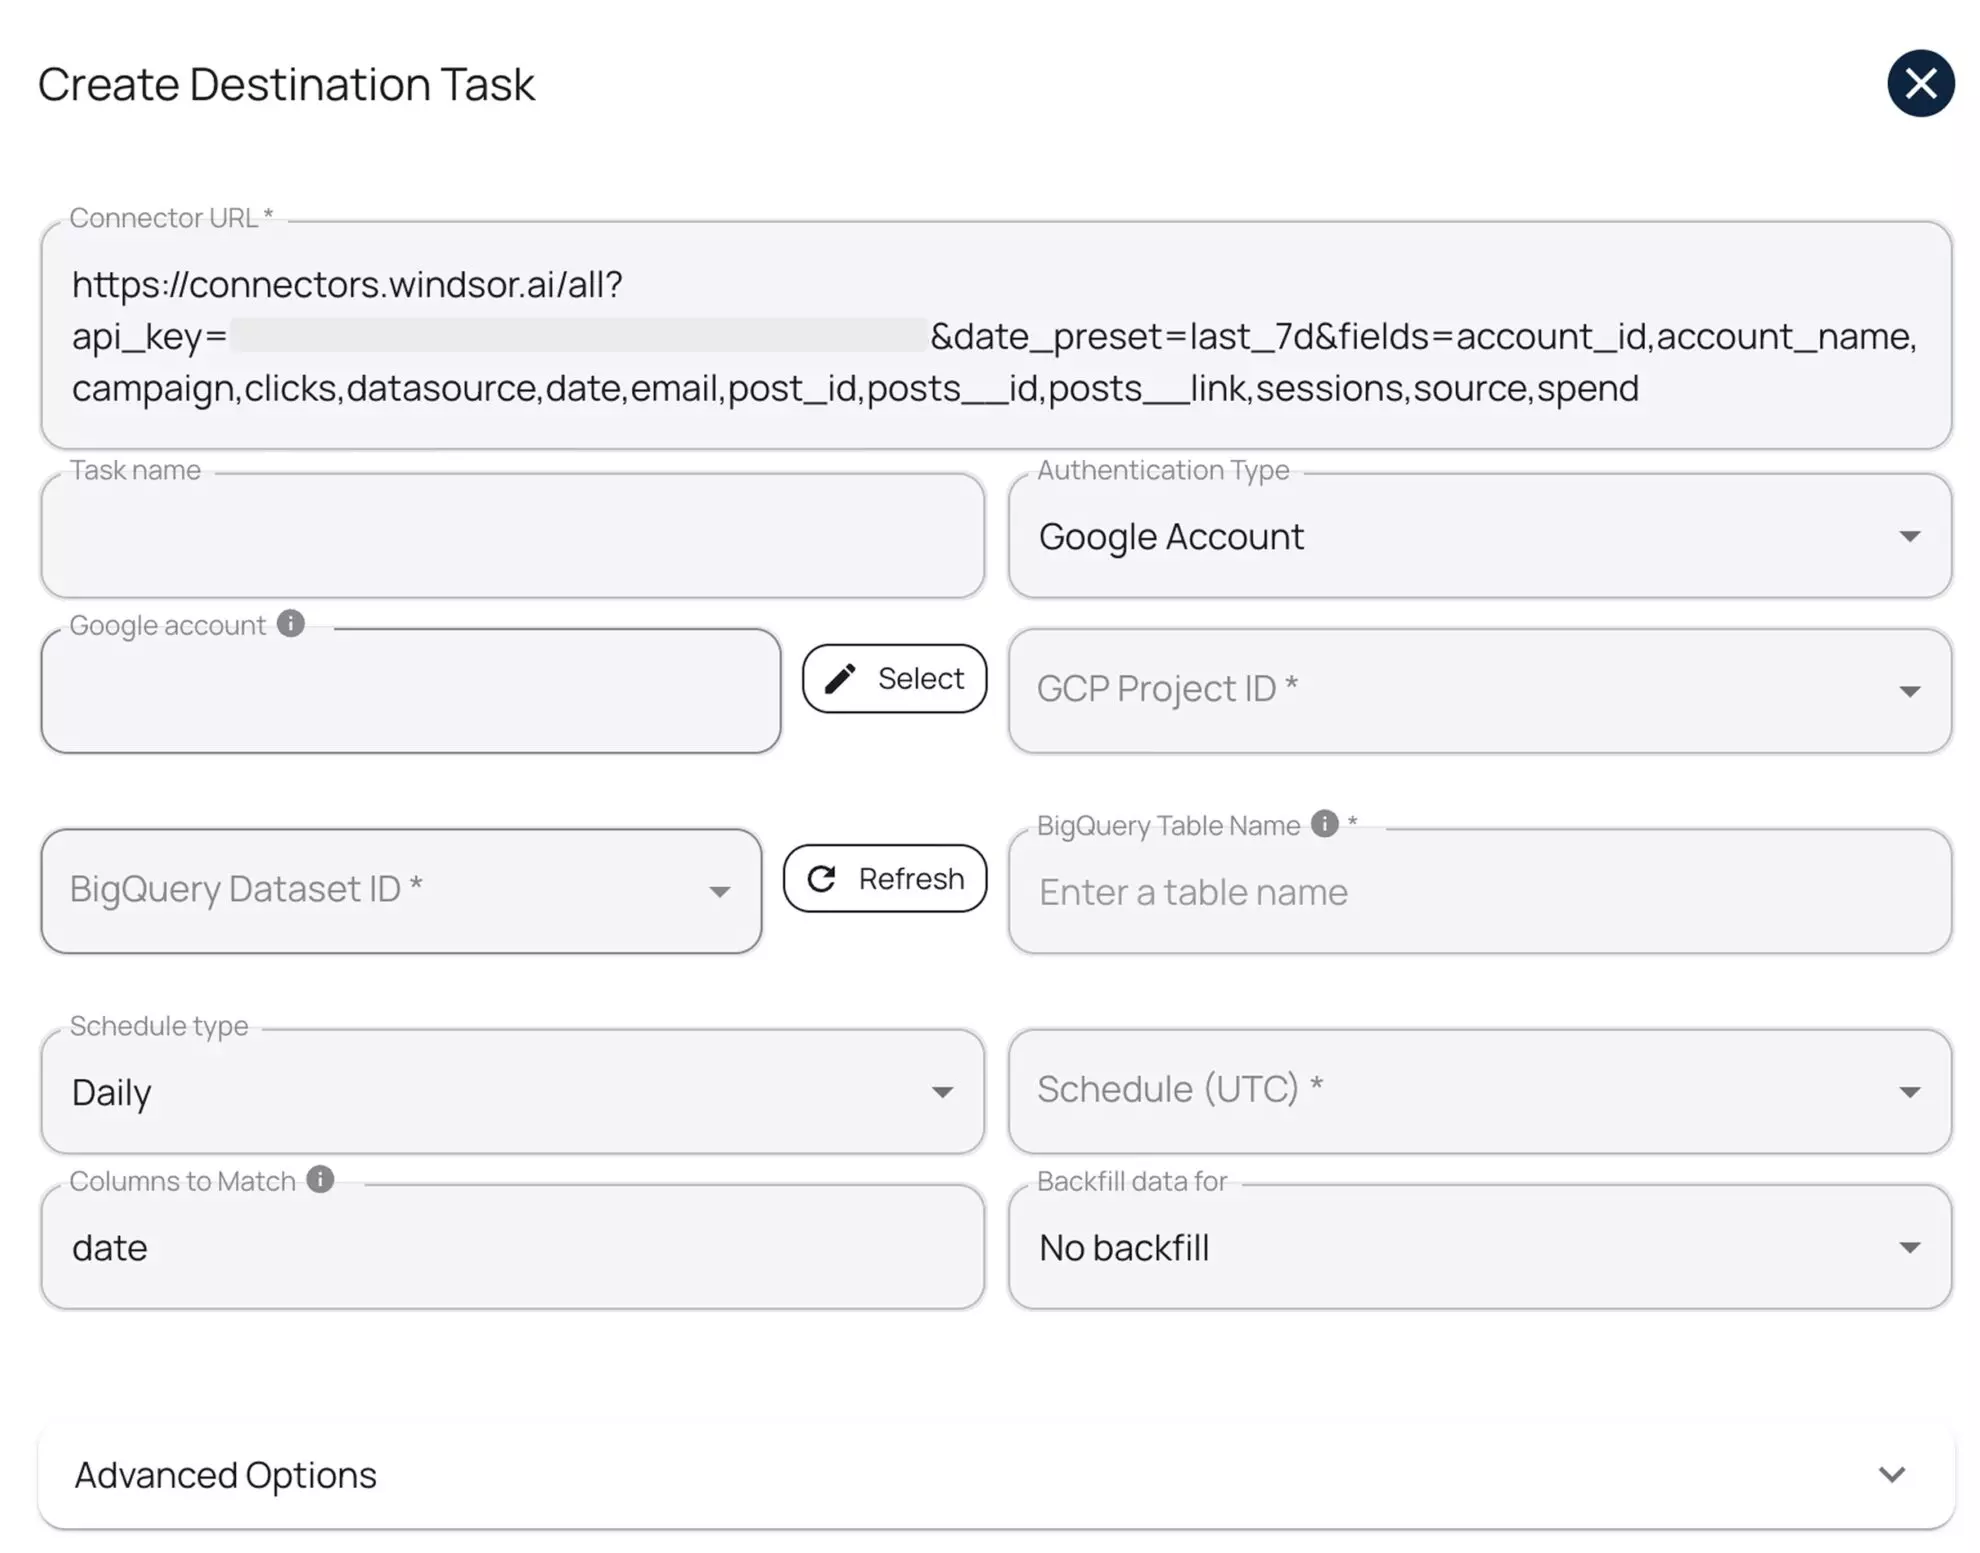
Keep in mind that if you add new fields or edit the query after the table was initially created, you must manually edit your schema and add or edit those fields in your BigQuery table. Alternatively, you can create a new destination task, and Windsor.ai will auto-create a new table with a full schema.
While Windsor.ai auto-creates the table schema on first setup, it does not automatically update the schema when new fields are added or edited later.
8. Select advanced options (optional).
Windsor.ai supports clustering and partitioning for BigQuery tables to help you improve query performance and reduce costs by optimizing how data is stored and retrieved.
- Partitioning: Segments data only by date ranges (either by date column or by ingestion time, e.g., a separate partition for each month of data). Learn more about partitioned tables.
- Clustering: Segments data by column values (e.g., by source, account, campaign). Learn more about clustered tables.
You can combine table clustering with table partitioning to achieve finely-grained sorting for further query optimization.
9. When completed, click “Test connection.” If the connection is set properly, you’ll see a success message at the bottom; otherwise, an error message will appear.
When successful, click “Save” to run the added destination task to BigQuery.
- See the task running in the selected data destination section. The green ‘upload‘ button with the status ‘ok‘ indicates that the task is active and running successfully.
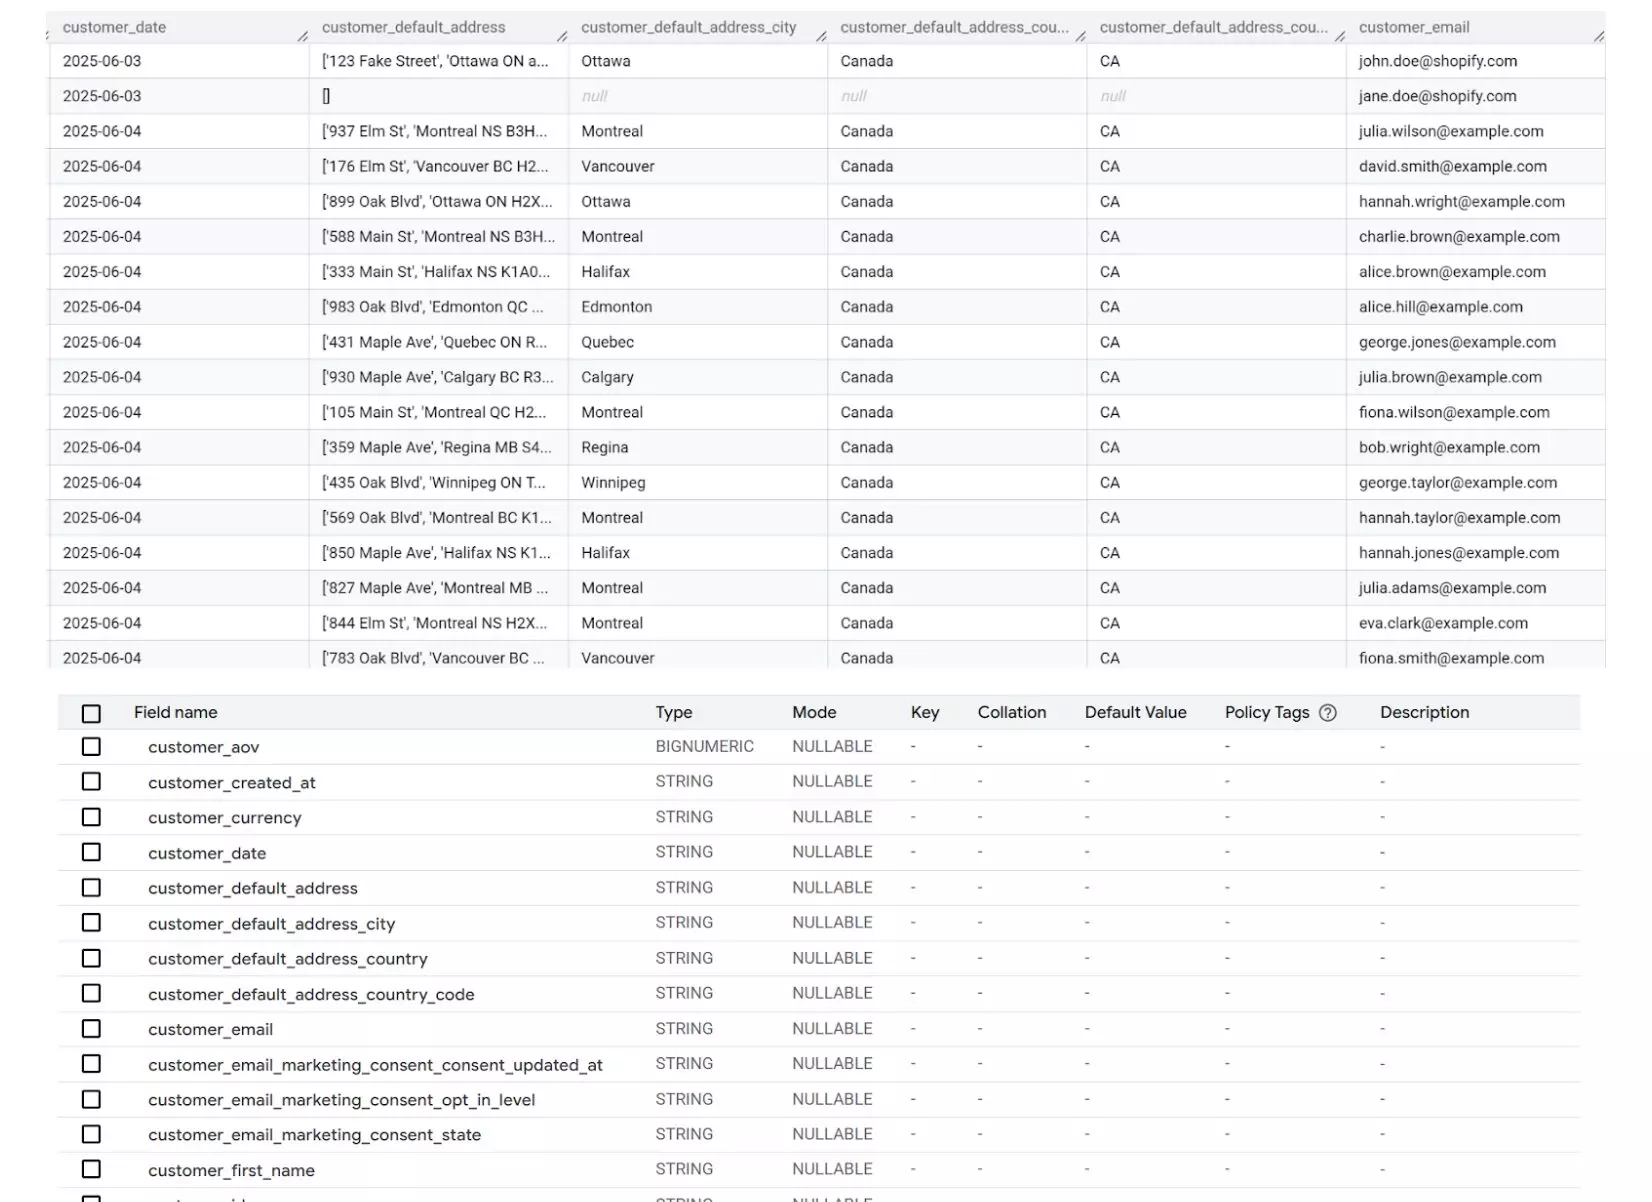
10. Now, when you open your specified BigQuery project, you should see your Shopify data uploaded there:
That’s it: a quick and completely no-code Shopify to BigQuery integration method via Windsor.ai.
Why use Windsor.ai?
Windsor.ai offers some of the most competitive pricing in the ETL market, starting at just $19/month, without compromising on quality and ease of use. Unlike many other tools, setting up an integration between Shopify and BigQuery with Windsor.ai requires no technical expertise.
You simply connect your Shopify account, create a destination task for BigQuery, and Windsor handles the rest. The entire process takes less than 5 minutes, saving you hours of manual work while eliminating technical hurdles and API limitations.
Sign up for free at Windsor today! And import your Shopify data into BigQuery within minutes.
Conclusion
When planning to move Shopify data to BigQuery, select the integration method that aligns with your technical skills and goals. For non-technical users, no-code ETL tools like Windsor.ai provide the fastest and simplest setup.
Other methods, such as custom scripts or Google Cloud Functions, give you more control and customization. For small datasets, you can use manual CSV uploads. However, they don’t scale well because they require manual data updates.
Whatever method you choose, always clean and shape your data the right way. Keep syncing it to avoid using old data. And always remember Shopify API limits and BigQuery rules.
When set up correctly, Shopify data in BigQuery becomes an essential tool for creating smart reports and making informed business decisions.
FAQs
How do I integrate Shopify with BigQuery for real-time analytics?
We have helpful resources to help you get started. You can explore our official documentation and ready-to-use templates for seamless Shopify to BigQuery integration with Windsor.ai:
Is BigQuery the right fit for my Shopify store analytics?
Yes. If your Shopify store is growing, BigQuery can handle large datasets, run fast searches, and provide insightful reports.
Is there a no-code way to sync Shopify data to BigQuery?
Yes. You can use the Windsor.ai ETL connector to move your Shopify data to BigQuery without writing code.
What is the best tool for integrating Shopify with BigQuery?
Windsor is deservedly the best tool for automated Shopify to BigQuery integration. It allows you to connect data from over 325 sources, ensuring secure data transfer.
How often should I sync Shopify data to BigQuery?
It depends on your needs. For near-real-time updates, schedule refreshes for every 5 to 15 minutes. For continuous reporting, hourly or daily report updates work nicely.
Does Windsor.ai provide a free trial?
Yes. We offer a 30-day free trial, allowing you to test the tool without any commitment. Try it for free now.

